Wratten Filters -- Forgotten Film Gems
Have you ever heard of a Wratten number? I am betting you have not if you started photography in the digital age. A Wratten number is simply a numbering system for warming or cooling filters. The Wratten filter harkens back to the earliest days of photography and Wratten filters are responsible for some of the most iconic looks of film photographs. Ansel Adams was never without Wratten filters in his tool bag nor was any well known photographer of the 20th century.
Wratten filters come in a variety of colors ranging from pale yellow to red to green to blue. These filters can be used to increase contrast in black and white images, to cut through haze in the atmosphere, to compensate for mixed lighting situations and to compensate for film deficiencies.
In the digital age actual physical Wratten filters have become all but obsolete, but their functionality can still be found in various post-processing applications, including Photoshop. The availability of Wratten filters in Photoshop is fantastic for people that know about them and how to use them, but unfortunately most digital photographers have never heard of Wratten filters, do not know what the digital equivalents hide in post processing programs, and even if they know they exist, they often have no idea why or how a photographer would want to use a Wratten filter. These gems are not even taught in many collegiate photo courses. This is a shame as these iconic filters are as important to photographic history as is film.
With the advent of programs like Instagram, many people want to emulate the look and feel of vintage photographic styles. This has lead to a host of programs that emulate classic film types. I see a lot of photos that have been developed as a Kodachrome photo, Velvia Photo, etc. I also see lots of times when these films are emulated but the final product just misses the mark when the digital product is compared to a vintage photo. The lack of use of Wratten filters, or their digital equivalents, is more often than not a primary reason for the discrepancy.
One blog article is insufficient to teach anyone how, when, and why to use a Wratten filter but it can be used to show how a simple filter can change the look and feel of a photo.
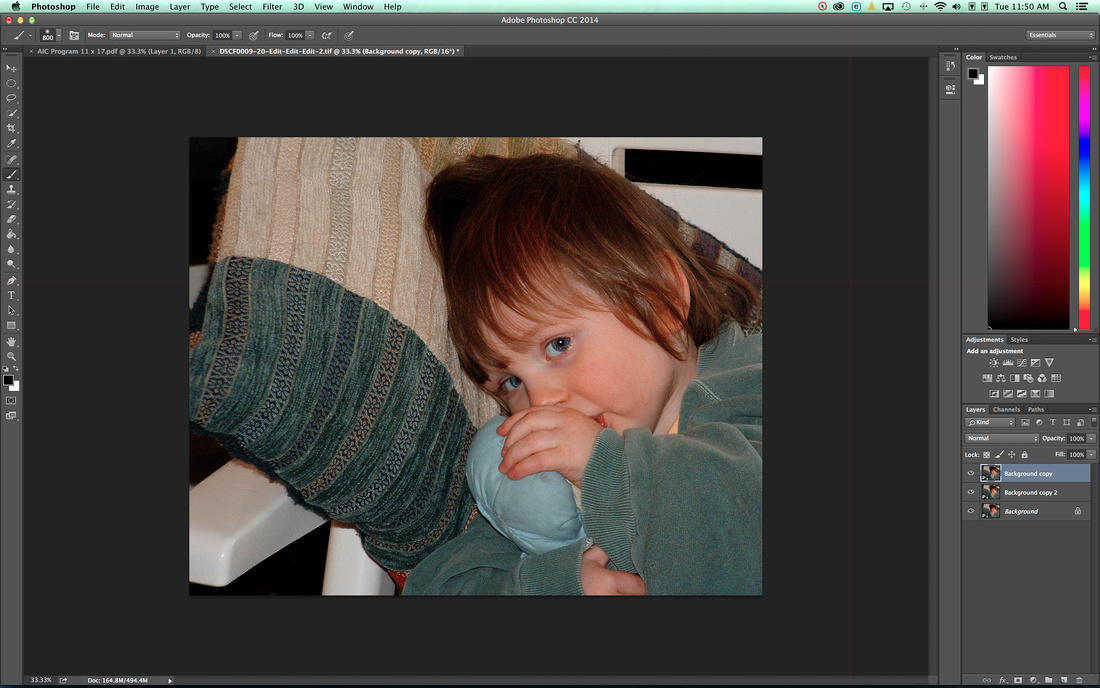
My daughter with her beloved blue baby doll. I processed this using a Kodachrome 25 emulation process. I love the look of Kodachrome 25 but at times Kodachrome film was just too warm for every photo. For me this photo is just a bit too warm.
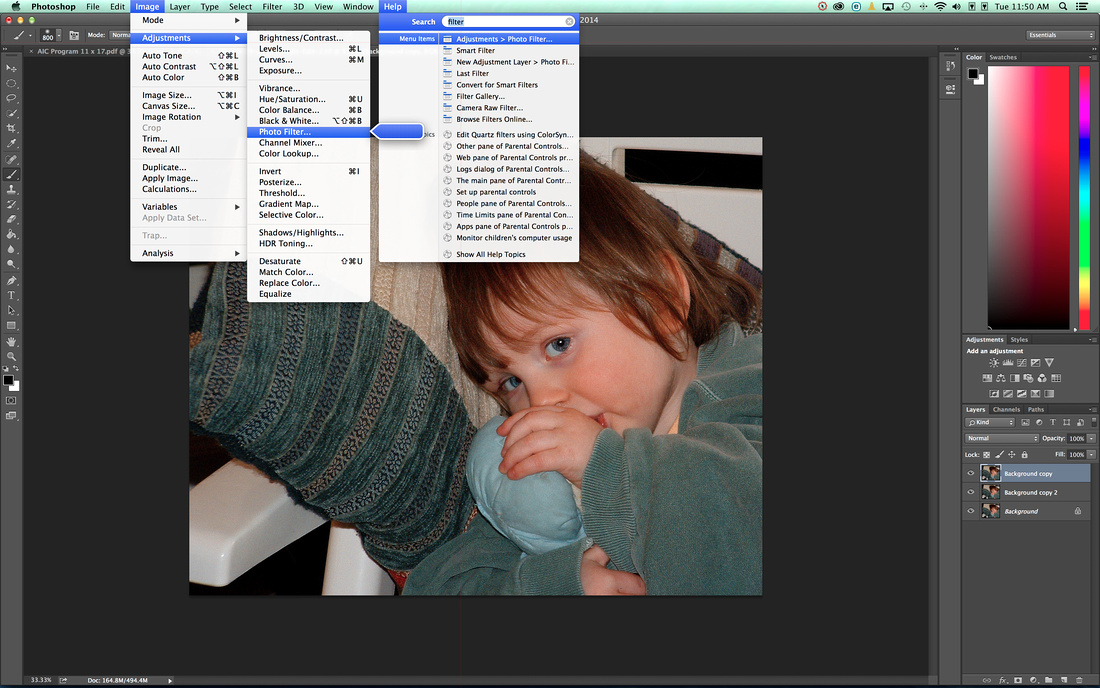 In Photoshop, I would have thought that Wratten filter equivalents would be listed under the Filters tab. However, they are not there. To find these equivalents, you have to either search for the word 'filter' or go to the Image tab, scroll down to Adjustments and then select Photo Filter. Not easy to find, but at least these filters are still there for times when they are needed.
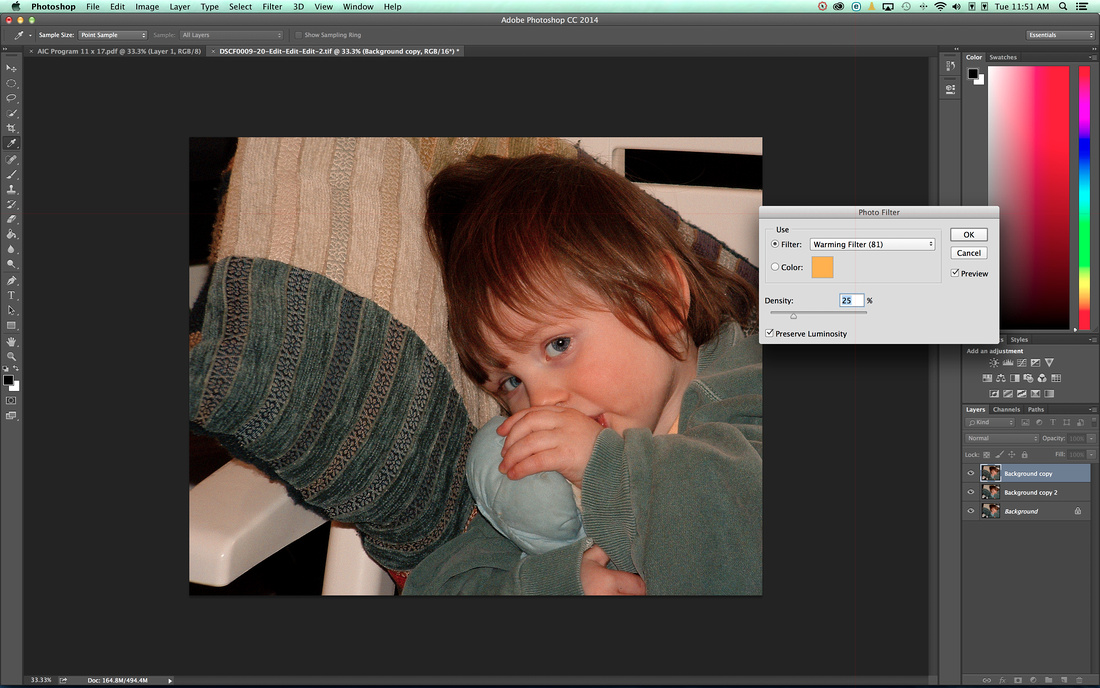 Once you have found this almost hidden feature, the application of these filters is straightforward. Just use the pull down feature in the pop-up box to select a filter you want to use. Here, I have applied a warming filter. For me it is just too much so I need to cool things down.
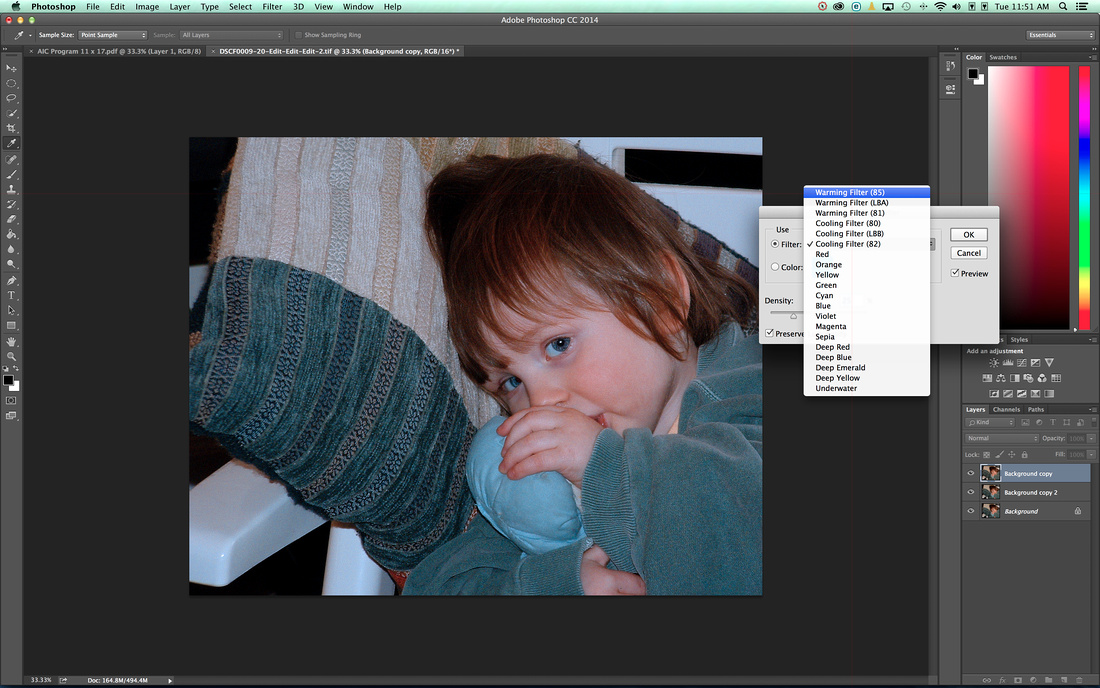 Since I know that Kodachrome 25 was a little warm/red for this type of photo I needed to cool down the photo a bit. I know from experience that a Cooling Filter 82 will quickly fix the photo I simply select it from the list of available filters.
I wish I could give you a recipe for every occasion, but I can't. I just want you to know that these filters exist and that they can make a big difference in your final product. I encourage you to play with these filters, read about how they were used with film and incorporate these great filters into your post production processes.
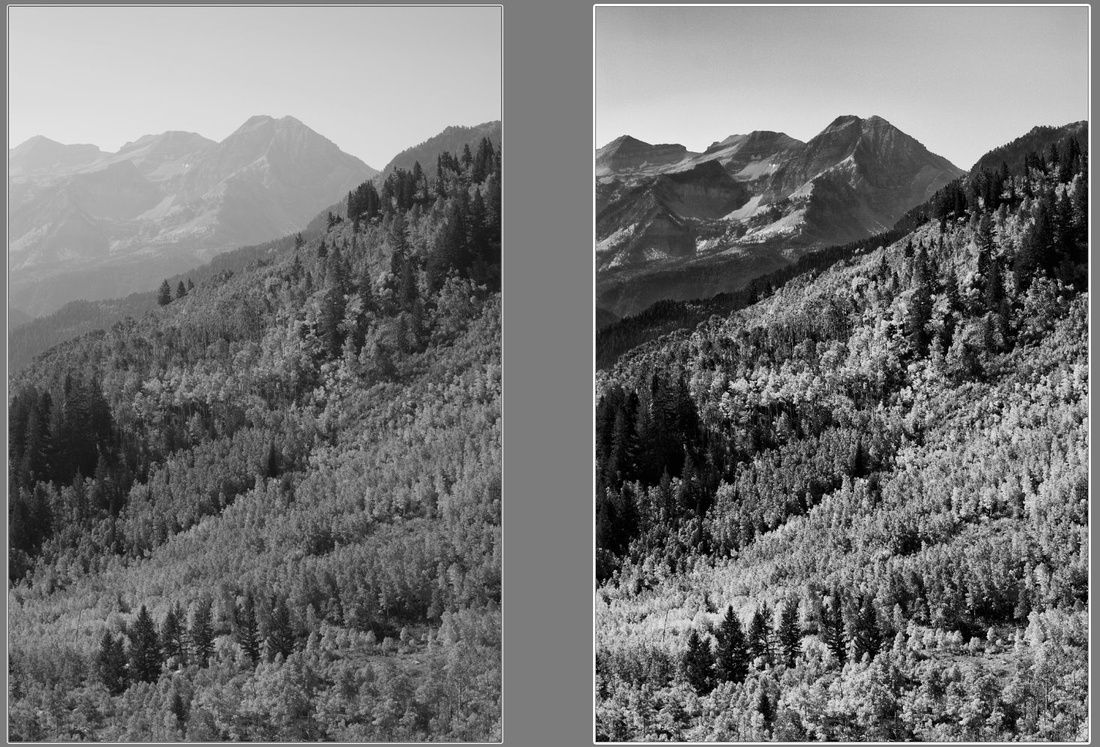
The photo on the left is a standard black and white conversion of a color photograph. The photo on the right is the same conversion except that a red Wratten filter was used prior to conversion to black and white. I learned this technique from reading about Ansel Adams and his photographic technique. Ansel Adams loved using colored filters in front of his lens when taking black and white photos. They are a simple way to increase contrast and detail in a black and white image.
-- Enjoy
Mind's Eye
"I go out into the world. I take a photograph. I give it to you as the equivalent of what I saw and felt." -- Alfred Stieglitz
In other words, it is not enough for a photograph to reflect what any random person might have seen, but it should reflect what the artist saw in his mind's eye and the feelings the scene evoked.
Ansel Adams might add something to that quote, such as: the time to decide how to post-process an image is ideally before the shutter button is pressed. The image should be, if possible, visualized prior to lifting the camera to your eye.
A lot of times color and texture can make or break a message that is being conveyed in a photo. I had the opportunity to take some photos at a 1950's - 1970's style summer camp. When I started taking photos at the camp, I was taken back to a period of time when I went to this camp as a kid. Nothing had changed in the last 30+ years. I envisioned this scene in Kodachrome Color Positive Film. So, when I sat down to post-process the image, I had to pull out the Kodachrome filter from DxO. The color and film grain make this an image that could have been captured 40 years ago or today. Without the color and grain, it is just a digital image that is firmly rooted in the 21st century. With the Kodachrome processing I am a kid again.
Left: Before Kodachrome Processing
Right: After Kodachrome Processing via DxO
-- Enjoy
Indoor White Balance -- Mixed Lighting, or as I like to call it Gymnasium Lighting
As photographers it is important to remember that we do not take photos of things. We take photos of light that is reflected off things. This means that before we ever press the shutter button we should have evaluated the light in a scene. We need to look at the color of the light, the quality of the light and the quantity of the light. The modern digital camera has a built-in light meter that is very good at determining the color of the light and the quantity of the light available. The camera makes a lot of choices for us about aperture, shutter speed, ISO, and color. The vast majority of the time the camera makes good decisions, but there are times when those decisions will fail to capture the scene in a faithful manner.
This essay concerns itself with a specific type of failure that is common and predictable: taking pictures with mixed lighting can result in colors that don't match reality.
When we shoot outside there is usually one source of light. A camera's white balance system is very good at determining the average color of the light in a scene. At different times of the day, the sunlight will be more orange colored (warmer) or more blue color (cooler); but as long as sunlight is the only source of light, or at least the dominant source of light, the camera's white balance detection will seldom have trouble determining true white in the scene and will then adjust all the other colors accordingly.
When we shoot photos indoors we often rely on artificial light. This light might be florescent light, halogen light, tungsten (traditional light-bulb) light, LED light or even sunlight from a window. As long as there is only one source of light our cameras will also do a good job of setting the right white balance and then adjust the other colors as well.
Cameras tend to start to fail at adjusting white balance when a scene has a mixture of light sources. The human eye is a million times better than a digital camera sensor at determining true colors, even in mixed lighting settings. This means that sometimes the photographer has to manually adjust the camera's white balance in order to accurately reproduce colors.
A school gymnasium (or other areas with similar lighting) is the place I have found that cameras fail in a regular and predictable manner. Gymnasiums often use a mixture of light source. Many use sodium vapor lamps, similar to street lamps, as a primary lighting source. They often also have fluorescent lamps and halogen lamps to complement the sodium vapor lamp. This type of mixed lighting is a recipe for disaster if you plan on letting your camera just sort things out. More often than not, photos will turn out with a weird green, yellow, or orange tint. Never fear, there is a way to fix things, but it means that you have to take a little control away from the camera and make some decisions that the camera just is not good at doing in a mixed light source situation.
This essay is going to cover fixing color problems in mixed lighting when you are shooting jpg images and have no desire to do any post processing. This essay will also cover the process used by people that shoot RAW and fix the color at the computer after the images have been taken.
Setting a Manual/Custom White Balance in-Camera for jpg images with no need for post processing.
1) Evaluate your lighting when you enter a room.
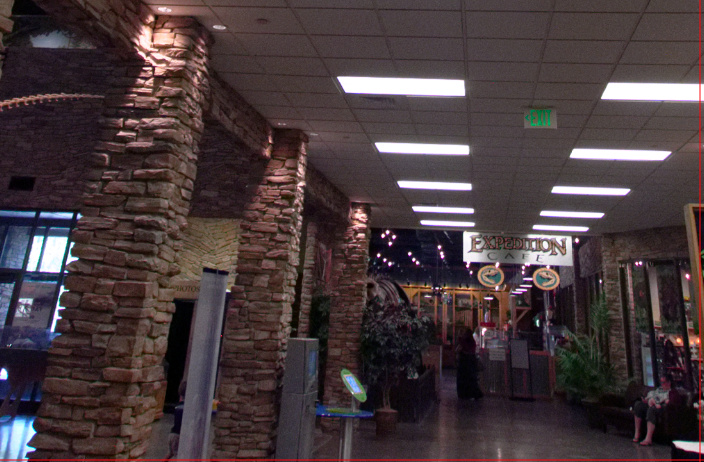
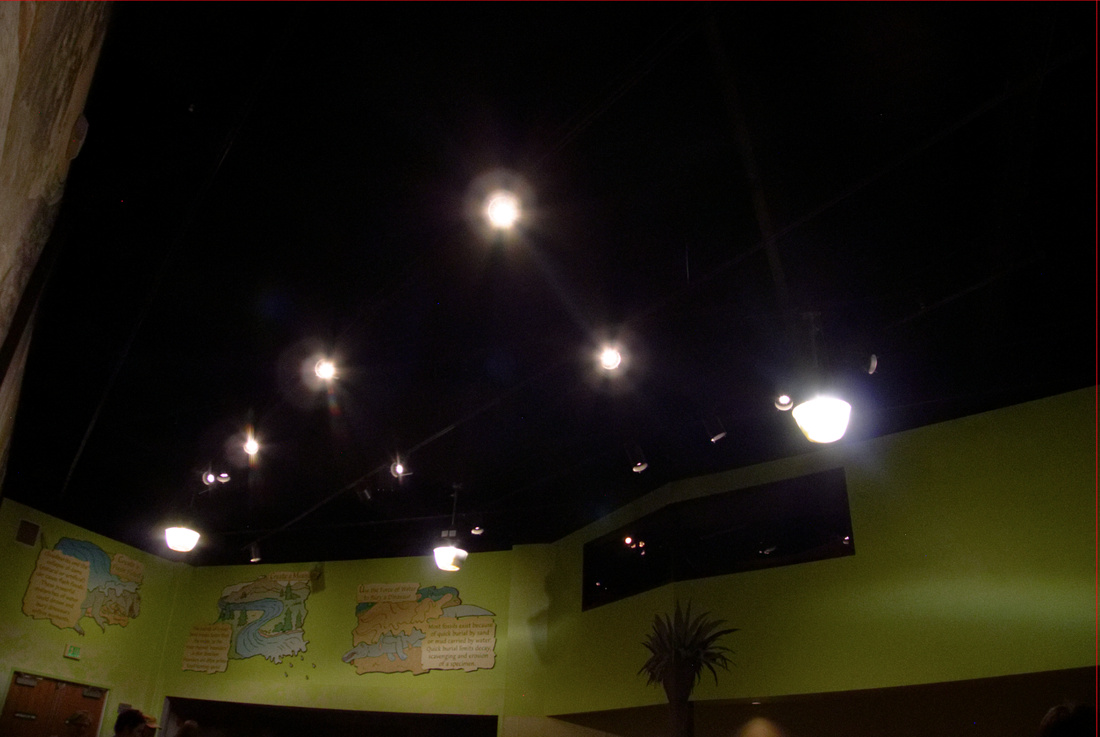 This is the lighting at a local museum play area. When I entered the area I immediately noticed the lights. There are Sodium Vapor Lamps, Fluorescent, Incandescent (Tungsten), and LED lighting fixtures. When I saw this setup I knew this room would be impossible to shoot in if I was to rely on my camera to determine white balance.
2) Find something that is supposed to be white or, if you planned ahead, take out a white piece of paper that you keep in your camera bag or pocket just for these occasions.
 I found this sign. It looked white to my eyes. Cameras can and are fooled by mixed lighting. To the camera this white sign looks a weird orange/green/yellow. I can tell right away that any photo taken in this light is going to be a disaster if white balance is left up to the camera.
3) Set the camera white balance manually (this is most likely going to cause you to pick up the book that came with your camera, or take a walk through the menu settings of the camera and then hope that it is a intuitive). DSLR cameras often have a dedicated button just for white balance options.
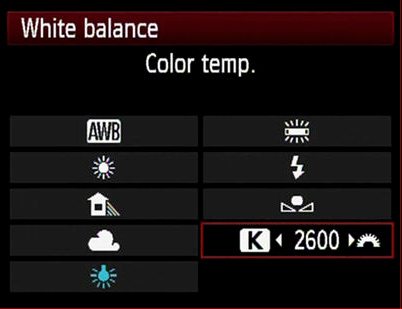
White balance menus are often very similar, even between camera manufactures.
![]()
This is what the typical white balance icon looks like. Again your camera may be different, so be sure to consult the documentation that came with your camera.
Once you have found the manual white balance icon, the process of setting a custom white balance is generally simple. In most cases it involves pointing you camera at a white surface and following on screen instructions to sample the white area and then the camera is calibrated to see that particular color as white and will adjust the other colors accordingly.
4) Take a photo to check the settings.

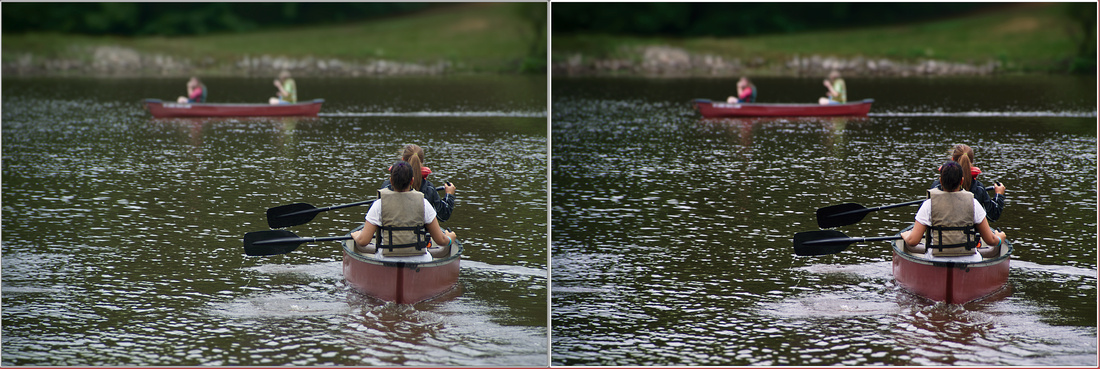
The photo on the left was taken with auto white balance and the photo on the right represents the results of a manual or custom white balance.
5) Pay attention to your lighting as you move around the room. The custom white balance you set may not work well in every part of the room since the intensity of the various lights may vary greatly in different areas of the room.
 This enlarged portion of a snapshot was taken in the same room where my white balance sign was located and is a good example of how just moving to the other side of the room can change the white balance drastically.
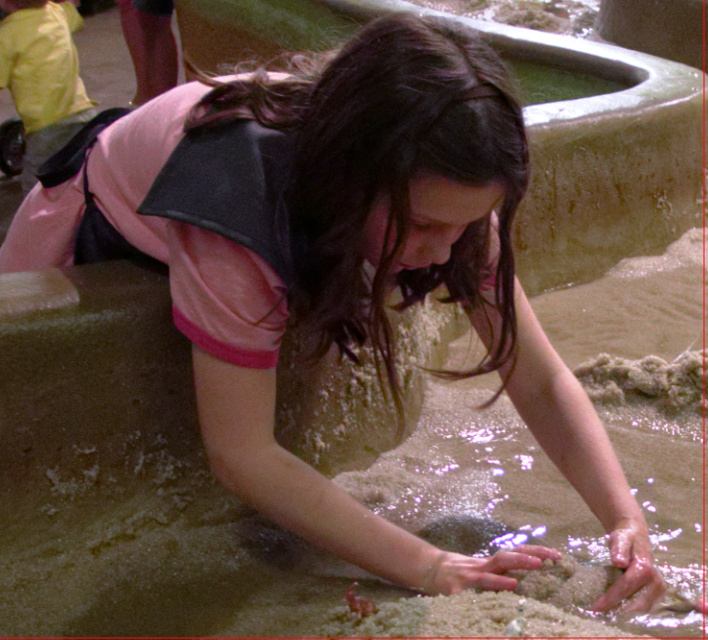
This enlarged portion of a snapshot was taken moments after the first image but it has a manual/custom white balance that is specific for the part of the room in which the photo was taken. Notice how much more natural the colors look. The colors could be improved upon in post processing but they are very close to where they need to be in-camera.
6) Do not forget to reset your camera to auto white balance when you finish shooting.
Shooting RAW and Correcting White Balance in Post production.
1) Evaluate your lighting when you enter a room.
This shooting situation is tricky because it has fluorescent overhead lighting and incandescent (tungsten) lighting as accent lighting.
2) Find something that is supposed to be white or, if you have planned ahead, take out a white piece of paper that you keep in your camera bag or pocket just for these occasions. Better yet, buy a white balance card to use. When when you move to a new location in the room, just take your first photo of the white object, white paper or white balance card near the subject of the photograph.
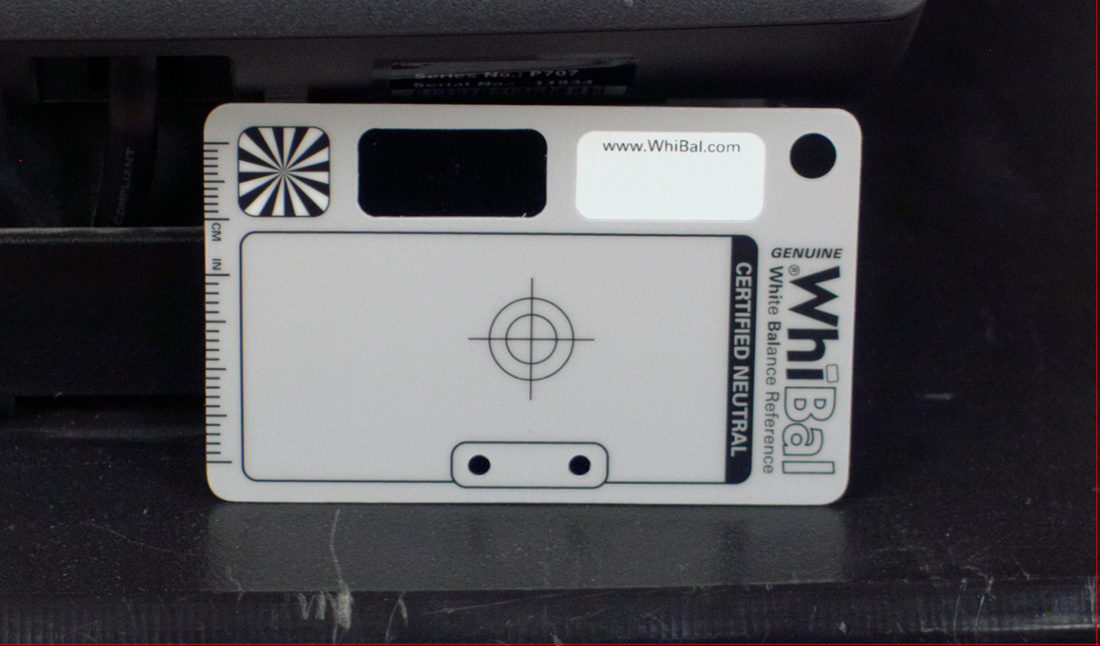
I carry a white balance card with me. Here I have proped it up against some equipment in front of a wall I was preparing to photograph. You do not have to worry about the focus being spot on just as long as you have a photo of the gray color on the card.
3) Take your photo and remember that when the light conditions change then just take another reference photo of the white balance card.
4) Load the images into your favorite post processing program. In this example I will be using DxO Optics Pro 9.
5) Find your gray card reference frame and use the White Balance Eye Dropper tool to sample the gray area of the card. Taking a sample on the gray area of a gray card is more accurate than sampling white (which is why I recommend purchasing an actual 'calibrated' gray card for photography).

7) Copy the correction settings from your photo of the reference card. In most programs, you simply right click on the photo or photo thumbnail and select Copy Correction Settings (or a similarly named feature).
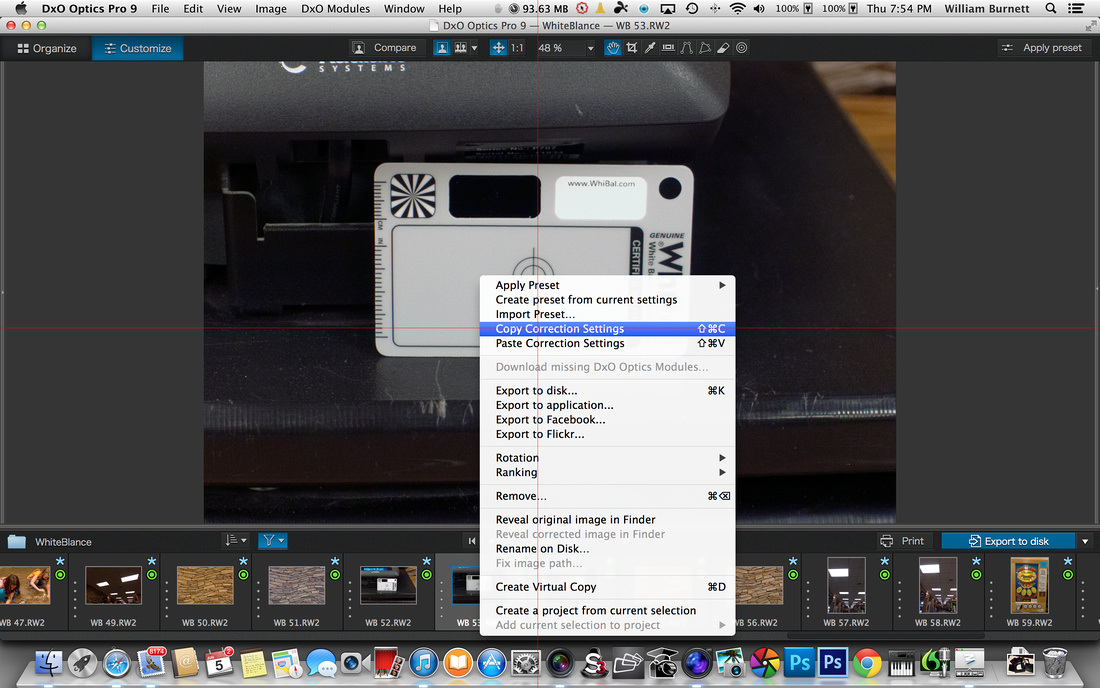
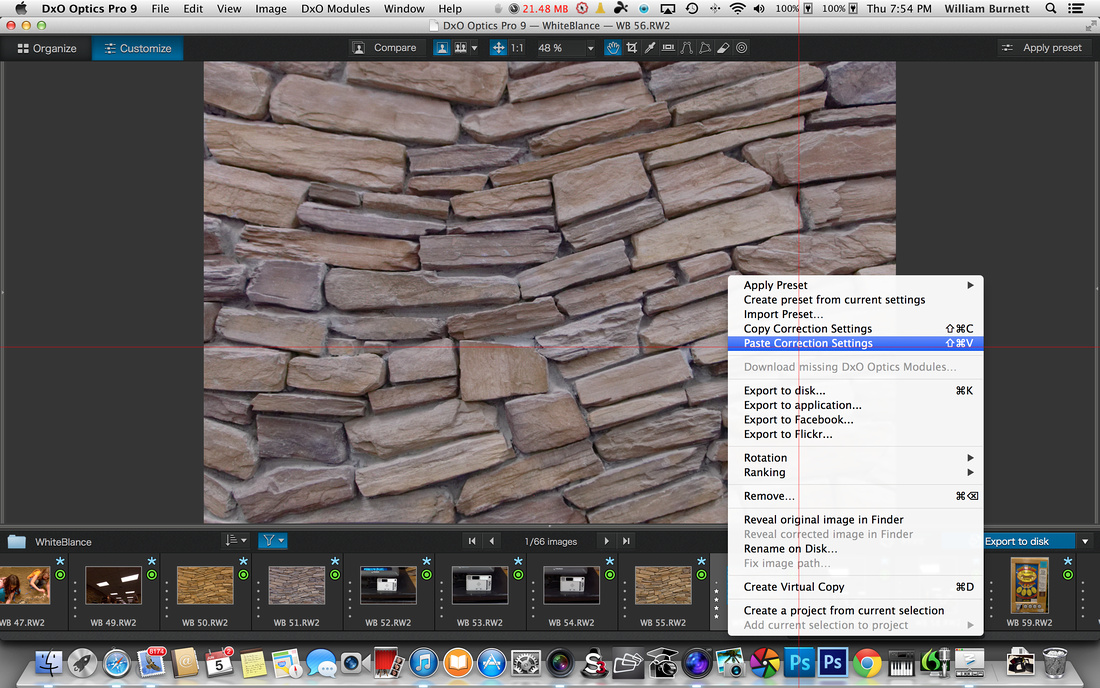
8) Paste the correction settings onto your photos that were taken in the same lighting conditions.
That is it. You will have a good white balance even in terrible mixed lighting conditions.

The photo on the left is pre-white balance correction and the photo on the right is after pasting the color correction from a white balance correction card. The stone wall was actually more tan than it was gray, and the white balance correction, as seen on the right, generated an accurate depiction of the color of the stones.
I try to have a white or gray reference in every set of photos that I take, it makes life easier. Using a gray card is also good photographic technique. You do not need mixed lighting to benefit from custom white balance, so feel free to use these techniques with any picture you take. -- Enjoy.
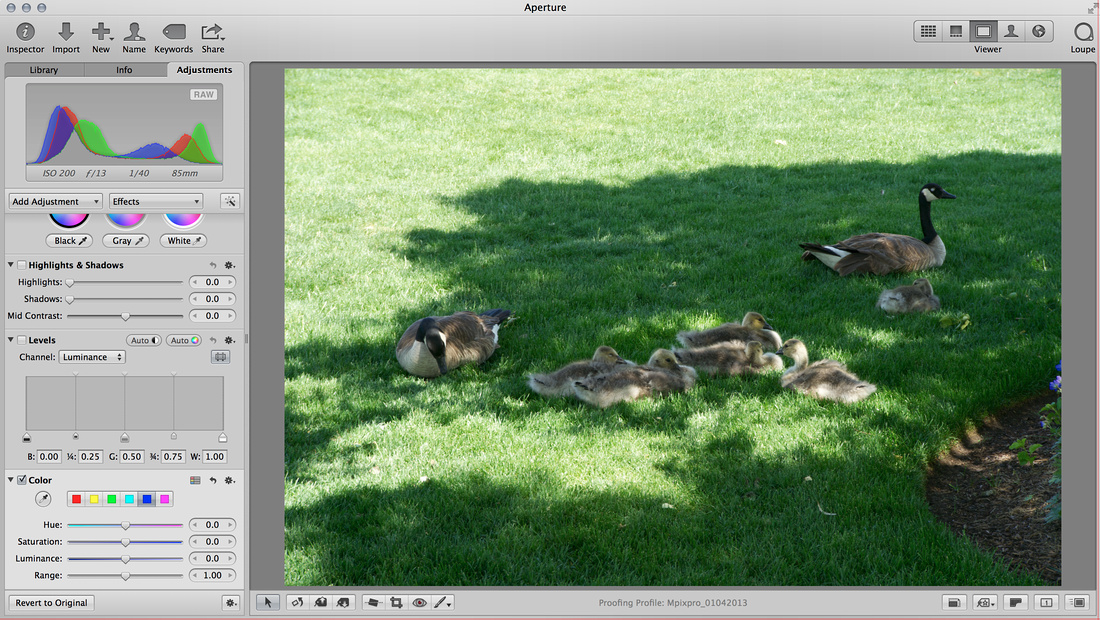
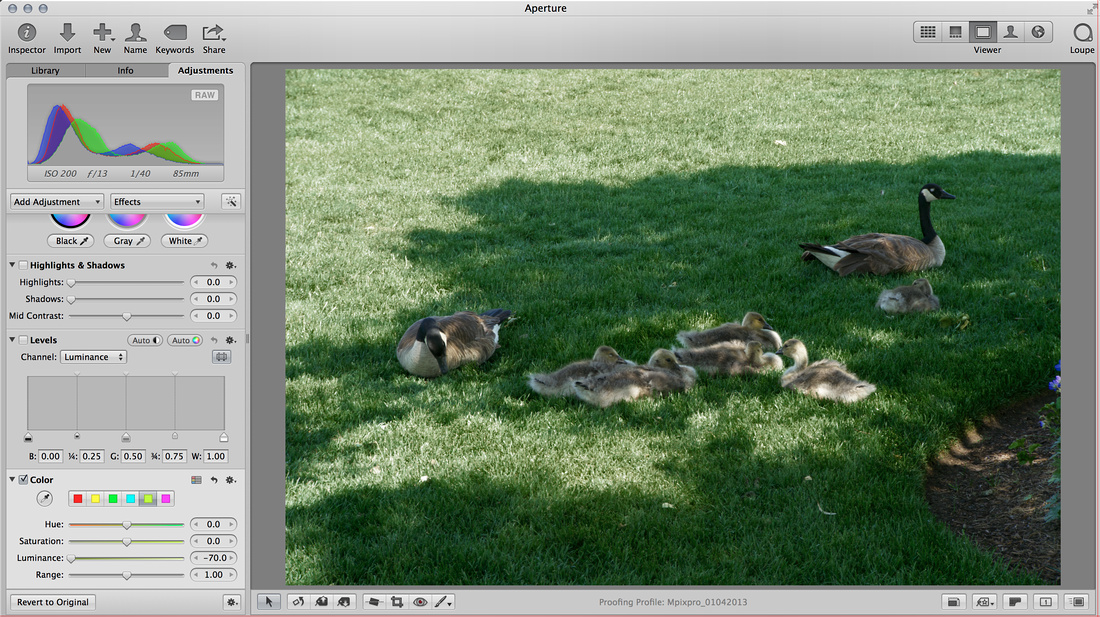
Shooting at midday in full sun can be a real challenge. It is even more of a challenge when your subject is in shadow but part of the background is in sunlight. Photos with this type of exposure can often look unbalanced and the bright areas can distract from the overall photo. This wide contrast will often happen when grass is in the photo. The grass exposed to sunlight will be very bright and almost yellow and the grass in shadow will be a rich green.
Here is a simple way to even out an exposure that has almost blown out grass and grass in shadow.
For this example, I will use Apple's Aperture 3.5.1 but the same correction can be accomplished in a variety of photo processing programs.
1) Look at your image and identify the parts of the image that need to be toned down or are almost blown out. In this case, the grass in the top half of the photo is too bright and draws attention away from the subject.
2) Use the eye dropper tool, in the Color adjustment module, and select the portion of the grass that needs to be toned down. The area that needed toned down is where the red lines cross in this screen shot.
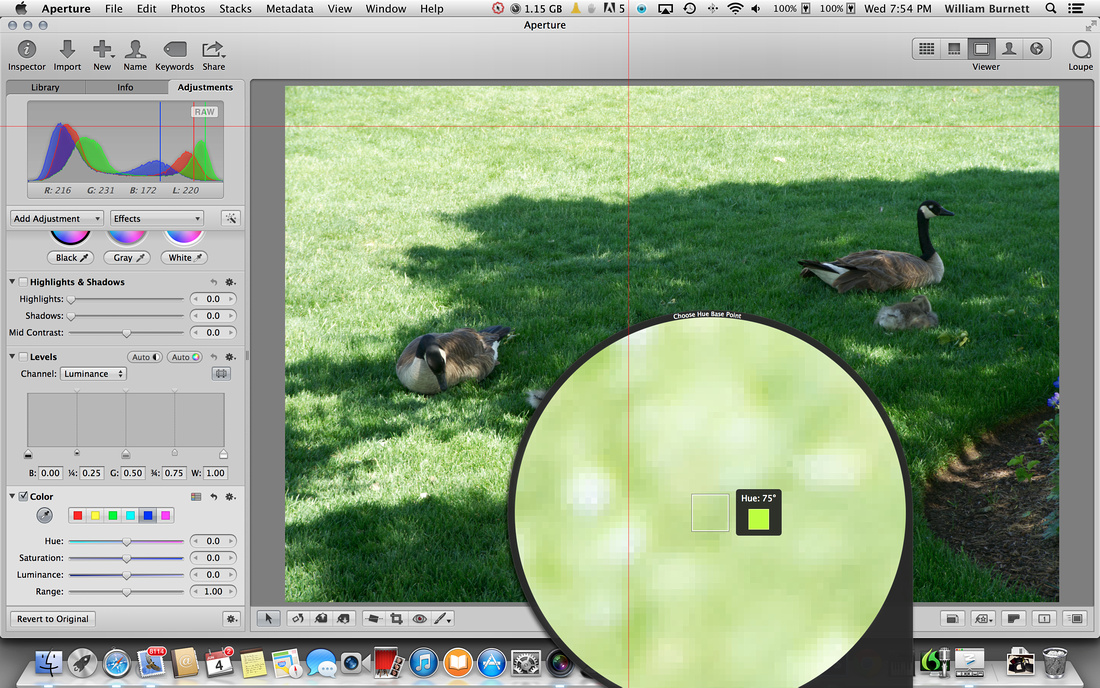
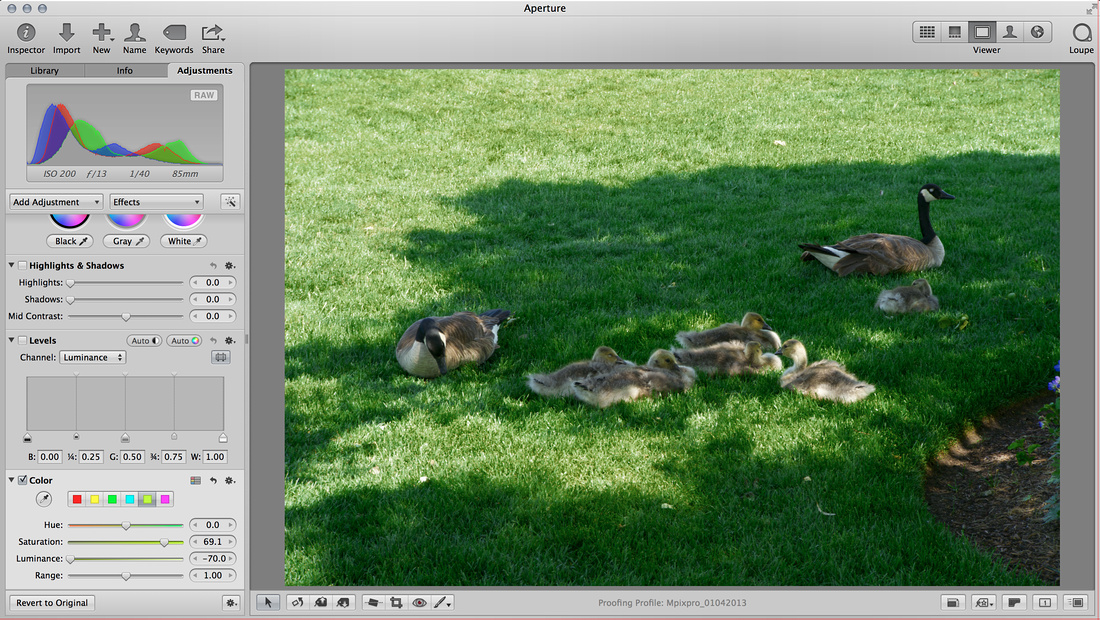
3) Use the Luminance slider to reduce the luminance of the sampled area.
4) Use the Saturation slider to increase the saturation of the sampled area until it is a closer match to the darker areas of the photo.
5) Use the Range slider to reduce the range of colors that are affected by the changes to the sampled area. It is common for the corrections to bleed over into the darker areas. This can be corrected by limiting the range of color that is included in the sample.
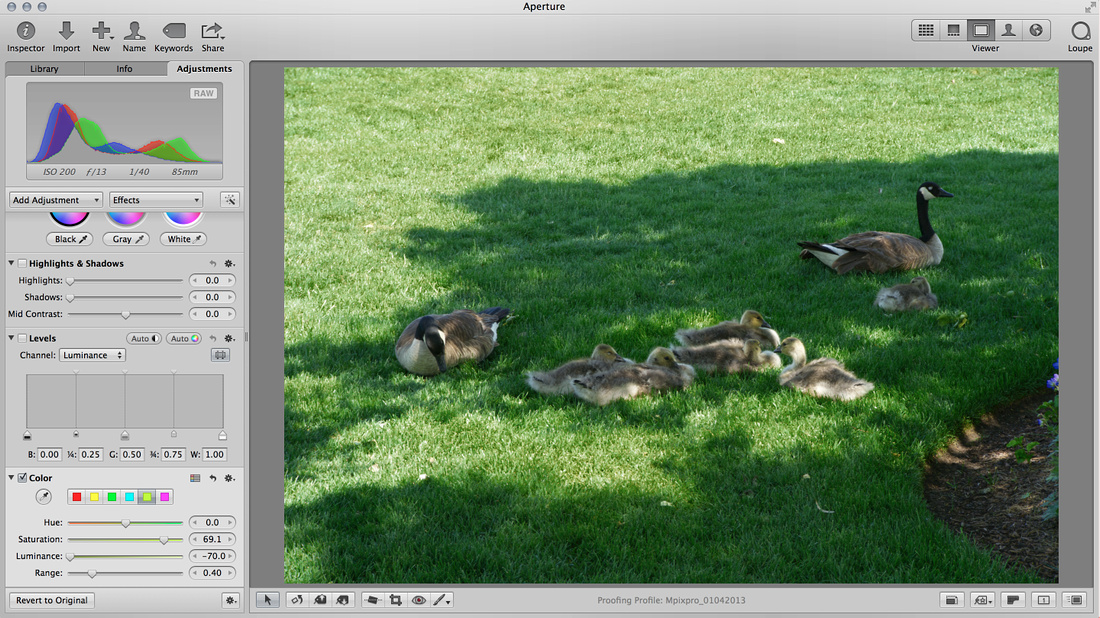
That is it. The same type of process could be used to brighten up the darker areas which I did in the finished photo.
Here are the before and the after photos.
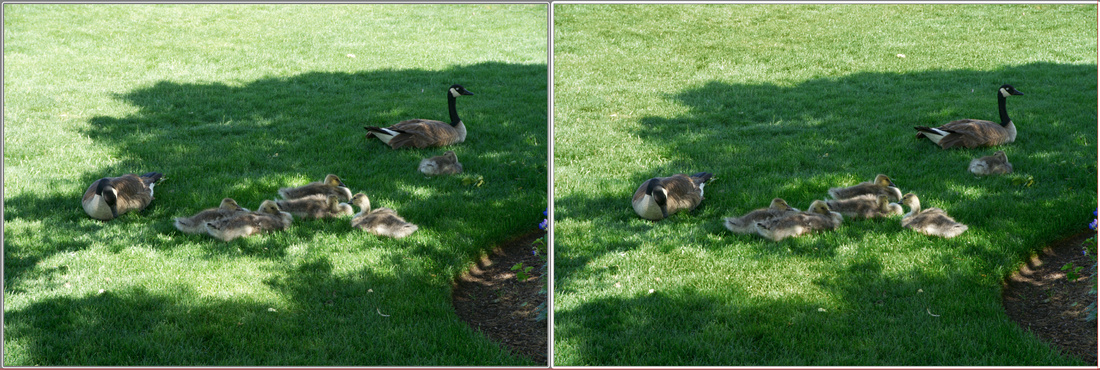
-- Enjoy
Resizing an Image to make an HD 1920 x 1080 HD Wall Paper
Before you start, make sure that you are using a copy of your original file. This process is destructive. In other words it cannot be undone. If you save the resized image over your original image then the original image is lost for good.
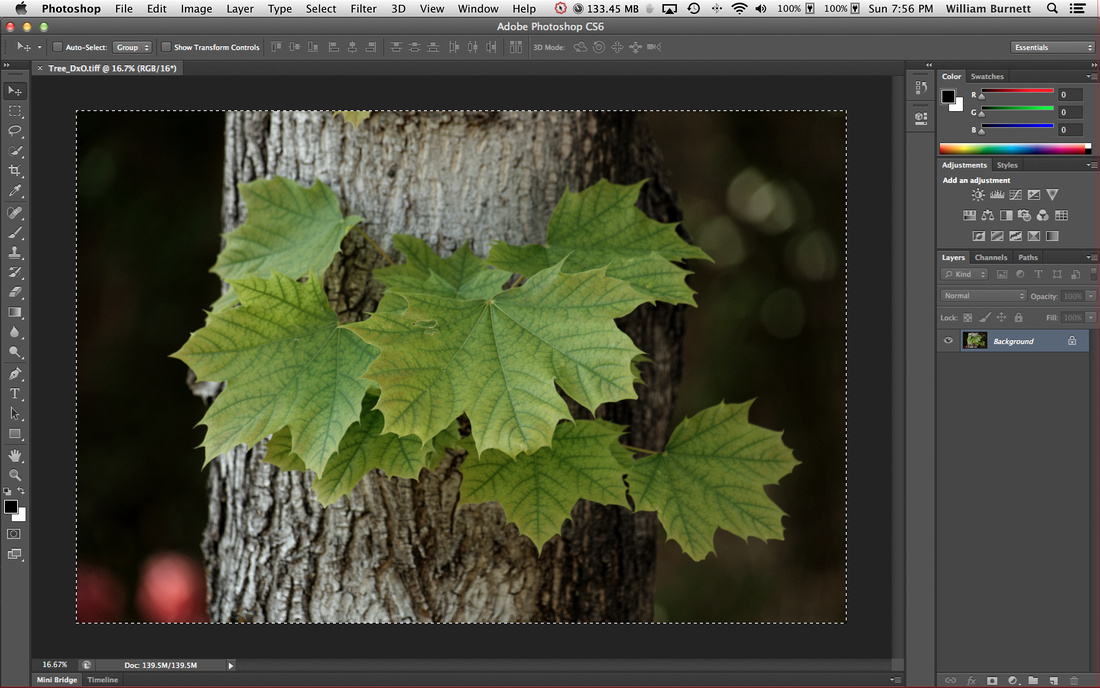
1) Open your image in photoshop.
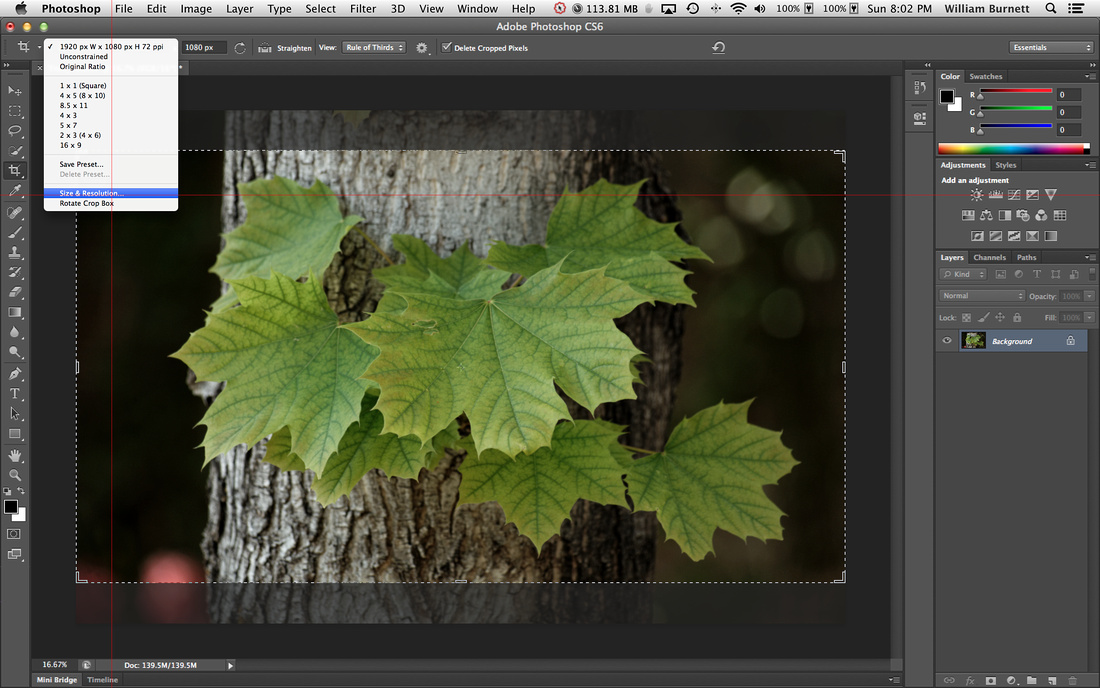
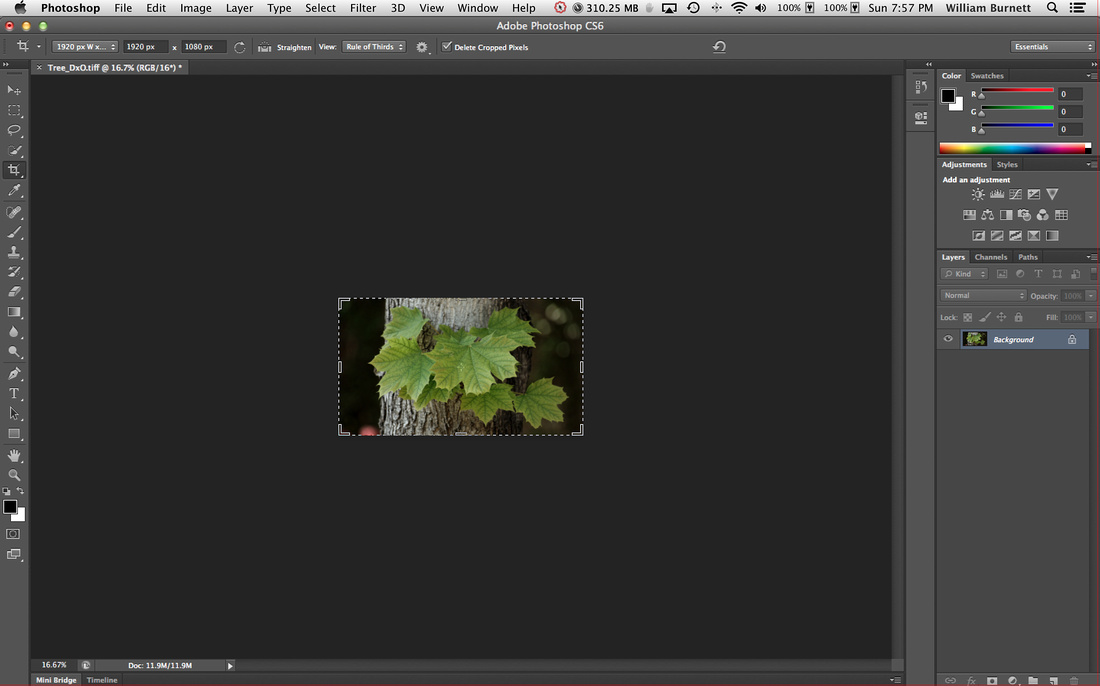
2) Select the crop tool and then select Size and Resolution from the drop down menu.
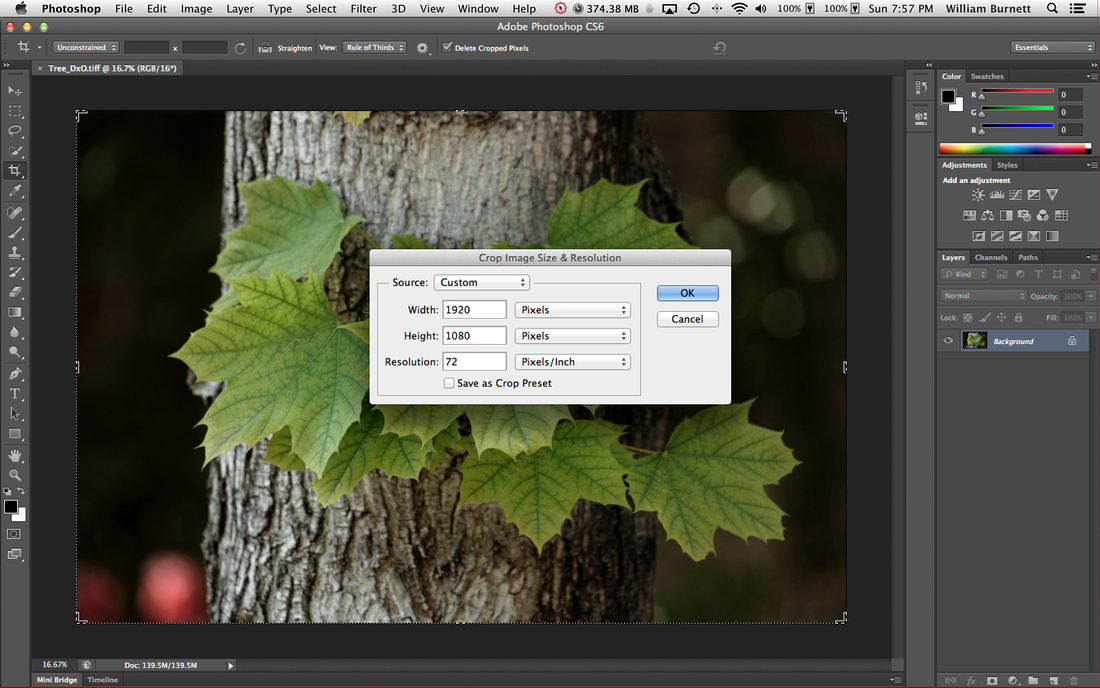
3) Enter your dimensions 1920 x 1080 making sure the unit value is set to pixel and that the dpi is set to 72dpi.
4) Click OK and you will see a preview of the cropping.
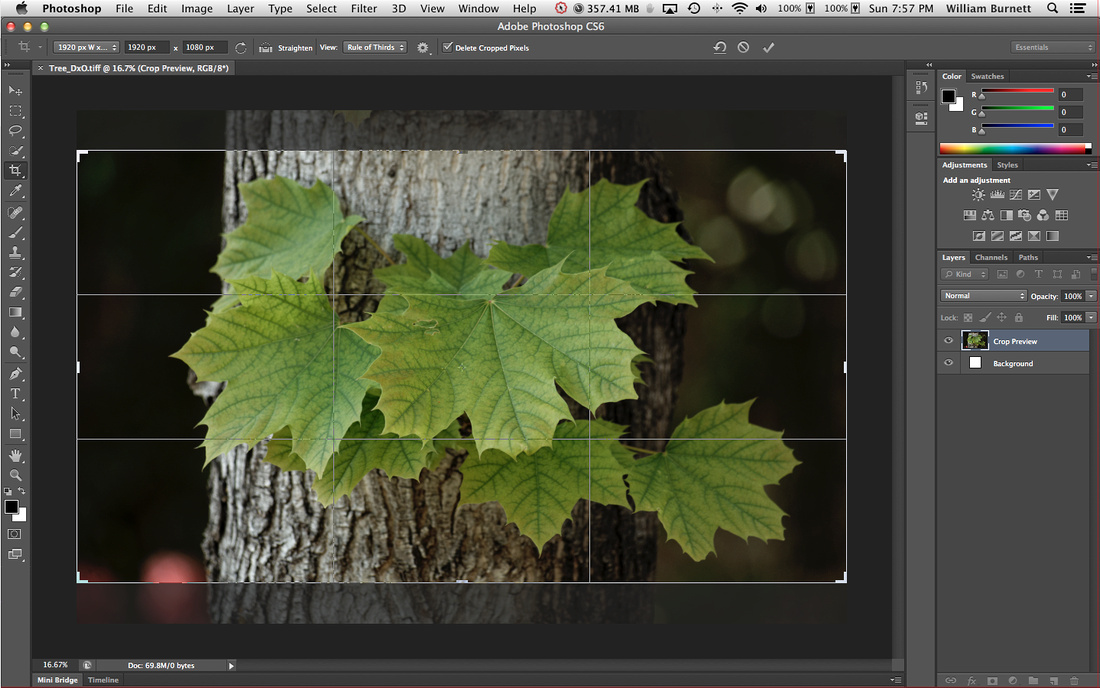
5) Press Enter to apply the crop. Notice how much smaller the image is. Then save your image.
That is all there is to it. Most other programs work in almost the exact same manner.
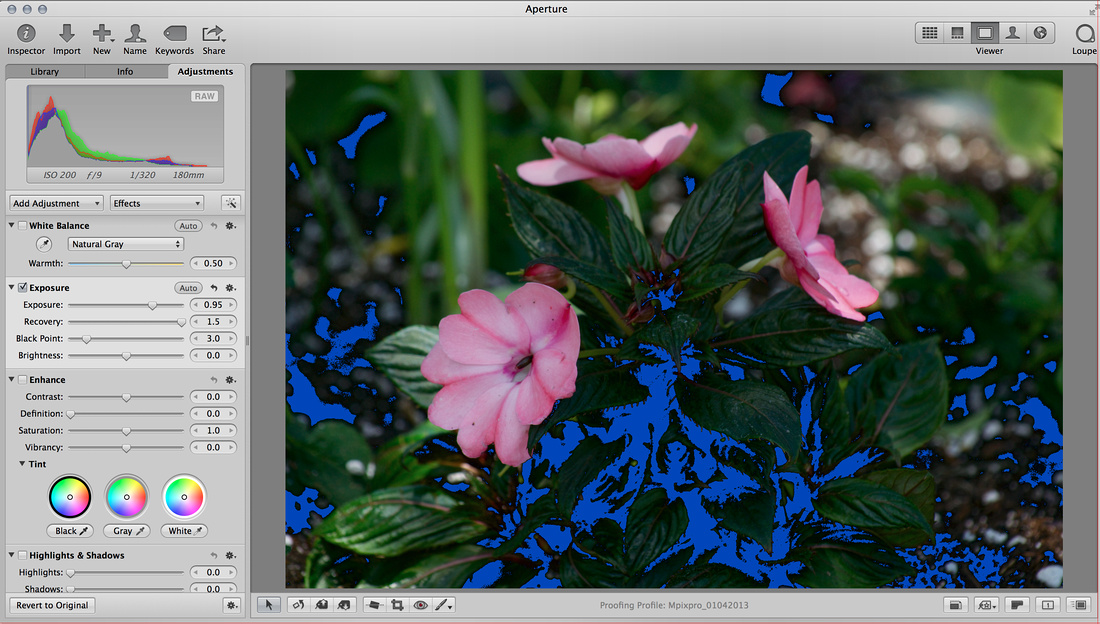
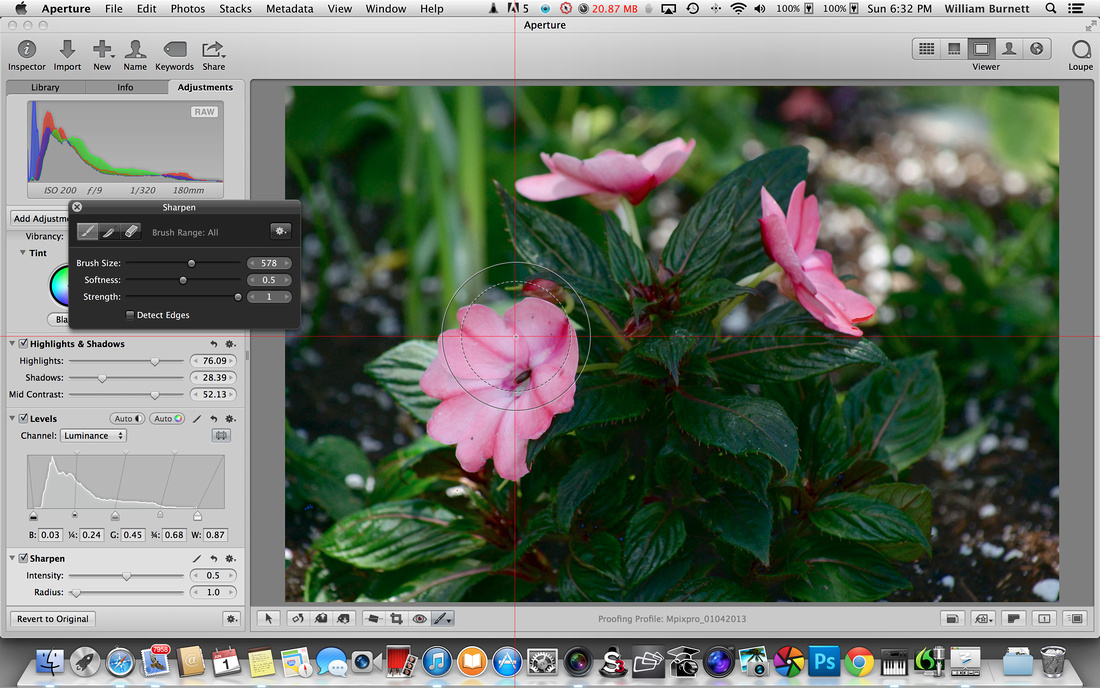
Exposure and Contrast Correction in Aperture (Without Using Curves)
This is a quick walk through of how to do basic exposure and contrast adjustments of a RAW image without having to use curves.
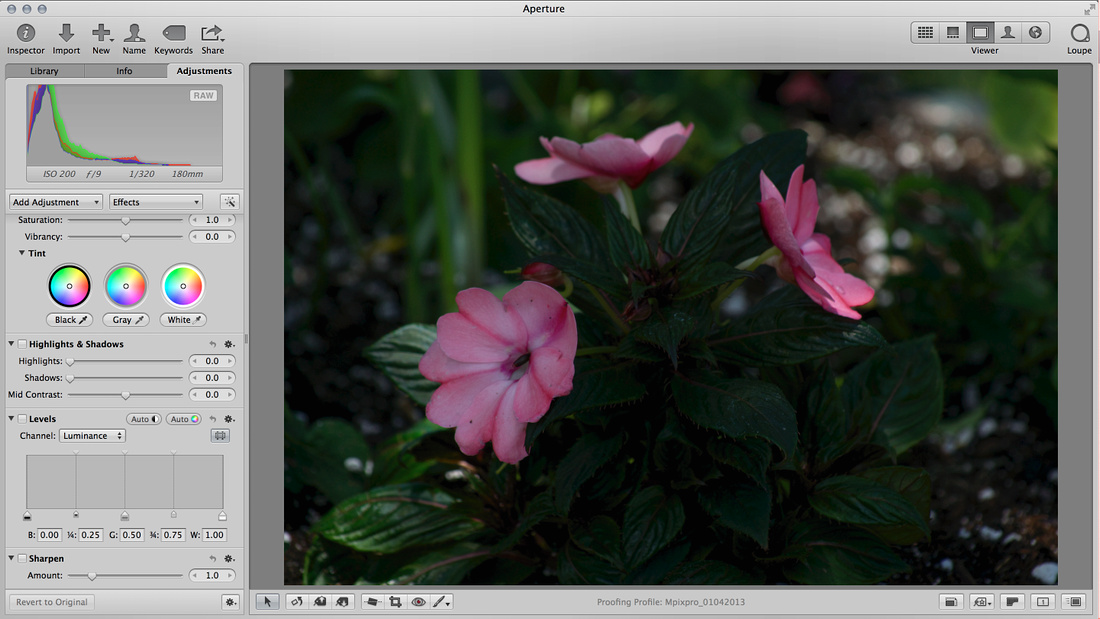
The starting image is a little dark, and lacks saturation and contrast.
-
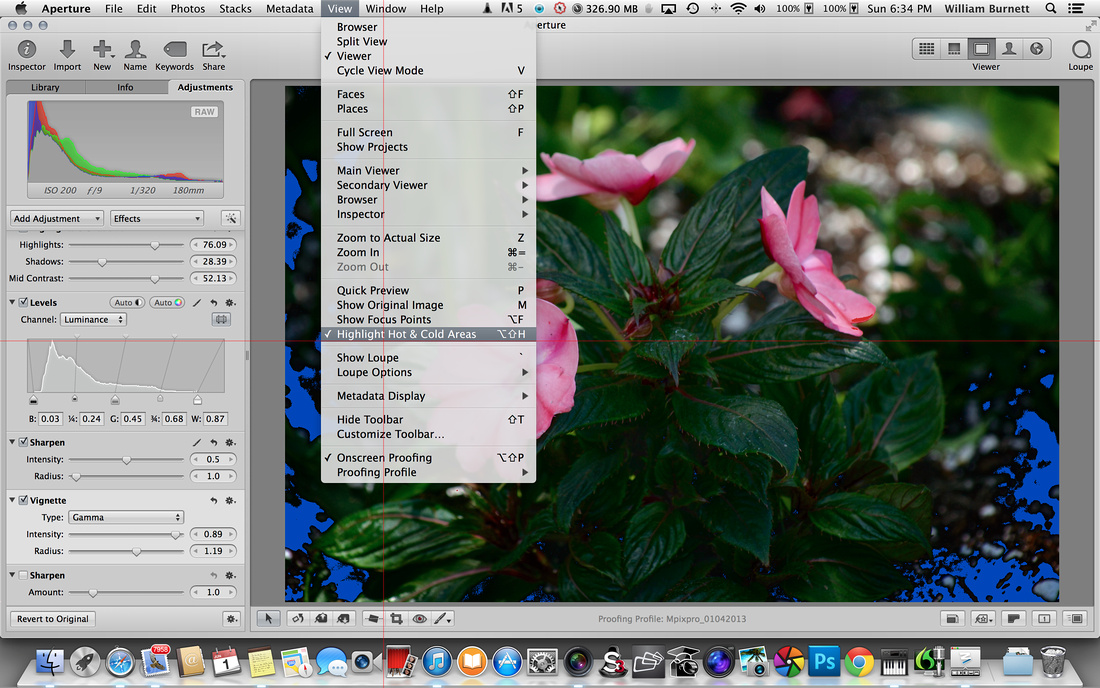
Turn on Hot/Cold Areas Alert
-
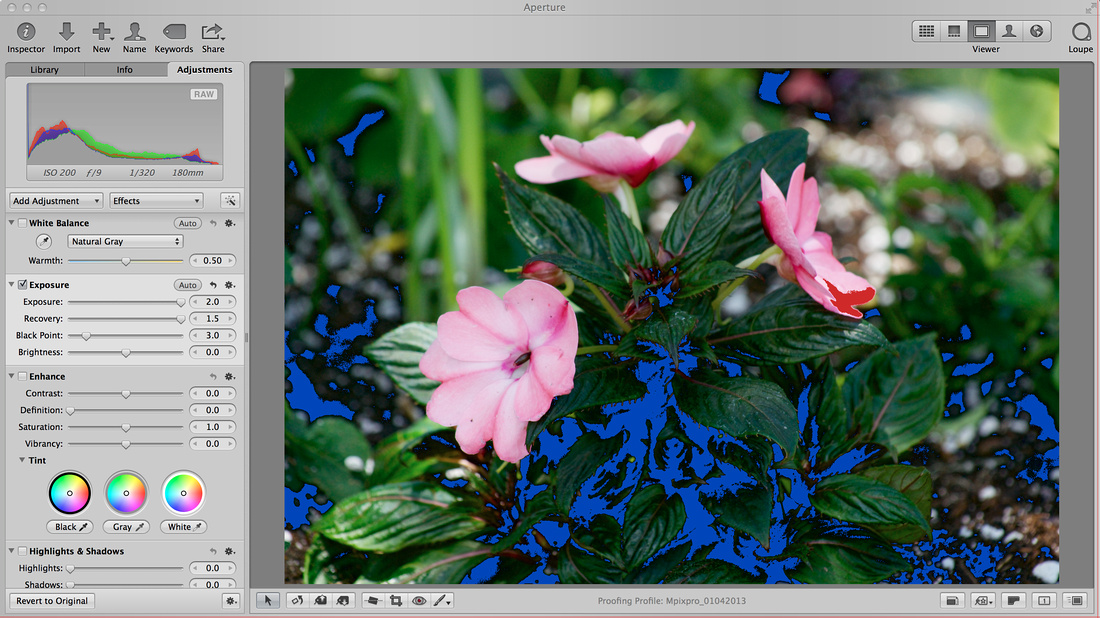
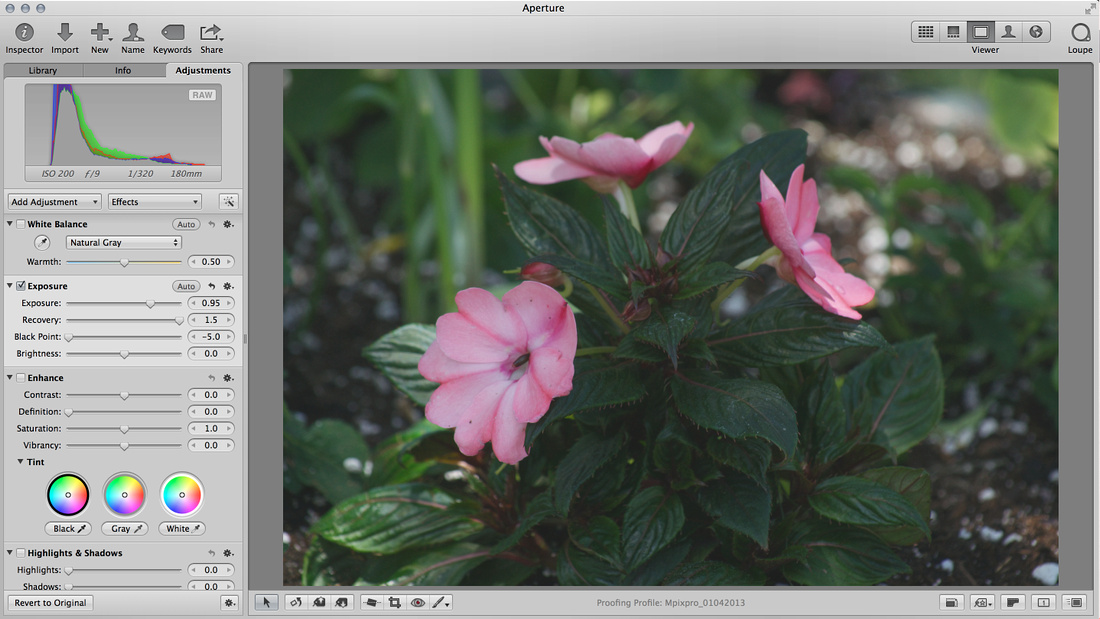
Bring Up Exposure

-
Bring Up Recovery
-
Lower Exposure until the Hot Area Alerts (Red Areas) Disappear.
-
Adjust Black Levels until Cold Area Alerts (Blue Areas) Disappear.
-
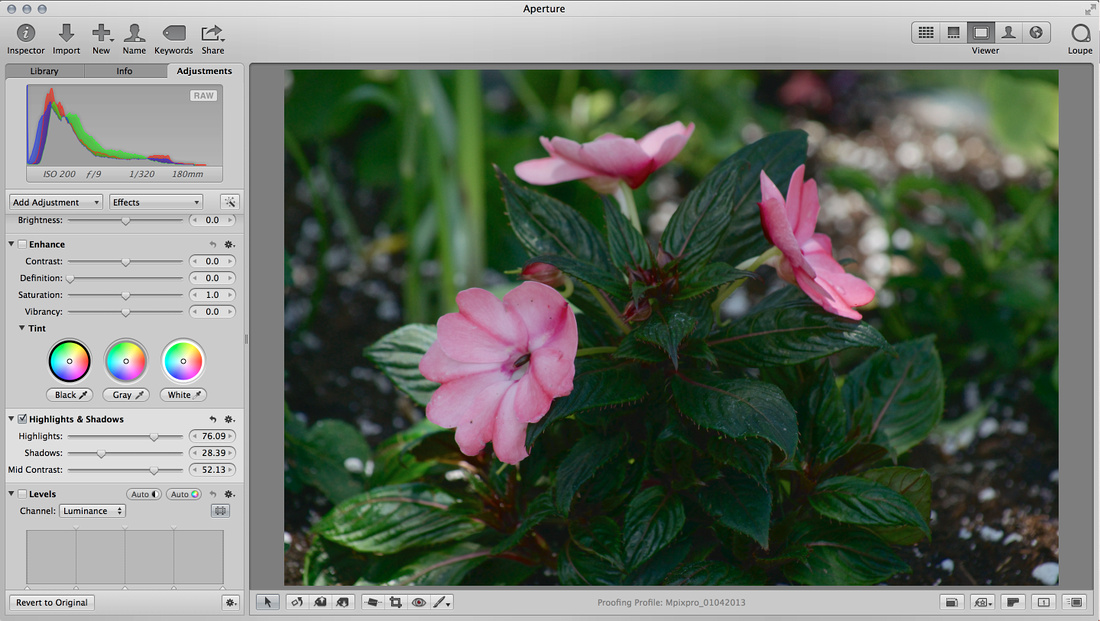
Adjust mid tone contrasts to your liking. Some Hot to Cold Area Alerts may reappear, that is normal but should be kept to a minimum.

-
Adjust Highlight and Shadows levels to your liking. In this case I tried to eliminate the Hot/Cold Alerts.
-
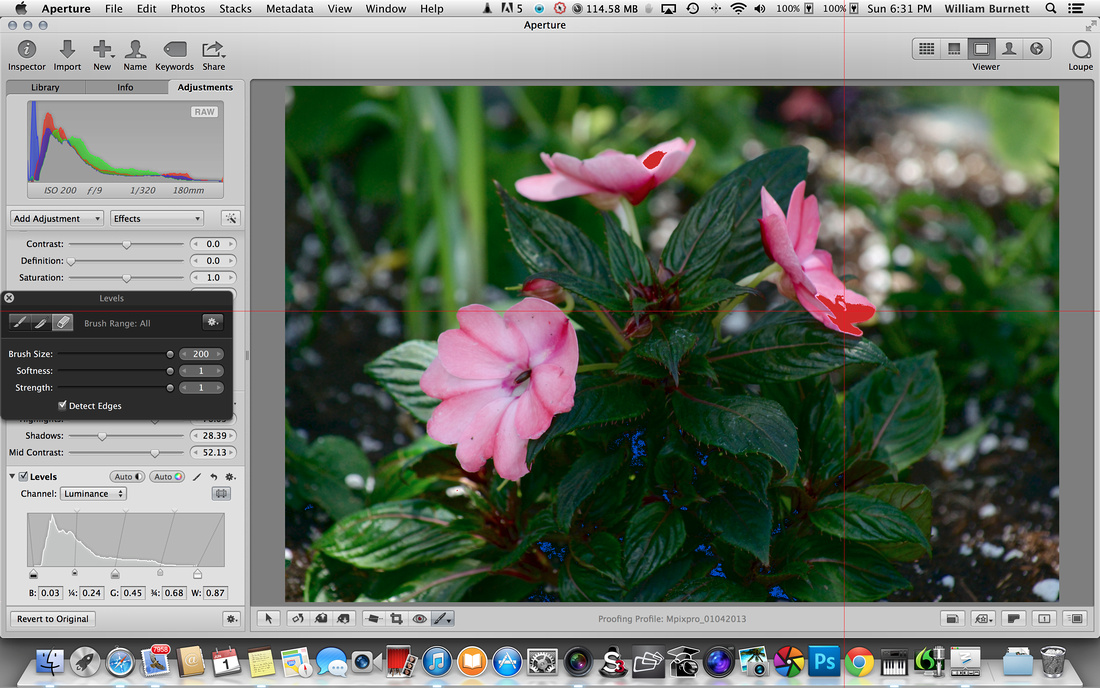
Fine tune exposure with levels. Use Brush Levels Away to remove Hot/Cold Alerts.
-
Use Sharpen Tool to selectively sharpen areas of interest in your photo.
- Turn off Hot/Cold Exposures.
-
Apply any additional effects that you like, in this case I added a vignette.
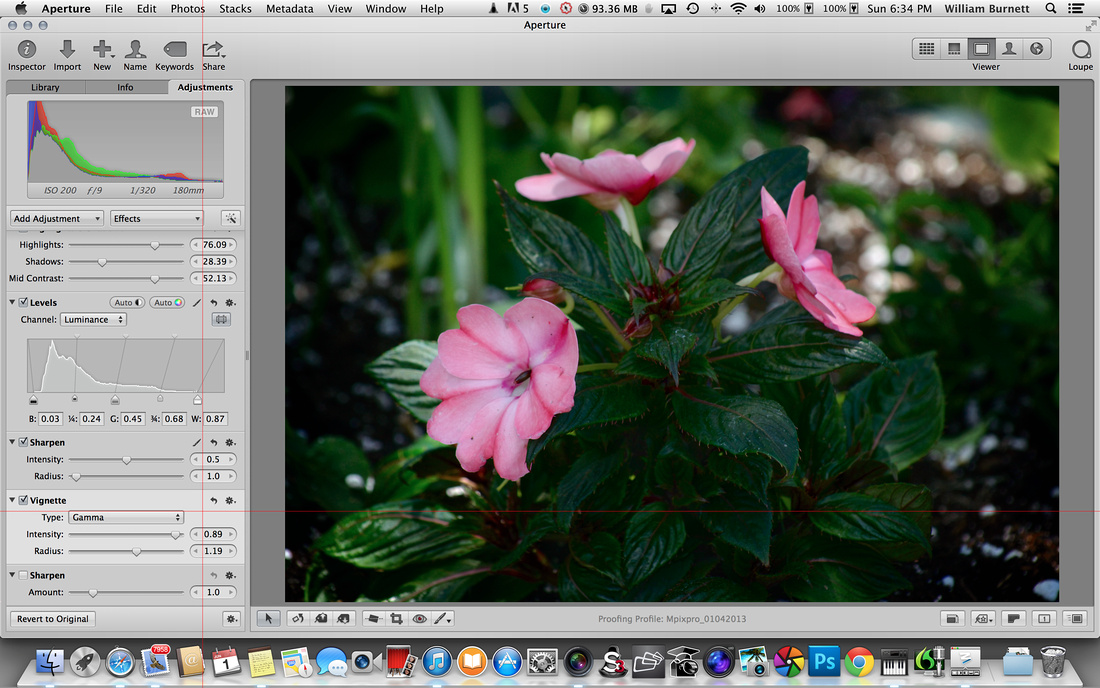
Press the M key to compare between Original image and the Finished product.
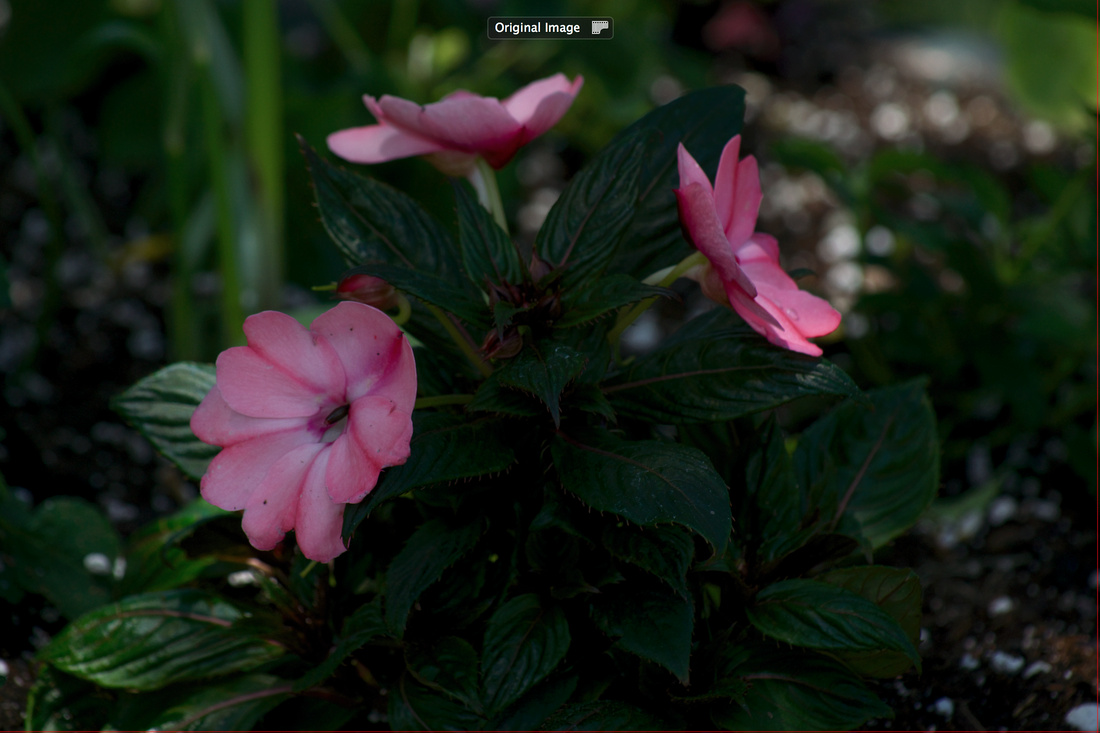
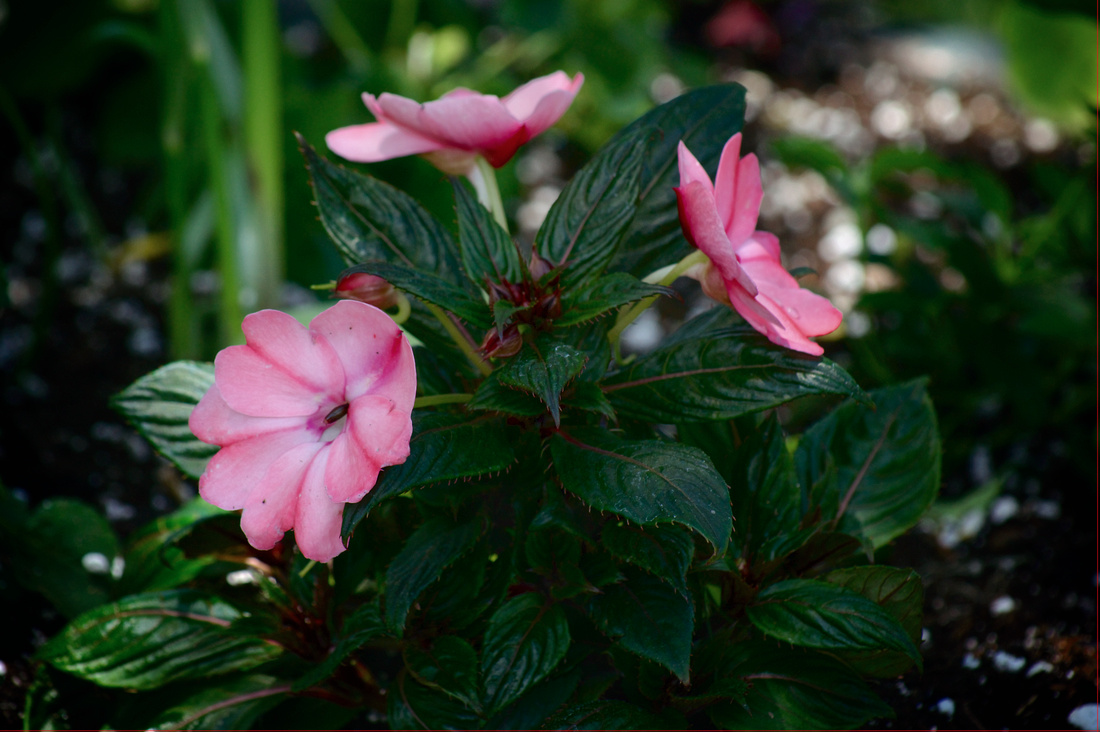
Here is a before an after side by side comparison.
These same techniques can be used in almost any RAW development program such as Lightroom or DxO Pro. Depending on the program used, these exact tools may have different names and will be located in different menus on each program.
Rembrandt Lighting and the iPhone 5s
1) Set up a background. I like using a black background.
2) Position your model or a stand in for your model. This is necessary to determine how your light falls on the subject.
3) Position your main source of light. In this case I am using a fluorescent bulb on a light stand. An open window and daylight would work just as well.
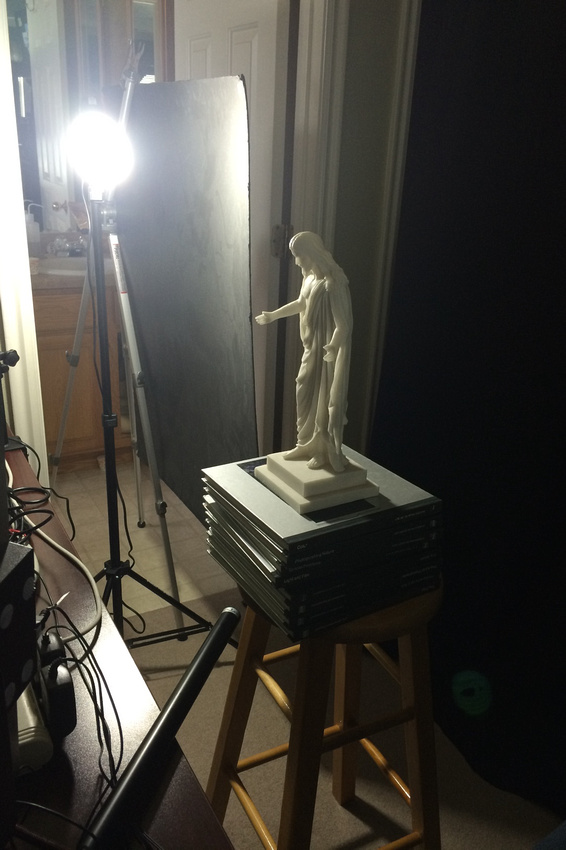
Note that a lot of light was spilling onto my background. I used a piece of black foam board to keep light from spilling onto the background. This was an artistic decision and not a requirement.
4) Position your reflector on the opposite side of the main light.
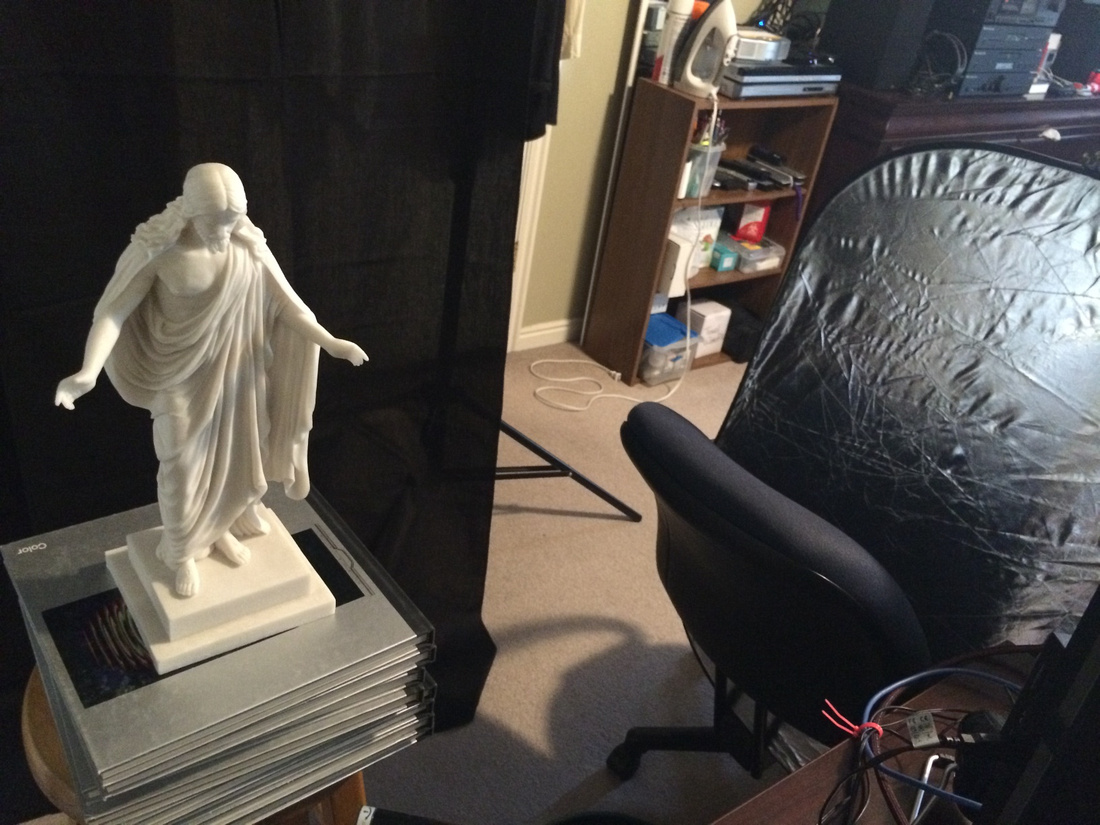 I did not have a anyone to hold my reflector. I just propped it up using an office chair.
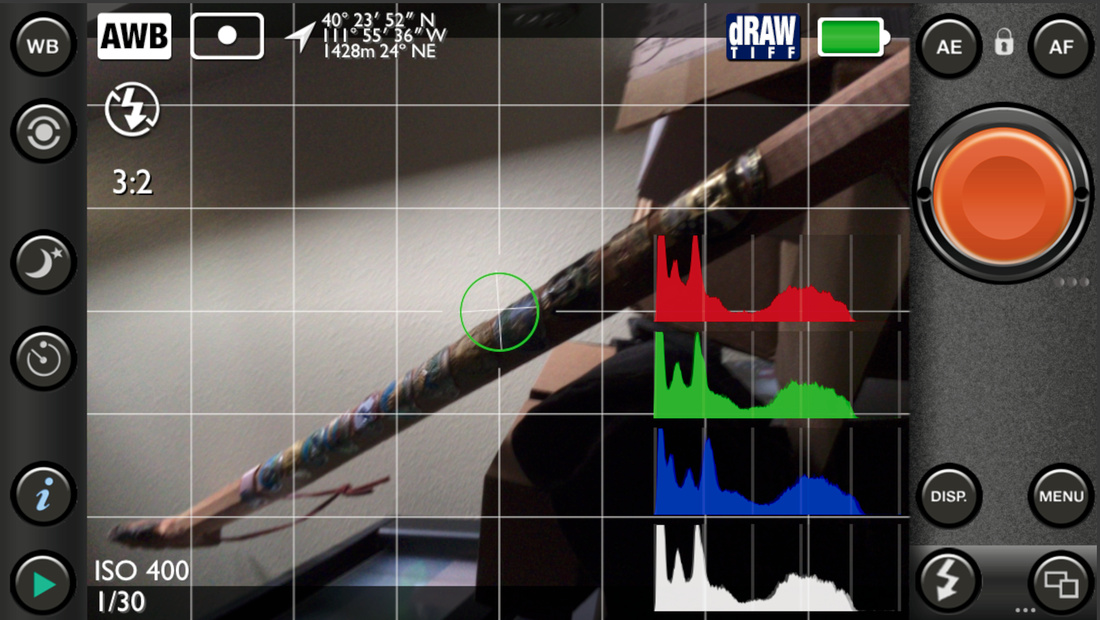
5) Launch the PureShot Photo App on your iPhone (This App is not included with your iPhone and must be purchased from the App store). This app allows you to select separate exposure points and focus points.
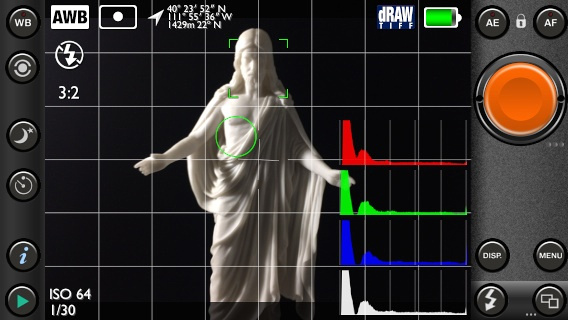
This is a screen shot from the iPhone running the PureShot App. The green circle represents the area of the photo that will be metered to determine exposure. I decided that I wanted to make sure and not over expose the image so I selected one of the brightest areas to be my point for exposure metering.
The green square is t he focus box. I placed it on the face of the subject to make sure that this portion of the photo was in focus.
6) Push the shutter button.

The final photo, no contrast or color adjustments were made in post processing.
-- Enjoy
"*Shadows" by Desireé D. Winkler
I would like to thank +William Burnett for giving me this opportunity to display my work, for taking time to graciously give pointers, guidance and encouragement.
Shadow - a constant companion. ©Desireé D. Winkler 2014
My shadow interest came about during a photo challenge. I was doggedly trying to get this picture to turn out right and I just wasn't feeling it, so stopped for the night. The next morning, I was stopped in my tracks, for there, shadowed on my kitchen wall, was my "window of opportunity." I called for my boys and my interest was hooked.
What's unique about what I see in shadows is, they are everywhere! I can bring a shadow to life so they can tell a story of its own.
Many times, I'll just photograph a shadow (boy with ball shadow photo "Let's play Ball!") but depending on the angle or fun-ness I see in my mind, I'll also bring an object in, which not only adds more depth but added interest. (Boy with ball and real ball photo)(I don't have a title for this one yet)
I've taken pictures as close as 6 inches up to 4 feet away. Just keep in mind, "do I want less or more contrast to work with in editing, do I want to leave or crop out objects?" While several of my photos are B&W, there have been times I want color. I have no rhyme or reason, I just see a photo and think- this one needs to have color for contrast-this other photo can be more poignant just B&W.
Now, I understand lighting is a Biggie for many so please don't be too disappointed when I tell you, most of my work comes from natural light or the use of a room light, sometimes both. I just lower my EV so there's no glare from the wall to lighten the shadow.
Then, if I want a B&W photo, I start with Snapseed (my main go-to). Headed to "Tune Image" I'll start with contrast to darken my shadow, use a little of saturation (this depends on lighting & the picture itself, on how much play is needed) and then more shadow. Hardly ever do I use brightness and ambience because then my window lines are diminished.
If working on a photo for 30 minutes doesn't get me the result I'm looking for, then it means that the photo was poorly taken and I need to try again. Mainly it would be because my photo was too light or too dark to work with and darkening/lighting just makes it more blurry.
Why Shadows? It piqued my interest when my tween son, who is at an awkward age, hated to have his picture taken yet would jump at the chance to be a willing model in my shadows. So Shadows became a perfect way for us to interact, have a unique look yet still be a part of who he is. While I hope he can one day grow out of his shyness, it's thanks to him that I've found my passion.
My "window" will be used often because a window looks into a person's soul-there are SO many possibilities out there I have yet to explore!
So open your "window" wide and find your passion, find that "one thing" that shines a light into your soul. ("How do you View the World?" Photo)
Thank you all for your time and this opportunity to share a little from my soul.
Desireé D. Winkler
Photo for this essay and essay are ©Desireé D. Winkler 2014
A Window and a Smile: The art of the impromptu portrait.
Updated May 27, 2014
This article is for the beginner who wants to take portraits of their children, spouse, family and/or friends. No special equipment is needed other than a point and shoot camera, a subject, a window and the sun. If you have a DSLR that is great, but you don’t need one to make a stunning portrait; and to prove it, I used my point and shoot to do all the photographs for this article.
1) Set the camera. Most digital point and shoot cameras have what is known as a portrait mode. The portrait mode setting is usually found on a dial or on a menu and usually looks like a cartoon drawing of a child’s head. If your point and shoot or DSLR has this setting, then turn it there before you get ready to take the photograph. If your camera does not have this setting, see if it has an ‘exposure’ selection or ‘metering mode.’ If it only has metering mode then select ‘spot exposure’ or ‘center weighted.’ Basically you are going to want to expose the photograph just for the subject and not for the background, so the camera needs to ignore as much of the picture as it can when determining the correct exposure.
 Graphic by Althepal
A typical mode selection dial on a point and shoot or DSLR camera. The dial is currently set to Auto but should be turned to the portrait mode in preparation for portrait photography.
2) Find a window. The ideal window will have venetian style blinds or perhaps a sheer curtain that allows the majority of the light to pass through into the room. I like the blinds because I can control just how much light enters the room. However, in a pinch a window with no blinds or curtain will do just fine. Here is an example:
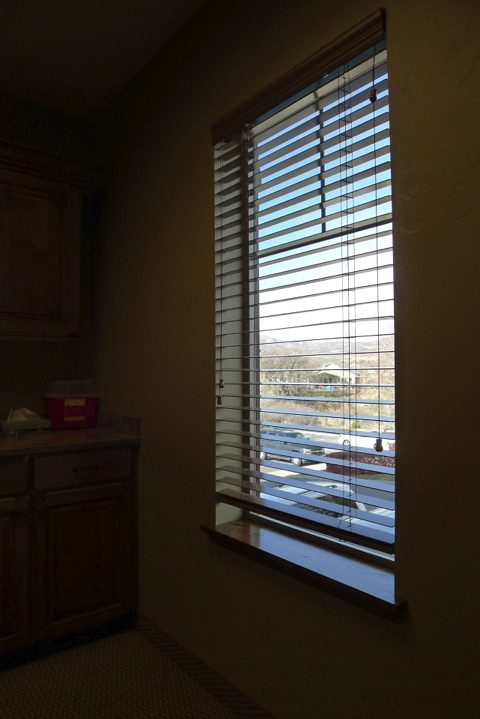
This is the window at my doctor’s office.
3) Place your subject next to the window. The idea here is to get the subject close enough to the window that the light shines on one side of their face while leaving the other side of their face in partial shadow. This type of lighting is called Rembrandt lighting. As you you may have already guessed, this is how Rembrandt posed his subjects when he would prepare to paint them. So, in his honor, this style of lighting is named after him.
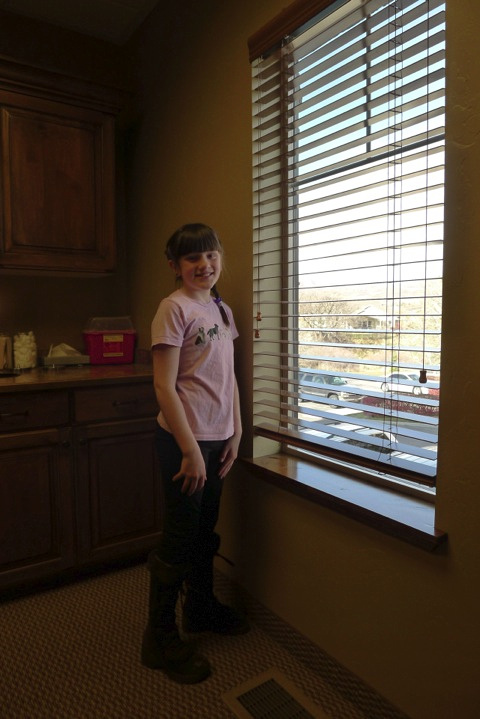
Rembrandt lighting: Place your subject near the window with the person half facing the window and turned to look back at you. One half of the face should be in partial shadow. This is a simplified form of Rembrandt lighting we are using the walls in the room as reflectors and they then act as fill light. In a studio setting you would use a single light source and then position a reflector nearly opposite that light source. Just remember the purpose of this tutorial is to keep it simple and that means we are dealing only with the window light.
4) Turn off the lights. Yep, turn the lights off and for heaven’s sake do not turn on your camera’s flash. The only source of light should be the sunlight streaming in through the window.
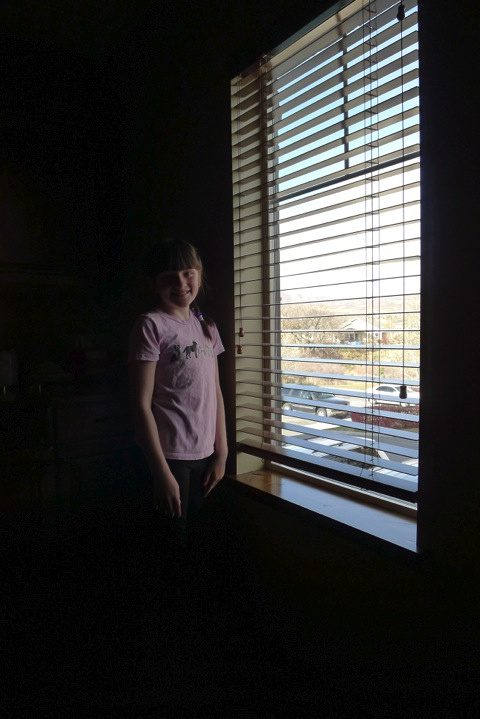
Turn off the lights. (This may make your background go completely to black, if it doesn't that is all right. What we are trying to achieve is a single light source and if you have spill over light into your background then that is just fine, if it goes completely black that is just fine too.)
5) Zoom in and take the picture. After placing your subject near the window, turn off the lights, and get about 6 - 8 feet away from your subject. Have your subject look at you, zoom in to the top 1/3 of their body, say something funny and push the shutter button when they smile. That is really all there is to it. Just fill up the frame, get them smiling and take the picture. Review your picture and if your background is too bright in the photo then switch the camera to spot metering, meter the bright part of your subject's face and take the photo again. You might also try using your EV adjustment and turning it down to -1 or -2, this will reduce the overall exposure of the entire scene as well.
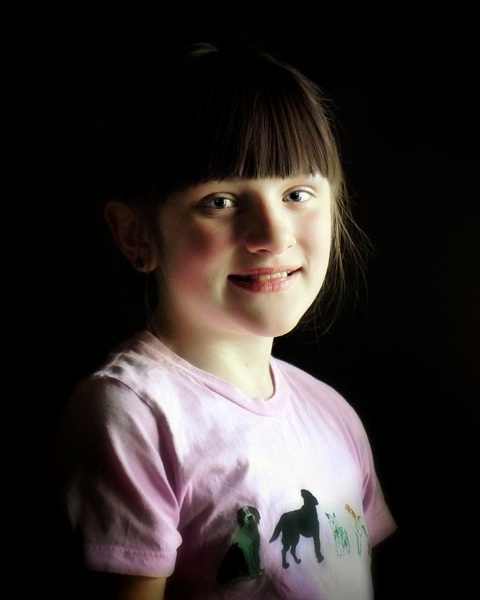
This portrait was taken using a Lunix LX5 set to portrait mode. The only source of light was sun through a window. The photo has been cropped to 8” x 10” format. A slight blur was added to the bottom portion of the photo and a very slight vignette was added to the bottom left and right corners of the photograph. The blur and vignette were added in an attempt to conceal a few wrinkles in the shirt of the subject but should not be considered requisite to the processing of the portrait.
That is really all there is to taking an impromptu portrait. Get out there and get shooting.
-- Enjoy
Time to Clean Your Sensor*
If it is spring time, it is time to clean the sensor of your DSLR. Spring time means pollen and pollen means dust spots on the sensor of your DSLR. Every flowering plant dumps tons of pollen into the air and that pollen does a couple of things. The first thing it does is pollinate plants, the second thing it does is make everyone sneeze, and the third thing it does is stick to the sensor of any DSLR camera it can find.

The above photo is marred by dust spots. Many of these dust spots are actually flecks of pollen that are super sticky and have affixed themselves to the sensor of the camera.
Most DSLR cameras have dust reduction systems. These systems work well for run of the mill dust. Pollen is not run of the mill dust. Pollen is big and sticky. Simply using the built in dust reduction systems or a blower is not going to take pollen off of a camera sensor. To remove pollen, the sensor must be cleaned.
Sensor cleaning can be done using a wet method (the method I prefer for extremely sticky pollen) or by using the dry method (sufficient for all but the most sticky pollen).

Before Cleaning

After Cleaning
Before and after photos of a sensor that is covered with pollen and that has subsequently been cleaned using a wet method. The cleaning is not one hundred percent perfect but it is usable. The few small dust specks that remain will not show up at apertures below f22. I had to use an f32 to get them to show up in the after image whereas I used an f22 for the before image.
*Here is the caveat in this essay. I do not recommend that you clean your sensor unless you understand that if something goes wrong you can ruin your camera. I do not recommend that you clean your sensor unless you understand that if something goes wrong you can void the warranty of your camera. I do not recommend that you clean your sensor unless you understand that you can send it to a qualified technician for cleaning and if they muff it up then it is their responsibility. If you still want to clean the sensor yourself then here are some YouTube videos that will be of help.
YouTube Tutorials:
Dry Cleaning of a Sensor: https://www.youtube.com/watch?v=iRW9AmDPqr0
Wet Cleaning of a Sensor: https://www.youtube.com/watch?v=qi6S3jHA21w
The One Thing
In a prior essay I posited that, to create photographic art, the camera, lens, computer, software, and printer were in essence irrelevant. I did so not to imply that decisions about these five things would not effect your final product but to establish that the majority of modern cameras, lenses, computers, and software are of a sufficient quality to make very nice art. I also wanted to establish that printing your art at home is not the most economical solution or highest quality solution for the majority of photographers. However, at the conclusion of the essay I stipulated that, in my opinion, there was one piece of hardware that every serious digital photographer should purchase.
As photographers we worry about the lighting, the focus, the aperture, etc. Then we worry about post processing our images. We want the eyes to be sharp and the backgrounds to be blurry. We want the sky to be blue, the grass green and the snow to be white. Every photographer knows the disappointment that comes back in the mail and that vibrant, spectacular, “National Geographic” quality photograph looks dull and lifeless as a print. Why does it happen everyday to millions of photographers around the world? It happens because what we see on our screens is not being communicated to the printer and the most common reason for this happening is that our screens are lying to us.

A CCD camera sensor: The sensor is the heart of a digital camera. It has been called “digital film” but it is far more complex than film. The Sensor is made of of millions of little squares called pixels and these are used to translate what you see, through the lens, into a digital photo. (Photo Credit: Jonathan Beauchamp)
Let’s imagine a simplified version of the data contained in a digital image. Each image is made up of millions of little squares called pixels and each one of these squares contains two important pieces of information. They contain a number that represents the luminance, that is how bright or dark that little square is supposed to be and a number that represents a color that the square is supposed to be. In theory, if we have a bright red pixel recorded on the camera sensor then that same color red pixel will be displayed on the computer screen and that same color red will be printed on the printer or by the printing lab. Everyone that has ever printed a photo at home or at a one hour photo can tell you that this rarely if ever happens. More than once I have heard people complain about the quality of the print that was produced on their printer or from the one hour photo. The vast majority of the time the printer or photo lab is not to blame. The blame almost always can be placed directly on an uncalibrated monitor.
My monitor is brand new, how can it be uncalibrated? Do you know how much I paid for it?
It does not matter if you monitor is new, old, or somewhere in between, it still needs to be calibrated. In fact most monitors are shipped calibrated but the calibration used is not one that is designed for color accuracy. Instead it is designed for high contrast and saturated images. In the early days of computing the monitors were pretty bad. They were dim, lacked resolution, and the ability to produce really rich colors. These monitors were essentially television sets without a tuner. In an effort to make programs like word processors, computer aided design programs and spreadsheets easier to read, the computer and monitor manufactures started adjusting their monitors to show brighter whites, darker blacks and more saturated colors. Then the age of video games hit full force and there was even more desire to have a super saturated, super bright screen. This super saturated/bright screen was a very good thing for most uses of the computer. In fact, that desire to have brighter, saturated and eventually bigger, high resolution, monitors led to the development of the modern flat screen displays that we all now take for granted. However, in 1987 a little program named Photoshop appeared. With the advent of Photoshop, a new age of photography was born and a need to reproduce the on-screen images in an accurate fashion was needed.
This really was not a new problem. In the 1950s the post war world transformed from an age of black and white printing to color printing and a system needed to be developed that could standardize colors. This problem was solved by the Pantone company. They began standardizing colors and eventually their color system was being used by every magazine publisher, auto body shop, fine art reproduction service, and just about anyone else in the world that needed to reproduce anything in color. Pantone used swatch booklets, called formula guides, to distribute the standardized color pallets to printing houses.

A Solid Matte Formula Guide from Pantone, 2005 edition. (Photo Credit: Reid Parham)
By 1993 the need to have a standardized method of representing color was at an all time high. Roughly compatible systems emerged as the industry standards. Apple introduced a system called Colorsync at the system level on every Macintosh Computer and a consortium of several different companies united to establish the International Color Consortium or ICC standard of color. Unfortunately, it would take until 1997 for Microsoft to incorporate this standard into their operating systems at a system level. Early on it was not fun calibrating a monitor. It involved some very tedious and time consuming matching of colors to a printed standard. Luckily for today’s digital photographers the entire process has been automated. Nevertheless there is no free lunch and to get a nicely calibrated monitor you are going to have to purchase a colorimeter. A colorimeter is a device that measures the colors produced by your computer and monitor and then compares them to a known color standard for cameras and printers in order to calibrate your monitor.
Just pick the brand you like and that fits your needs and budget, plug it in and in about ten minutes you will be a lot closer to being a better photographer. Well, at least your prints will look a lot more like what you saw on the camera.
All of the major brands of colorimeters work basically the same. The less expensive models work well for machines with only one monitor. The more expensive models can color match two or more monitors on a single computer. A colorimeter usually looks like a stick or a puck and either affixes to your monitor screen with a suction cup or hangs over the top of your monitor by its cords in such a way that a photoreceptor, on the colorimeter comes into contact with a designated section of your monitor screen. Then when you run the included software, a number of color swatches will appear on your screen. The colorimeter then measures how bright these colors are and what color they are displayed as on the monitor screen. At the completion of the measurements, which usually takes several minutes, the program will save a customized color profile for your monitor. The new color profile will be used by your computer and you can rest assured that your colors are being displayed accurately.
Having a calibrated monitor is a wonderful thing. It allows you make your monitor tell the truth but it goes a bit farther than just making your monitor tell the truth, it can also help you see if your printer is telling the truth. In many of the best photo editing programs you can do what is known as a soft proof of your images. A soft proof is only really capable with a calibrated monitor. Every major printer company provides color tables or profiles for their printers. These files can usually be downloaded from the printer company’s web site or may be included in the installation package for the printer. Most professional labs will provide, at your request, a copy of the printer profiles they use and you can then add those to your color settings on your computer. Then a program like Apple’s Aperture 3 will allow you to “soft proof” your image on-screen. In other words, you can preview a very good approximation of what your finished print will look like on any given printer for which you have a current printer profile. This is a very important tool for a photographer. Not all printers are created equal and they can vary widely in their ability to produce certain colors. So the calibrated monitor with a printer profile is important to at least have a heads up on what you can expect when you hit the print button.

Two on screen soft proofs of a recent cell phone photo. The image on the left is a soft proof based on the printer characteristics of a local print shop and the image on the right is the soft proof of the printer currently being used by Bay Photo. As you can tell the image on the left represents the blacks as more of a dirty dark grey. If I were planning on having the local printing house reproduce this image I would need to increase my saturation and contrast a bit to achieve the desired look.
Conclusion
I know this essay was long. However, I wanted to do more than just say buy a colorimeter. I think it is important to know why you should buy something. I know that money does not grow on trees and that photography is an expensive hobby. I believe enough in the importance of a colorimeter that I use one myself. Below you will find some links to the colorimeters that I recommend. Now, Get out there and get shooting. -- Enjoy
It is all a matter of scale.
I saw this giant fork and spoon in Virginia City, Nevada. I love Americana, and this is a classic piece of Americana so when I saw it I knew I had to photograph this hold-over from the not so distant past.
Here is the original in camera photo:

Not a bad snap shot as it was in camera but I had a different vision in mind when I shot the work. In post processing I went to work to create the image that I saw in my mind's eye. This was the result:

After all was said and done, I had indeed created the image I had seen in my mind's eye. However, one thing was missing. The thing that was missing was a sense of scale. I had always envisioned this image without the two electrical outlets. I felt they took away from the scene, but I soon found out that by removing them, I just a had a photo of a fork and spoon and not a photo of a GIANT FORK and SPOON. So I had to put them back into the photo (thank heavens for non-destructive editing).

The finished photo, with the electrical outlets, allows the viewer to stand in my shoes and understand just how large these giant utensils really were. The take away here is that sometimes an image needs something in it to give the subject of the image a sense of scale. In this case without the outlets, you have no way of knowing how big the utensils are and most likely you are left wondering why I took a photo of some letters and a fork and a spoon. In your own photography you might need to show how high a water fall is or how small a miniature figurine can be. In cases like these, remember to give your audience a reference point by which to judge, or the audience might just end up asking why they are looking at some letters and a fork and a spoon.
-- Enjoy
Note: This was originally published in December of 2010.
Upgrading to a Full Frame DSLR: The path of least resistance and greatest ROI (Return on Investment)
Warning: This article is geared to the new shooter, the intermediate shooter, and the advanced amateur. The working professional has different needs and as such may choose a different path to upgrade.
It is Christmas time*. Time to spend that money that mom gave you or to get Santa to spend a little on you. Well, what would you like Santa to put under the tree for you? If you answered a brand new Canon 5D Mark II, a new Sony A900, or a Nikon D3 then get out your eraser and change that list. For most of you out there, this is the wrong way to go when you are building the ultimate camera rig. I know that a full frame sensor is tempting, but the advantages of the full frame are not as great as you might expect and there are ways of upgrading that will make you much happier over time.
The following is an overview of 12 steps to building a professional grade camera system with the ultimate bang for your buck. The purpose of the list is to provide an overview of upcoming articles and to prevent many of you from dropping some big bucks on a camera body this Christmas.
The List:
1) Basic DSLR Camera and Bag: I make the assumption that most of you already have step number one taken care of and you are ready for step number two. Just in case you don’t have a basic DSLR and bag, here is a quick guide to getting into the DSLR side of the camera hobby. Look for bargains. Often manufacturers will put together basic and intermediate starter packages. These most often will include a DSLR camera body, at least one kit lens, and sometimes will include a basic camera bag. These kits can be found online and at box and warehouse stores for between $400 and $1000. Buy the best you can afford because you are going to be married to the camera body and lens set for some time. However, remember that even entry level DSLR cameras take better photos than most professional 35mm film cameras. The biggest decision you have to make here is what brand to buy. Here is a giant secret, Canon, Nikon, Sony, Olympus, Pentax, Sigma, and a few other brands I am sure I have forgotten: they all make fine cameras. If someone tells you that Nikon or Canon is the only way to go, then just ignore it. Maybe that is true for them, but decide for yourself. Go to the store and handle the cameras. See which camera fits in your hands the best. Look through the viewfinder, play with the focus, ‘kick the tires a bit.’ Then get the camera that fits your budget and your future.
If perchance you already own lenses for an SLR camera then I recommend checking to see if those lenses will work on the same brand DSLR camera and sticking with that brand. Remember, all the major players make fine cameras.
2) Computer, Good Monitor and Color Calibration equipment: Over 50% of all photographers use an Apple Macintosh computer. I am not telling you to go buy a Mac, but I am telling you that I like the functionality of the Apple Computers. In the very least you need a computer that is fast enough to run programs like Photoshop and a monitor that can display the sRGB color gamut. If you plan on becoming a professional photographer you will need to acquire a professional monitor that can display most of the Adobe RGB color gamut. Regardless of the computer or monitor you purchase, you need to have a way to know that what you see on the screen is what will be printed. This is accomplished by the use of a color calibration system such as the ColorMunki system or the Spyder color calibration system. These system cost between $170 - $2000.
3) Software: If you bought a Mac, then it came with iPhoto. This is the best place to start, in my opinion. A program like iPhoto provides basic workflow control. A year from now I expect that you will have outgrown iPhoto, but it is an ideal place to get your feet wet. If you bought a PC then you need to think about workflow. Workflow is the management of your photo library. The gold standard for this on the PC is a program called Adobe Lightroom. On the Mac, Lightroom or Aperture both are gold standards.
“But wait!!! I thought you had to have Adobe Photoshop!!!”
You don’t need Photoshop. In fact, you might not ever need Photoshop. I know that many pros love Photoshop and can’t live without it. There are just as many pros that rarely if ever use Photoshop. I have Photoshop and I use it on occasion but in reality there are better ways to do most of my daily photo chores than Photoshop.
4) Books and Education: Read everything that you can about your camera, exposure, composition, and lighting. Then practice the things you have read about.
5) Filters: Purchase some basic filters such as a circular polarizing filter, a neutral density filter, and a warming filter. Companies like Tiffen often offer starter packs with all or most of these basic filters included.
6) External Flash: Buy the flash from the company that makes your camera. Buy the largest guide number flash that you can afford.
7) 50mm sub f2 lens: A nice lens like a 50mm f1.8, f1.4, or f1.2 is the first lens anyone looking to extend the capabilities of their camera should buy. Some people like to purchase only lenses from the manufacturer of their camera, however several lens companies make fine aftermarket lenses.
Items 8 - 11 do not have summaries presented in this article. However, rest assured they will be covered in depth in future articles.
8) Tripod
9) Reflectors and Diffusers
10) Specialty Lenses and Accessories
11) Studio Lighting
12) Full Frame Camera Body: “Why last? It will take me two or three years to get all that stuff! I want one now! I am ready to start shooting weddings and portraits! I am ready, I swear. I have had a weekend course in photography, a kit lens, and I printed my business cards already!!!!”
I put this one last on purpose. I hope it does take a couple of years to get to the point of upgrading the camera body; it should. Cameras follow Moore’s Law. Simply put: the camera you can buy two years from now is going to be tons better than the camera you can buy today and it is going to be tons cheaper. Camera bodies will come and go. They have lots of moving parts and technology is always marching forward. By the time that you have developed a professional skill set and all the accessories a pro needs, you will have worn out the first and possibly a second camera body. However, those lenses and accessories will last a lifetime.
Conclusion
Photography can be an expensive hobby/profession. Great tools exist for people on every part of the learning curve. Be wise with your money and get some bang for your buck.
By the way, I hope that Santa treats you right this Holiday season.
-- Enjoy
* I am aware that many of my readers are not Christian. I use Christmas here as a literary tool and I hope that it is taken in that spirit. No offense is meant or implied.
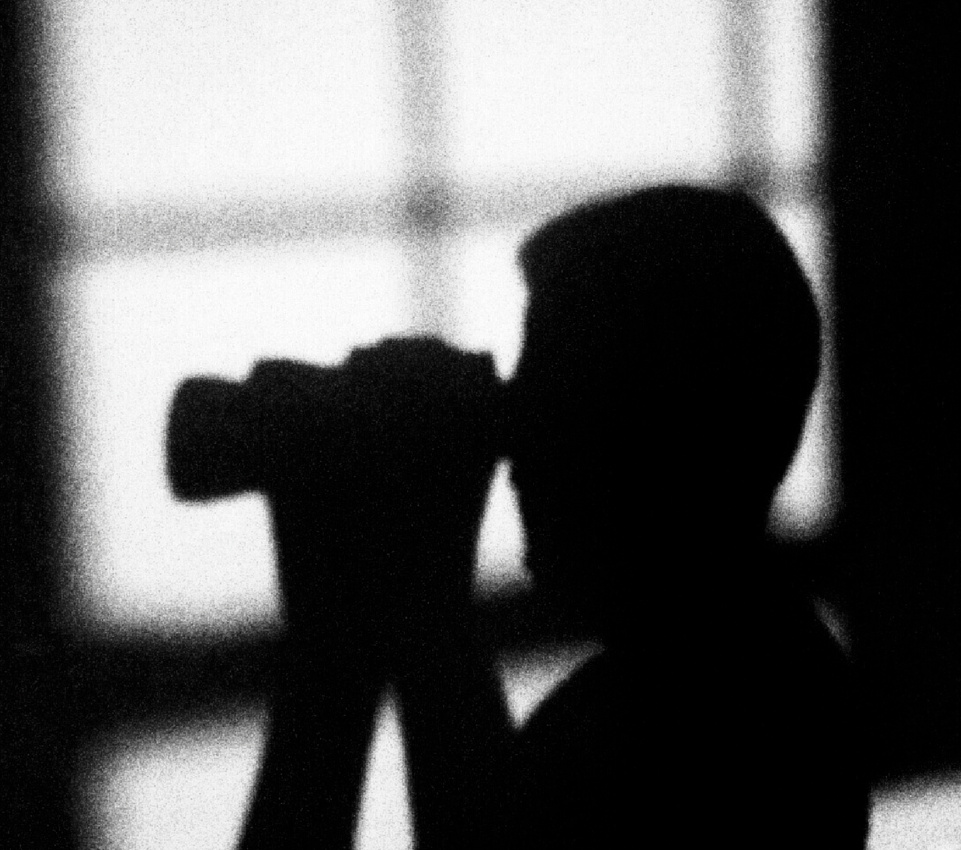
Candid Moment

ISO 1600, 210mm, f5.6, 1/320s, (Model - Unknown*)
The Story of the Photo
Some time ago I accompanied my oldest daughter to day camp. My plan for the day was to tag along and take some pictures of the kids at camp to document the experience for my daughter. While photographing the kids doing beadwork I began to pay attention to some of the junior camp counselors. They had congregated behind a tent and through a mesh window of the tent I could see them talking. I noticed the energy between the counselors and in particular I noticed this young lady who from time to time would catch a glimpse of an older Boy Scout. However, when the Boy Scout would look her way she seemed embarrassed and tried to avert her stare. After watching this scene play out over a series of minutes I decided to see if I could capture the teenage awkwardness of the situation.
I decided to shoot this image in black and white. When I shoot in black and white I often like a very grainy texture, so as to harken back to the days of black and white film. To accomplish this it is necessary to use a relatively high ISO setting. I choose ISO 1600 because it would give sufficient grain while retaining a modicum of details in facial expression. I chose a telephoto lens so as to be able to capture the moment without intruding on the space of the subject. The mesh of the tent window provided a degree of natural diffusion to the light. The challenge of the mesh was to focus through the mesh onto the subject so that the mesh became all but invisible. The mesh window is there in spirit only. It serves as a barrier between the subject and the observer. In preparation for this photo I waited until the Boy Scout crossed into the scene (dark figure on the left) and as he crossed the young girl’s stare was broken and she looked down. I pressed the shutter button and froze that moment of angst/awkwardness in time.
Overall I am exceptionally pleased with the composition of the photo and the choice to shoot it in black and white. I am not sure I would have taken the photograph had the mesh not been in the window of the tent. It provided me with a vantage point that did not disturb the organic nature of the photo. The mesh is really a metaphor for time. As an adult I am able to look back at teenage years and filter those experiences; yet, these teenagers were experiencing these feelings of awkwardness and angst for perhaps the first time. To me and the viewer, the mesh became like time itself- a divider or filter by which to evaluate the scene.
Photos tell stories and it is important to look for those stories in our surroundings and then be familiar enough with our equipment and techniques so as to be able to make split second decisions on how we can capture the stories that life presents to each of us.
Application Lessons from this Photograph:
- Know your camera and how to do things like set the ISO, depth of field, shutter speed, and recording modes such as black and white.
- Watch for candid photo opportunities.
- Use a telephoto lens so as to observe without intruding.
- Tell a story with the photograph.
-- Enjoy
Content Aware Fill May Leave You Discontent
Content Aware Fill and Adobe Photoshop CS5 (This is a review from 2011. I have since used this feature in newer versions of Photoshop and I cannot tell that the feature has improved at all. Of course Your Mileage May Vary)
Since the release of Adobe Photoshop CS5, the web has been filled with descriptions of some of the almost magical features of this program. Perhaps the most touted feature of CS5 is the Fill or Content Aware Fill feature.
What is promised?
The promise is that with little to no effort from the photographer, unwanted objects can be outlined and selected and then by selecting “Fill” from the edit menu the item will be removed and CS5 will seamlessly fill in the void with content appropriate material. In the past this type of “Fill” could only be accomplished by painstakingly cloning and pasting the area by hand or in some cases actually painting areas with the appropriate colors and textures. Either of these solutions could be time consuming and challenging to the casual Photoshop user or the less than artistically inclined user.
What is delivered?
If you are to believe the cherry-picked examples littering YouTube and web tutorials, Adobe has hit a home run and all those people that studied graphic arts in school should pack it in and start practicing how to say “Do you want fries with that?”
The Truth Sometimes the Content Aware Fill gets it close. However, my experience is a classic example of “Your Mileage May Vary.” Does Content Aware Fill work? You be the judge. Here is the first image on which I tried content aware fill.
Original Image

This image has a post in the upper right hand corner that detracts from the overall photo. I want to remove this post: a perfect test for Content Aware Fill.
Detail of post to be removed.

1) Using a selection tool select the item to be removed.

2) Select Fill from the Edit Menu.

3) Select Content Aware Fill.

4) The Result.

5) Detail of the Result.

As you can see the post has been removed but the fill is not very good. I also decided to replace the post by hand using the clone stamp. Here are the results.
Post removed by traditional clone/stamp method.

Detail of the post removed by traditional clone/stamp method.

Side by side comparison. The image on the left is done by hand and the image on the right used the Content Aware Fill in CS5.

Conclusion
At least for me, Content Aware Fill is not going to replace the tried and true clone and stamp method of object removal. Close but no cigar on this feature.
As I said, your mileage may vary.
Enjoy.
Note: Some people may criticize my choice to use a sepia image in this test. I also performed the same test with a color version of the photo and the results shown in the sepia image are representative of the results obtained using the full color counterpart of the image.
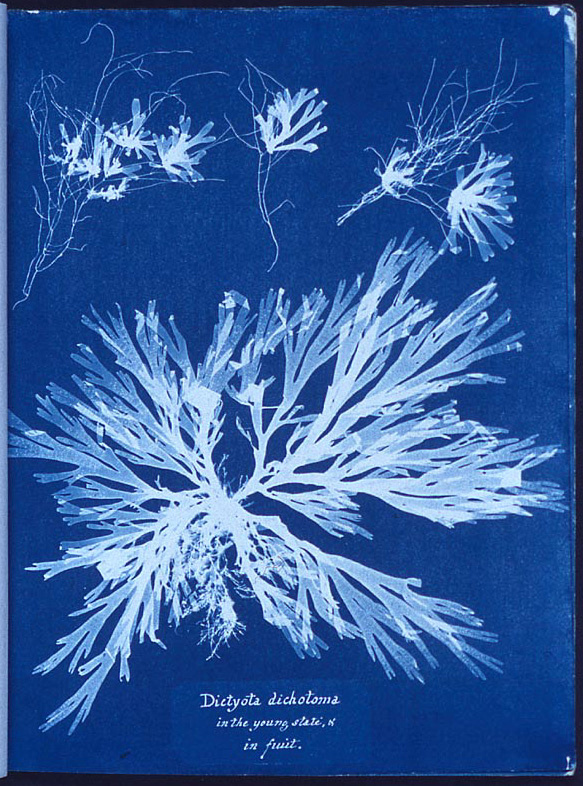
Cyanotype Process
The cyanotype is generally viewed as the third major step in the evolution of photography. Previous to the cyanotype photographs had been made on pewter plates coated with bitumen and then the Daguerreotype was developed. The Daguerrotype used a copper plate coated in silver to capture the photographic image. The pewter/bitumen and copper/silver photographic processes were expensive and dangerous. The cyanotype, like the previous processes, is a direct print method of photography. That means that the final image is produced directly on the paper or the photographic plate.
A Cyanotype is one of the easiest types of photography to master and is perhaps the safest and most economical forms of classical photography ever developed. Since cyanotype photography is a direct print method it is making a comeback in the digital age because you can produce cyanotype prints of digital images.
The following links and videos provide a good overview of the cyanotype process and how to make true cyanotype prints from your digital images.
Suggested further reading:
http://www.ehow.co.uk/video_4947182_experimental-photography-pinhole-camera-cyanotype.html
http://www.instructables.com/id/Cyanotypes---super-easy-photo-prints-at-home./
http://en.wikipedia.org/wiki/Cyanotype
http://www.mikeware.co.uk/mikeware/New_Cyanotype_Process.html
http://www.christopherjames-studio.com/build/ALTcyanotype.html
Burnett's Printing Process of 1857 (Uranotype)
If Charles Burnett had had his way, perhaps the popular Google//NIK Efex software package Silver Efex Pro would instead be called Uranium Efex Pro. During a period of 1855 - 1857, Charles Burnett experimented and then perfected the process of using Uranium to produce photographic images. The process was known as Burnett's Printing Process.
The reason I bring up this topic is two fold. One, my last name is Burnett. OK, that was the only original reason I brought up the topic. However, I think that the printed results of the process are worth being remembered. In the current digital age we can recreate the look of this ancient photographic process without the lingering radioactive side effect.
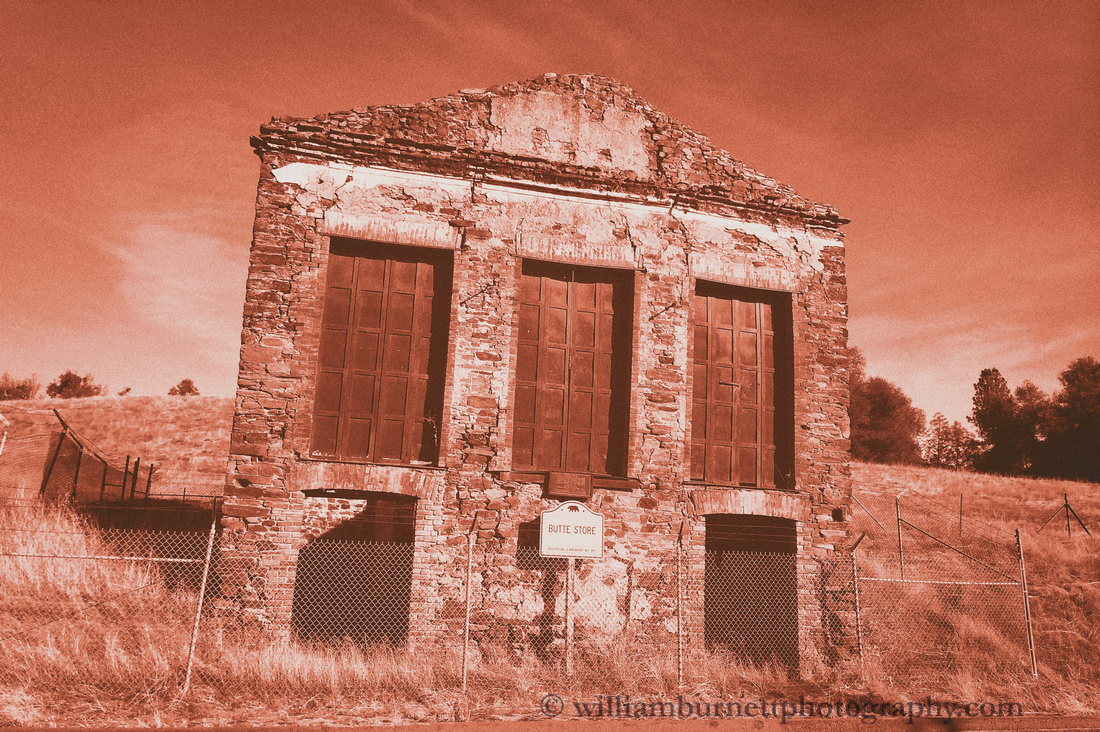
The resulting prints of the Burnett Printing Process very closely resemble the results that are obtained in cyanotype (blue print) printing process. The principle visible difference between the two processes is that the Burnett Printing Process would yield red/orange or brown tinted prints.
How to digitally duplicate the look of the Burnett Printing Process (no radioactivity needed).
Step One: Take a photo.
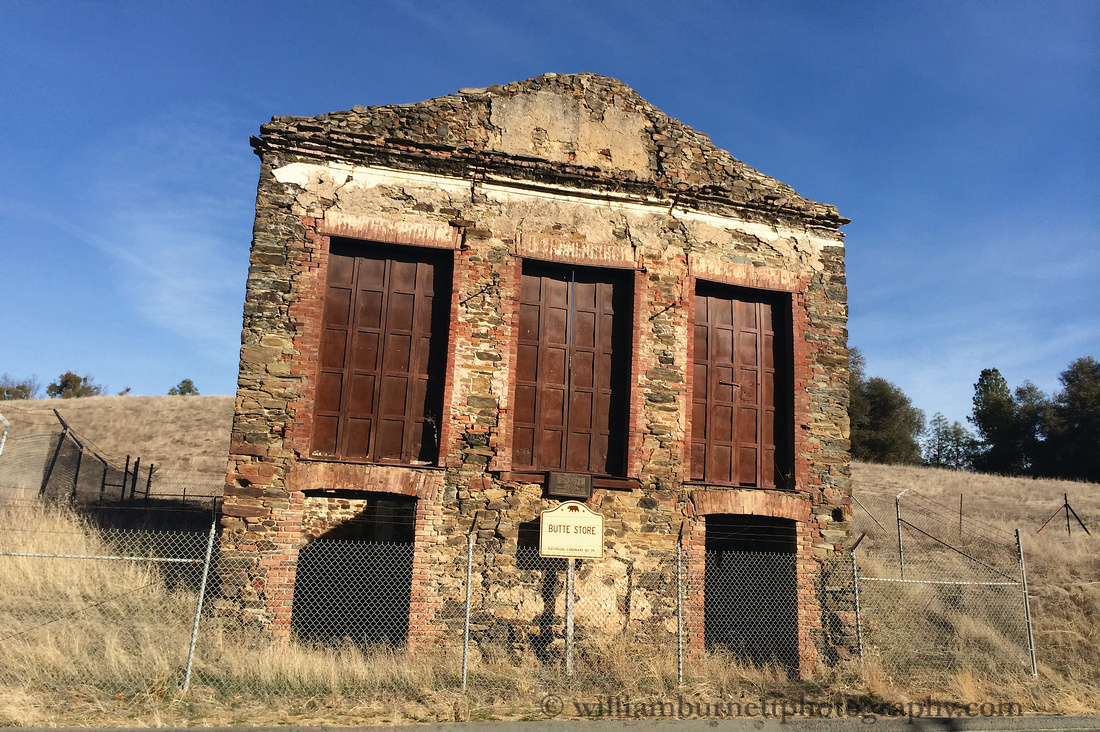
When selecting a photo for use with the Burnett Printing Process keep in mind that you are attempting to replicate the look of an 1857 printing technique. The cameras of the period had slow shutter speeds compared to modern cameras. This means you need to pick relatively stable subjects and that your subjects need to be will lit. Once you take your photo, transfer it to your favorite editing software and make a copy of the image. You should always work from copies.
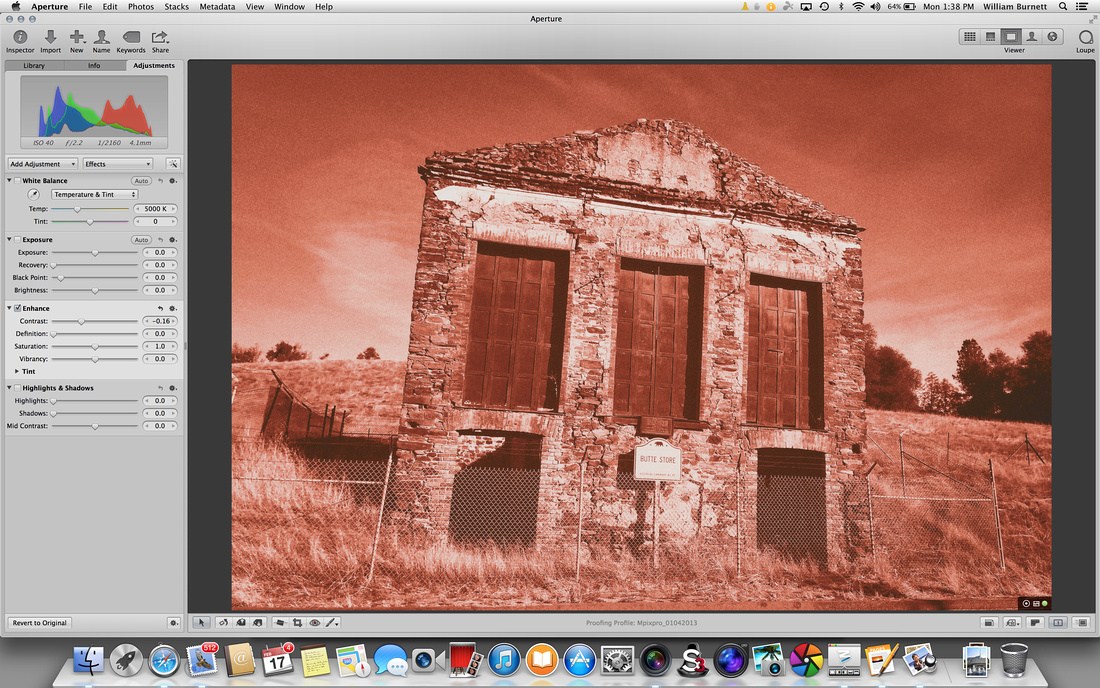
Step Two: Convert your image to black and white.
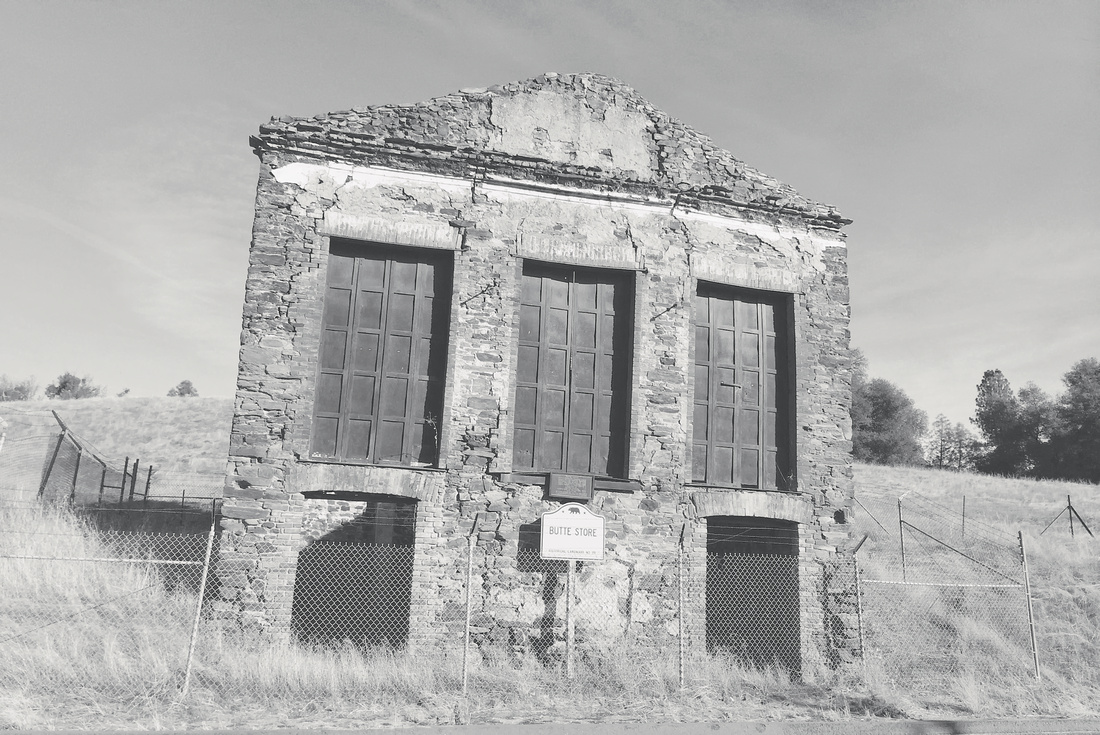
I tend to adjust the brightness and reduce the contrast of the image when converting the image to black and white. Most cameras in the middle part of the 19th century produced lower contrast images than the cameras of our day and age.
Step Three: Apply a color overlay.

I use Aperture to apply a Color Monochrome layer over the entire image. This can also be accomplished in Photoshop by adding a semi-transparent fill layer and selecting the appropriate fill color and then adjusting brightness and contrast levels to your likening. I searched Google for Uranotype and then kept the browser open next to my editing window. I then matched the color of my color overlay to approximate the brownish/orange tint of the Burnett Printing Process. This process is a subjective one as the process would yield various results depending on chemical concentrations and developing inconsistencies.
Decide to stop here or continue to make changes. At this point you can print or share your image or you can continue on to step four to add even a bit more realism to your simulation of the Burnett Printing Process.
Step Four: Add film grain and adjust contrast.
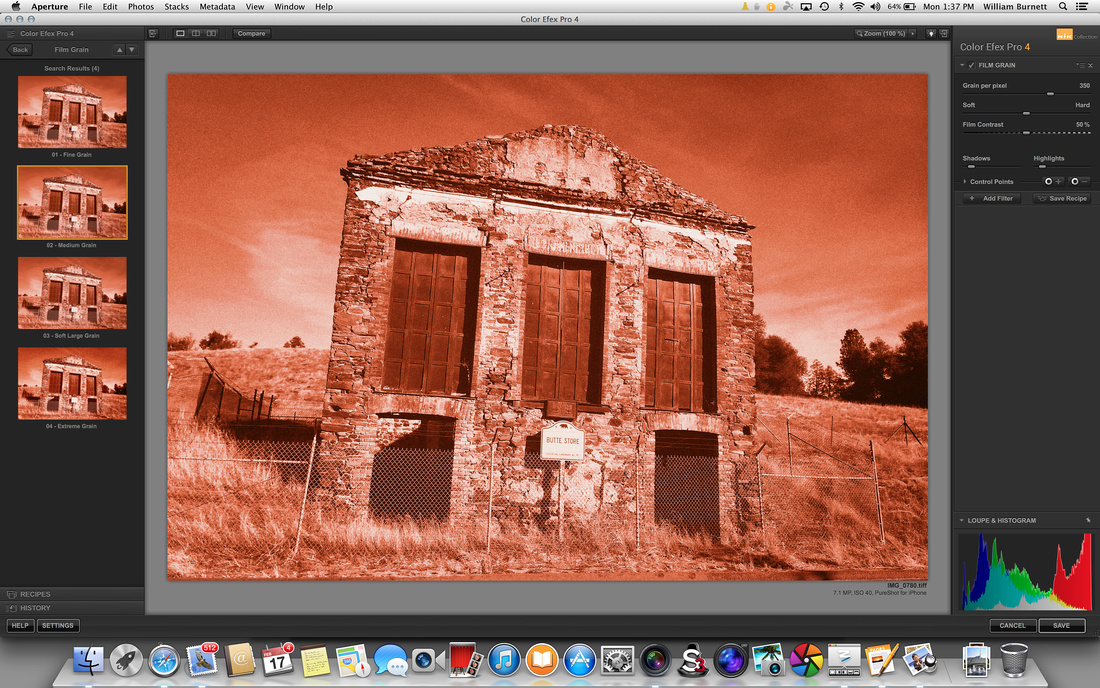
I use Google/NIK Color Efex Pro to add a medium-course film grain. Film grain can be added in Photoshop as well or using almost any other post processing program. I decided to forgo adjusting contrast in Color Efex Pro and decided to make my final brightness and contrast adjustments in Aperture.
Step Six: Share you final image on your blog, Google+, Twitter, Facebook, e-mail, or print the image.
-- Enjoy
Suggested Additional Reading:
http://www.orau.org/ptp/collection/miscellaneous/ableuranotype.htm
Found Art (What is in your pockets?)
I am a huge fan of found art. By 'found art,' I mean the organic placement of things and/or people into an arrangement that is interesting, pleasing to the eye, thought provoking, or novel. I think that this is a primary reason to always have a camera with me. I want to be able to record the 'found art' when I see it. I want to be able to preserve the way I saw the world at that moment and then show it to others.

This photo is entitled What is in your pockets? While visiting a local museum I was searching for a coat check ticket and I could not readily find it, so I ended up taking everything out of my pockets and depositing them on a bench. I looked down and I saw art. I am sure most people would have just seen junk, but I saw art and I captured it with my iPhone.
I encourage photographers to always be on the lookout for art. Look for organic patterns that can be captured and shared through the medium of photography.
-- Enjoy
Ansel Adams
A big part of being an artist is taking the time to study the masters. Certainly Ansel Adams was a master of photography. He set a standard that has never been surpassed. This look at Adams debuted in 1958 and is still an interesting view into the man and the artist that was Ansel Adams.
- Enjoy!
Film Noir
What is Film Noir?
In my opinion Film Noir is the work of Orson Wells. He established the style and techniques that dominated the genre in his classic film Citizen Kane. Although most Film Noir movies never reached the artistic vision of Wells' work, they all harken back to his genius and ability to use extremes in contrast, angles, lens selection and story line to involve the audience in film in such a way that had never been accomplished before the birth of this cinematic art form.
Wikipedia defines Film Noir as "a cinematic term used primarily to describe stylish Hollywood crime dramas, particularly those that emphasize cynical attitudes and sexual motivations. Hollywood's classical film noir period is generally regarded as extending from the early 1940s to the late 1950s. Film noir of this era is associated with a low-key black-and-white visual style that has roots in German Expressionist cinematography. Many of the prototypical stories and much of the attitude of classic noir derive from the hardboiled school of crime fiction that emerged in the United States during the Great Depression."
"The term film noir, French for "black film", first applied to Hollywood films by French critic Nino Frank in 1946, was unrecognized by most American film industry professionals of that era. Cinema historians and critics defined the category retrospectively. Before the notion was widely adopted in the 1970s, many of the classic films noirs were referred to as melodramas. Whether film noir qualifies as a distinct genre is a matter of ongoing debate among scholars."
Film Noir and the Still Image Photograph
Film Noir is first and foremost a cinematic term, not a photographic term. But there are photographic elements that are common to Film Noir cinematography. The mixing and matching of these elements can convey the feeling of Film Noir in a static print.
Film Noir is about extremes. The following are common components of a Film Noir photograph.
- Shadows.
- Low angle of shooting.
- Back lighting.
- Film grain from high ISO settings.
- Close up with either a narrow depth of field for a single intense point of focus or a deep focus to keep both the foreground and background in sharp focus.
- Black and White. Film Noir does not exclusively have to be black and white, although the majority of the genre was shot in black and white. When color is used, dark themes and high contrast still dominate this style of photography.
- Chiaroscuro: low Key or high contrast between dark and light that is often achieved by a single bright light source.
- Dutch Angles: cantering (tilting using the tripod) the camera so as to introduce tension or uncertainty in a photograph.
- Night-for-Night shooting as opposed to Day-for-Night shooting: shooting in actual darkness using high ASA film or high ISO film settings in place of shooting in the daytime with filters to simulate darkness.
- Forelengthening: distortion near the edges of a frame caused by a wide angle lens (a fish eye lens would be an extreme example of this).
- Story: even a still life in Film Noir needs to imply a story or mystery.
- Film Noir Style Establishing Shots: wide-angle and or close up shots that give an introduction or overview of the story that is about to unfold. Often these shots would be of a crime scene or a city and are often shot at night in near darkness or during crepuscular periods (at dawn or dusk). These shots may be a close-up image of an object or action that immediately implies mystery and sets a scene. My favorite example of a close-up Establishing Shot is that of the snow globe in a hand in the film Citizen Cane.
Planning a Film Noir Photograph
When planning a Film Noir photograph, I start to look for natural instances of contrasting light and shadows. I look for something that has some backstory to it that the viewer may be able to infer or imagine.
Making the Image
Angle
After selecting a subject, I then start looking for shooting angles. I keep in mind the common angle used in Film Noir. I see if a wide angle shot, a dutch angle shot, or an up angle shot will help the viewer infer or create a backstory or mystery.
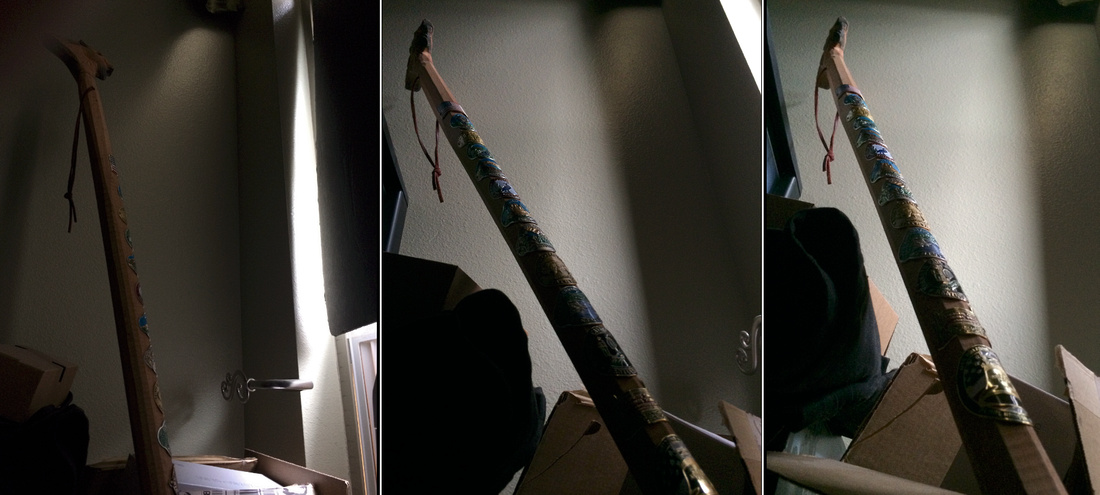
In these three photos I am looking for angles to best tell a story about this walking stick.
Exposure and Focus
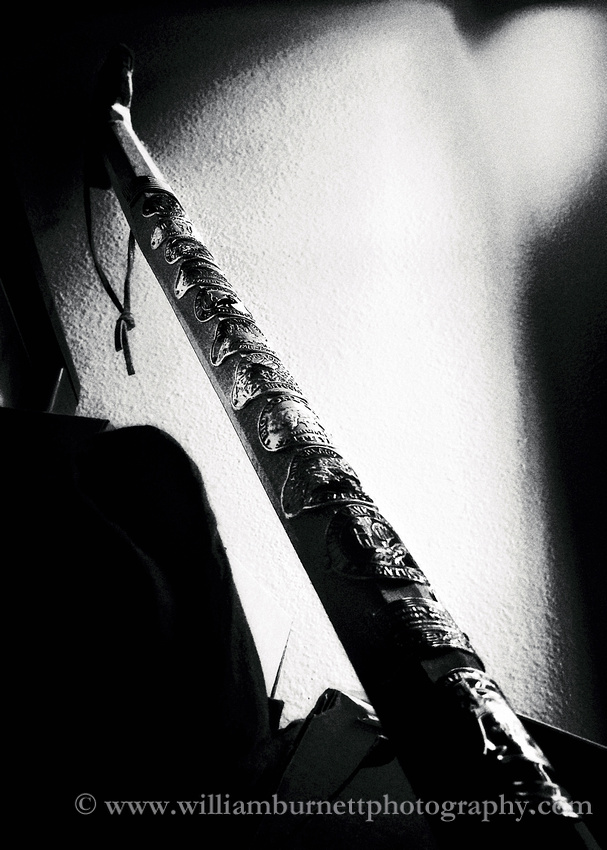
Exposure and focus decisions are critical. You can choose to keep everything in focus or in this case to narrow the depth of field as I have done in this photo. I have blurred the extreme foreground slightly because this is a walking stick and I wanted to imply movement. My exposure decision was a simple decision to keep most of the image in shadow and not blow out the highlights. In Film Noir, it is fine to occasionally bury the histogram to the left since part of the genre involves always asking the question "what is in the shadows?"
Since I am shooting this photograph with a cell phone camera, I would have had to change my angle to control for sharp depth of field. If you are using a camera with manual aperture control, you would only need to reduce the size of the aperture to bring the entire frame into acceptable focus. This image has an aperture opening of f2.2. If I moved that aperture opening to f8 or f11, the entire image would have come into acceptable focus.
Post Processing
My post processing work flow for this image is as follows.
- I imported the image into my editing software and made a copy of the image. Remember to always work from copies.
- I then reduced sensor noise. If you work with a RAW image, you can correct for sensor noise using either the noise reduction in your editing software or a noise reduction plugin like DxO Optics Pro or Nik Define.
- I applied a small bit of sharpening, globally, to the RAW image. This can be done using a sharpening tool in your editing package or by using a plugin like Nik Sharpener Pro (Pre-sharpener).
- I performed a Levels adjustment to make the darks a little darker and the lights a little lighter. I understand that many of you will not know how to work with levels or curves. I will cover these topics in later tutorials, but I encourage you to open up a photo in your favorite editing software and then play with the levels tool or the curves tool to see what changes happen to your photograph. In photography there is no one-size-fits-all formula for doing things. In fact there are a million ways to do everything. It is important for you to learn what the tools do and then you will be able to use them when you have an idea in your head that you want to transfer to a print. There is really just no substitute for experimentation. I can tell you the technical aspect of how a tool works, but you have to really get a feel of the tool yourself before you can instinctively reach for it and manipulate your image with the tool.
- I cropped and adjusted the photo. I already had a pretty good Dutch Angle but I eddied it even more using the Horizon Straighten tool in my post-processing software.
- I wanted this image to have a bit of a glow. This an be accomplished a number of ways: it can be done with a plugin or in Photoshop using one of the numerous blur filters. The important thing to remember is that it has to be a slight blur/glow. A harsh blur or glow would soften the focus of the image too much.
- I then applied selective sharpening to my image. Selective sharpening allows me to sharpen the areas of the image where I want to direct people's attention. You should usually leave selective sharpening as the last step in the workflow, but in this case you will want to sharpen the image prior to black and white conversion if you plan to add photographic grain (I discuss this in step 8). If you wait to do selective sharpening until after you have added photographic grain, you will end up sharpening the film grain rather than the subject of your image. So it is best to finish any sharpening before moving on.
- I then converted the image to Black and White. I used Silver Efex Pro 2 for my B/W conversion. The two things to keep in mind in converting to black and white are that you want to preserve contrast and that Film Noir photography was shot using high ASA (ISO) film. This means that the finished movie or print had lots of grain. Grain is simply the size of the pieces of metal that composed the reactive layer on the film stock. The larger the piece of metal particle, the more surface area it has, and the more light it could gather in a short period of time. Larger film grains equaled fewer film grains on a piece of film as well as lower resolution images. Since digital cameras have a fixed pixel size, it is necessary to add grain to an image to simulate the appearance of film stock. Programs like Silver Efex Pro allow users to select film models that accurately represent popular film types. If you do not have a plugin that allows for specific film emulation, your post-processing software most likely offers a generic film grain tool. Film Noir often uses film stock that employs a medium sized film grain applied at a medium density. If you are using Silver Efex Pro that translates into about 100 grains per pixel and a medium hardness to the grain edges. After conversion, I adjusted the contrast and brightness and saved my work.
-
I then shared my work. You can share your work on Google+, Facebook, a website or make a print of the image.
Before and After
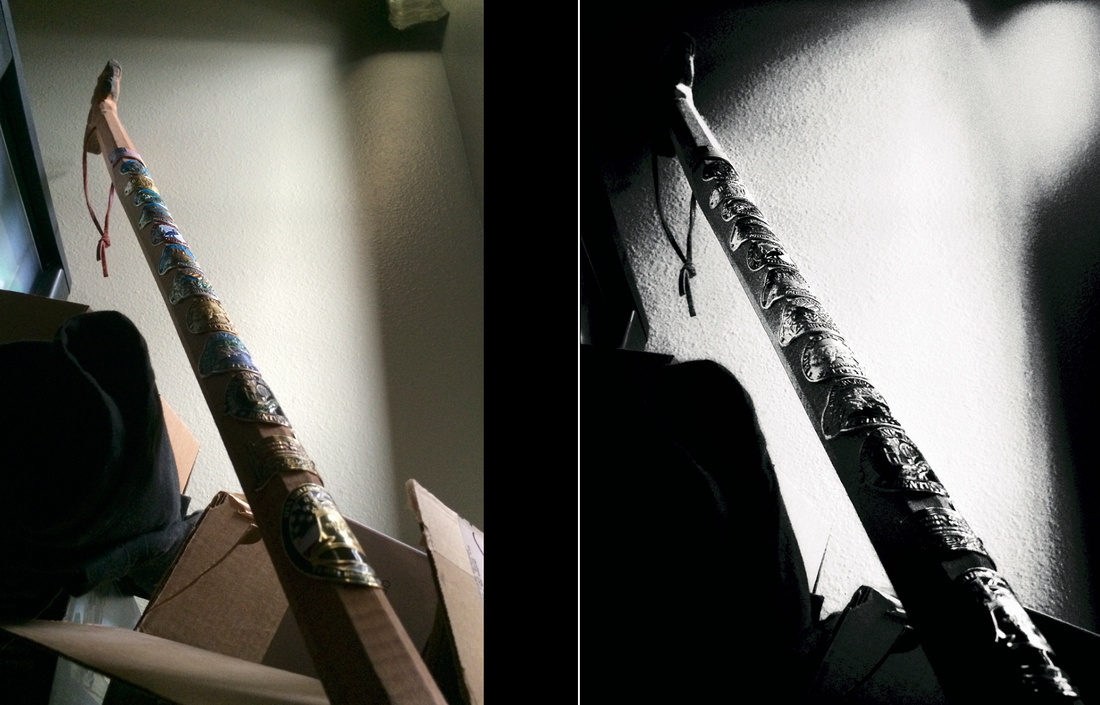
The image on the left is the original photograph and the image on the right is the finished Film Noir B/W version of the photograph.
Conclusion
Since Film Noir is essential a cinematic genre, it is often difficult to translate into a single frame of a still image. But if you keep in mind that Film Noir is about mystery, and about setting a tone for the viewer to try and decipher the mystery, you will be off to a good start. Remember to use the basic elements of the Film Noir genre, do not be afraid to exaggerate contrast, and you will be well on you way to creating a Film Noir masterpiece of your own. If you need any inspiration, I recommend watching a Orson Wells movie, 1950's crime movie on late night TV or pull out a Mickey Spillane novel and look for inspiration. Remember there are eight million stories in the naked city (http://en.wikipedia.org/wiki/The_Naked_City).
Suggested Further Reading:
- http://filmnoirstudies.com/glossary/index.asp
- http://books.google.com/books?id=R38hAAAAMAAJ&pg=PA263&lpg=PA263&dq=Forelengthening&source=bl&ots=pRkUK9lBlr&sig=lEpwMDhdRNNIvwF69OALo447Rjg&hl=en&sa=X&ei=TLr_Uq7lD4KCyAGs74G4CQ&ved=0CD8Q6AEwBDgK#v=onepage&q=Forelengthening&f=false
- http://en.wikipedia.org/wiki/Film_noir
- http://www.filmsite.org/filmnoir.html
- http://www.filmnoirfoundation.org/home.html
- http://www.rogerebert.com/rogers-journal/a-guide-to-film-noir-genre
- http://www.rogerebert.com/rogers-journal/evolving-versions-of-film-noir-explore-todays-uneasy-feelings
- http://www.popmatters.com/feature/175397-orson-welles-and-film-noir-style-in-the-1940s/
Valentine Roses with an iPhone and Filter Plugins.
A lot of people will be getting and giving flowers today. This makes it the perfect opportunity to take a photo or two and to try out some new software along the way.
Here is what you need:
- Flowers
- A Background and a White Board to use as a Reflector
- Light Source
- iPhone or any phone capable of saving a TIFF file
- Camera App that lets you control White Balance, Exposure, and Focus (I use the Pure Shot App in this tutorial)
- Computer
- Photo Editing Program like Apple Aperture or Adobe Lightroom
- Google Nik Suite of plugins (Download a free trial at http://www.google.com/nikcollection/ )
- Confidence
Step One: Set up your scene.
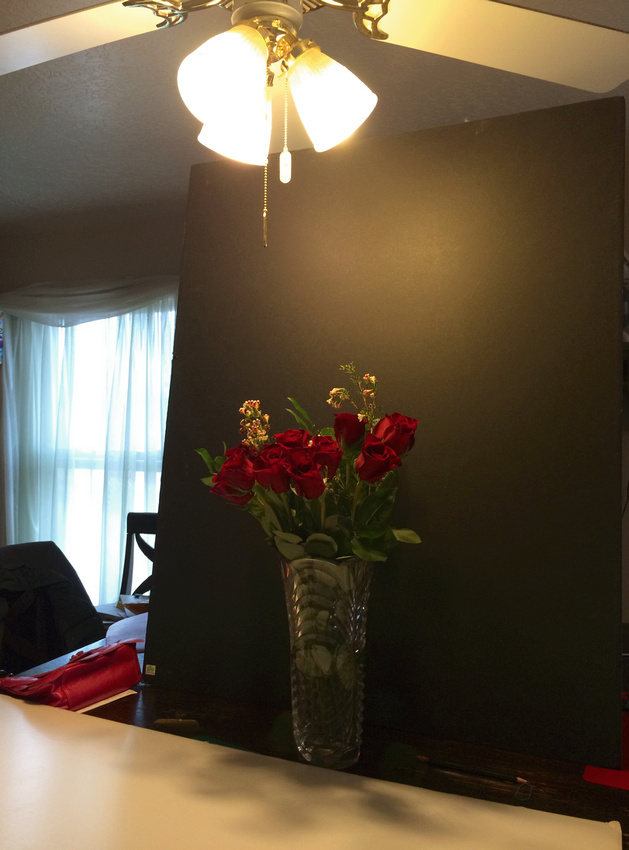
I have set the roses in front of a black background and lit them from the top using the kitchen lamp. I then placed the white board below them to reflect a bit of light back up to the under-side of the rose petals.
Step Two: Set your white balance.
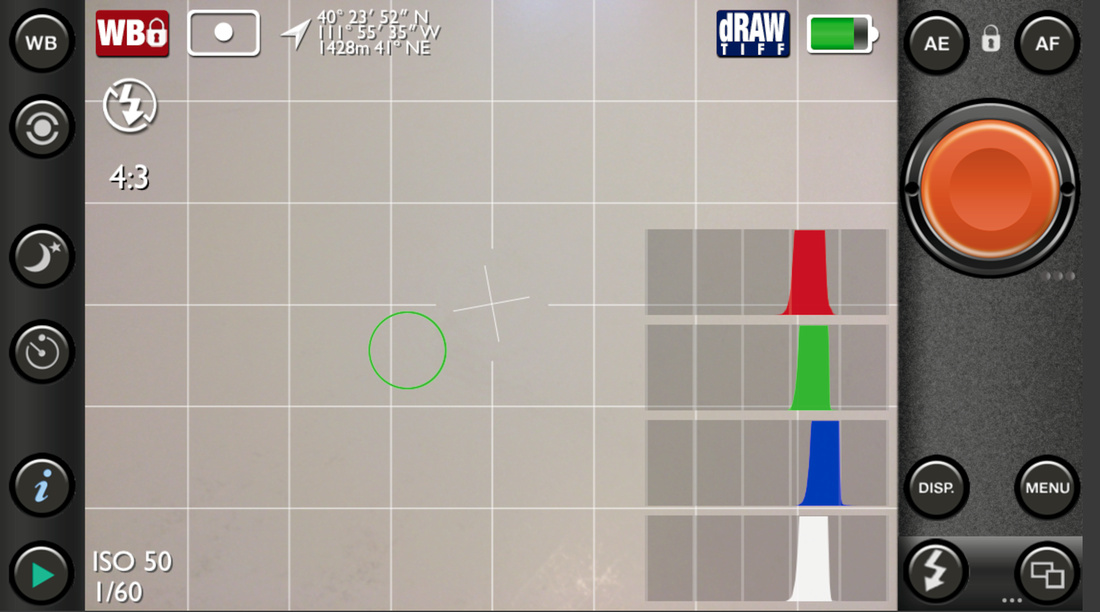
Using the Pure Shot App on my iPhone, I point my phone at the white reflector on the table and lock the White Balance (WB) in the App. Setting the White balance lets me be assured that my colors will turn out correctly.
Step Three: Set and lock Exposure and Focus.
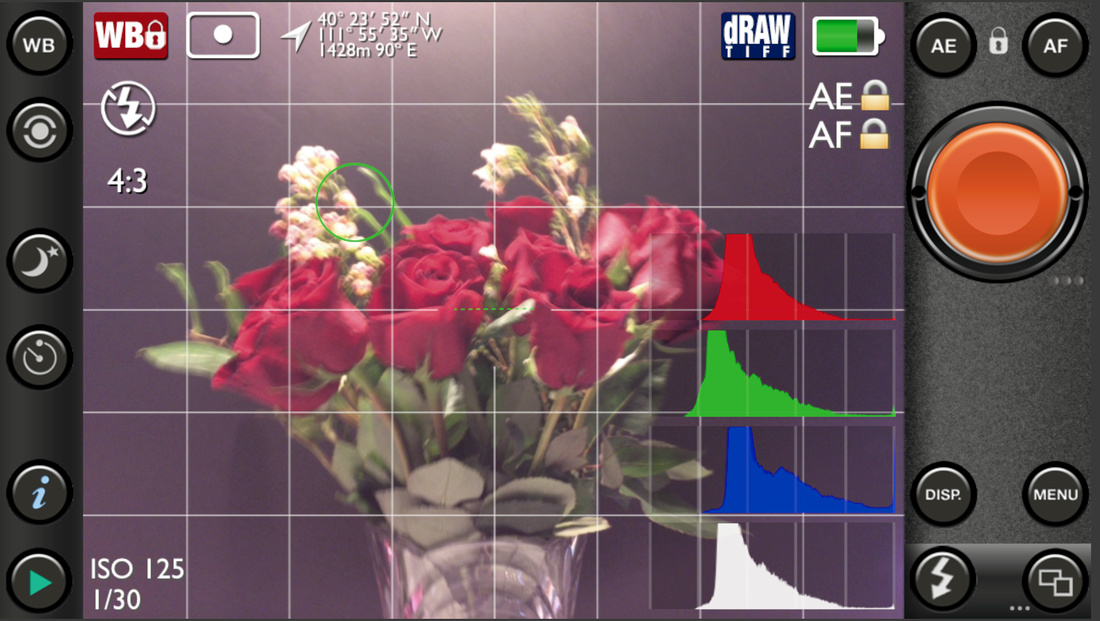
Focus on the flowers by moving the touching the screen where you want the focus, then hit the Focus Lock (AF) button. Repeat this for the exposure (AE). Try and keep your color histograms near the middle of the graph. You don't want the histograms to be smashed against the right or the left of the graph.
Step Four: Take the photo and transfer the digital file.
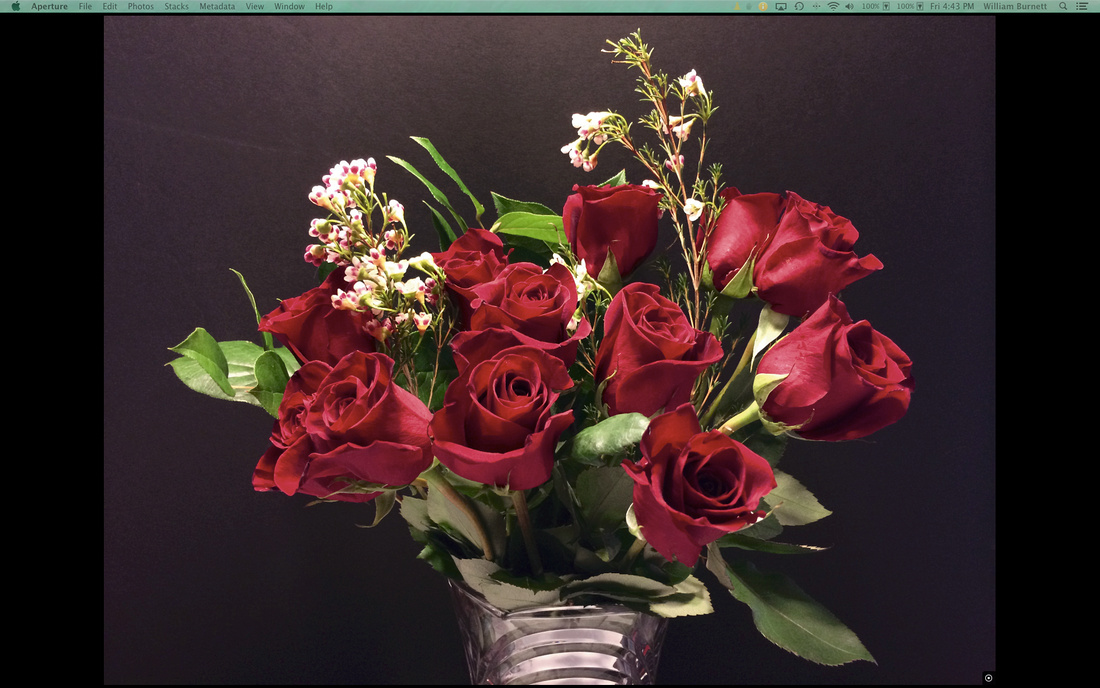
Save the file to your editing program on your computer and make a copy of the image. We always work with copies and never the originals.
Step Five: Run Noise Reduction and Pre-Sharpening tools in the Nik Suite of software.

Noise Reduction on RAW and TIFF RAW files is performed using the Define 2 plugin.
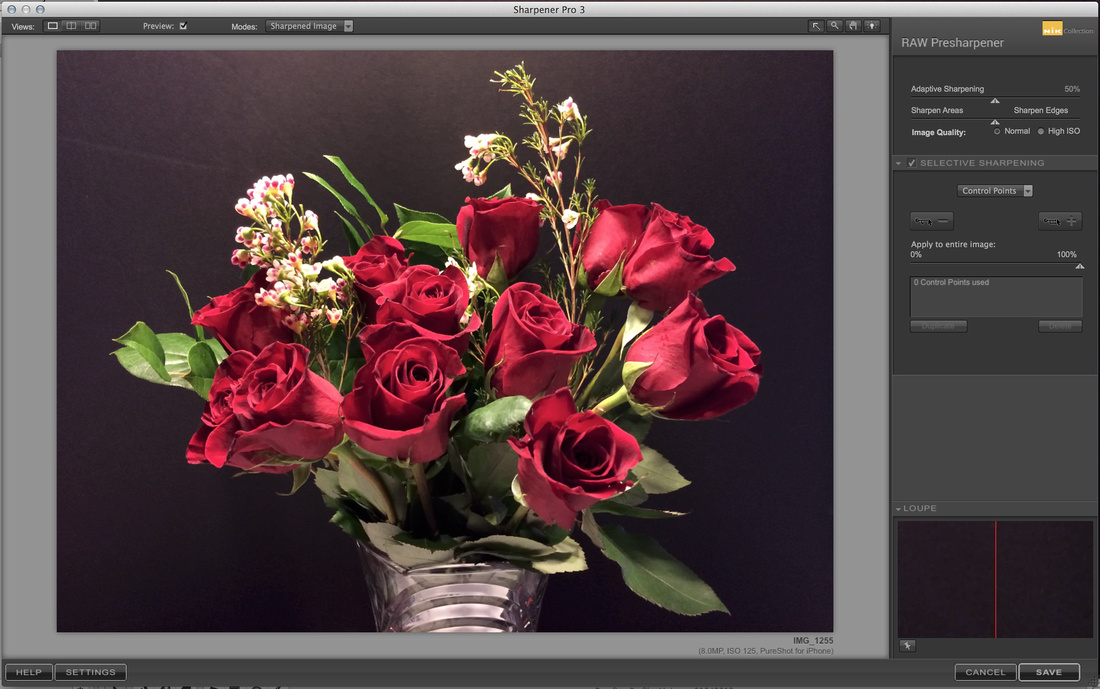
RAW and TIFF RAW images often need a bit of pre-sharpening to an image prior to manipulation.
Step Six: Adjust Levels.
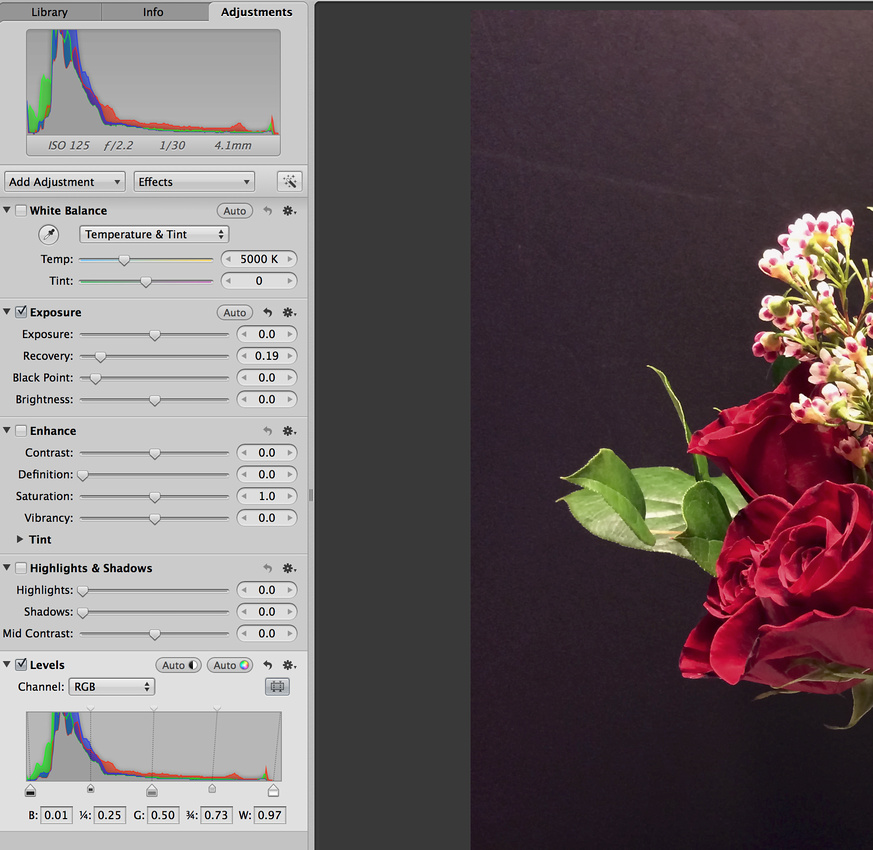
Adjusting levels, in its simplest form, is moving the sliders on the histogram to get rid of dark and light areas without information. There are many ways to use levels and also the curves functions to customize luminance and color, but these are outside the scope of this tutorial.
Step Seven: Burn out the background to darken it up.
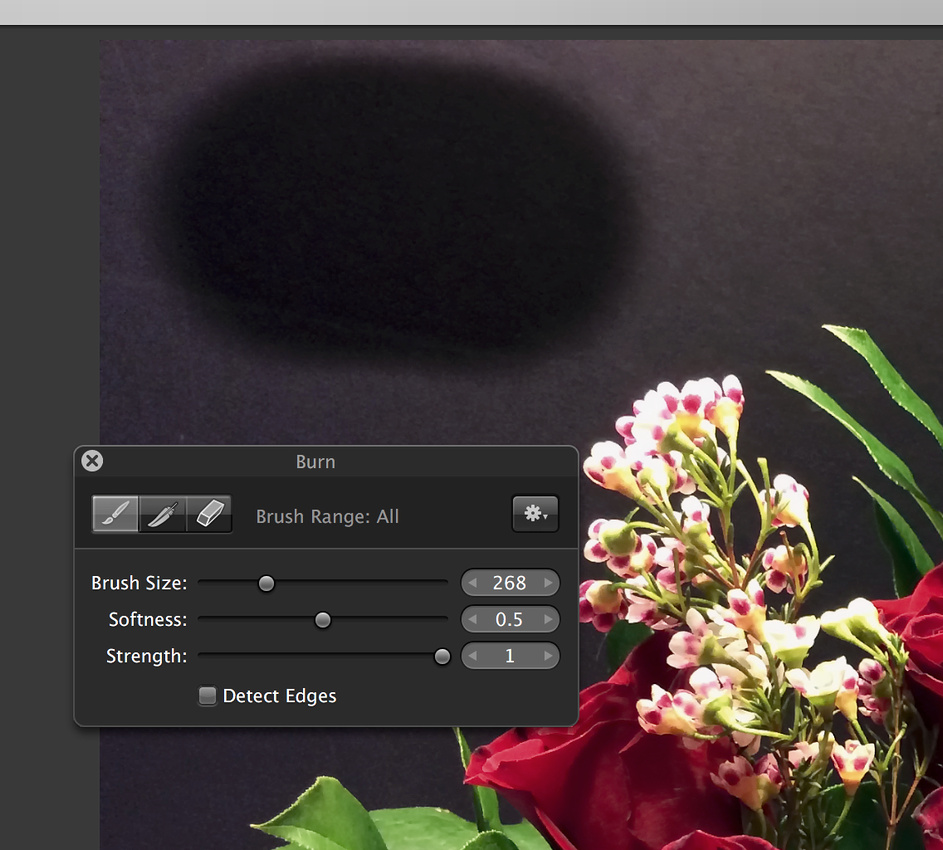
Burning is a method of making dark areas darker. It is a term that is left over from the Wet Darkroom days of photography. Of course you would not have to use the Burn Tool in Aperture to accomplish a darkening of the background. There are literally hundreds of ways to do this. You could mask out the background (Masking is a more advanced Photoshop technique), and you can adjust the black point of the image using the curves adjustment in your editing software. Since I am going for simple here, I will just use the burn tool.
Step Eight: Open the image in the Nik Color Efex Pro 4 plugin and experiment with the different filter options.
Do not be afraid to try everything. Remember you are working with a copy of your image and that means even if you mess it up, you always have the original sitting on your hard drive. Here are the filters I used on this image.
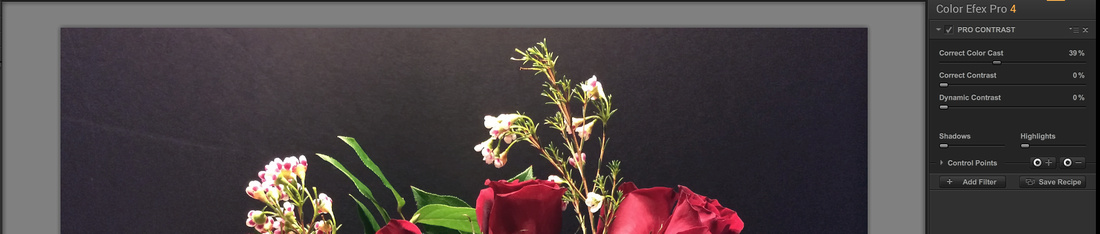
I used the Pro Contrast to adjust the color cast of the image a bit.
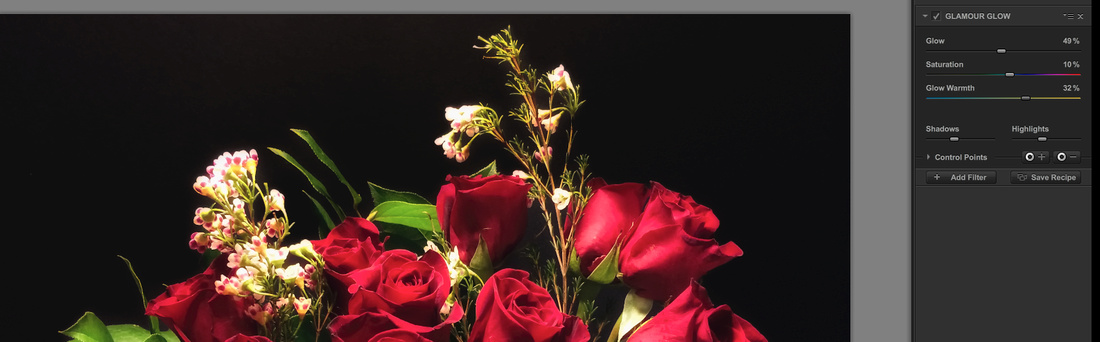
I thought the roses might look good with a little glow so I used the Glamour Glow effect.
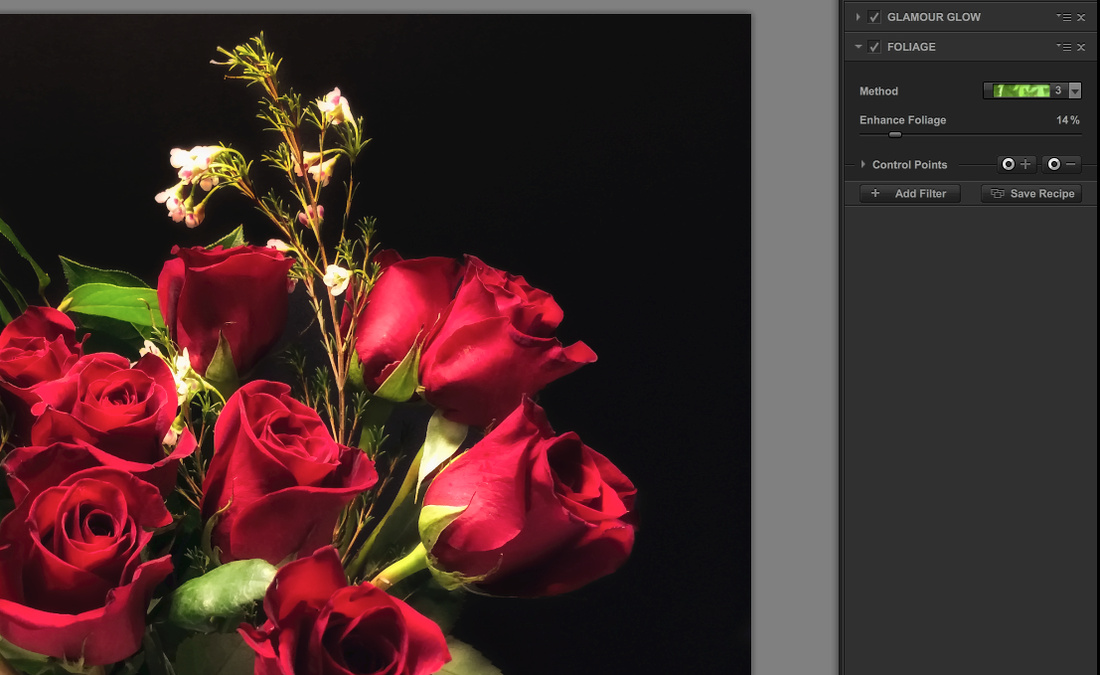
I thought that the greens could be a little greener. The Enhance Foliage tool can really help with that.
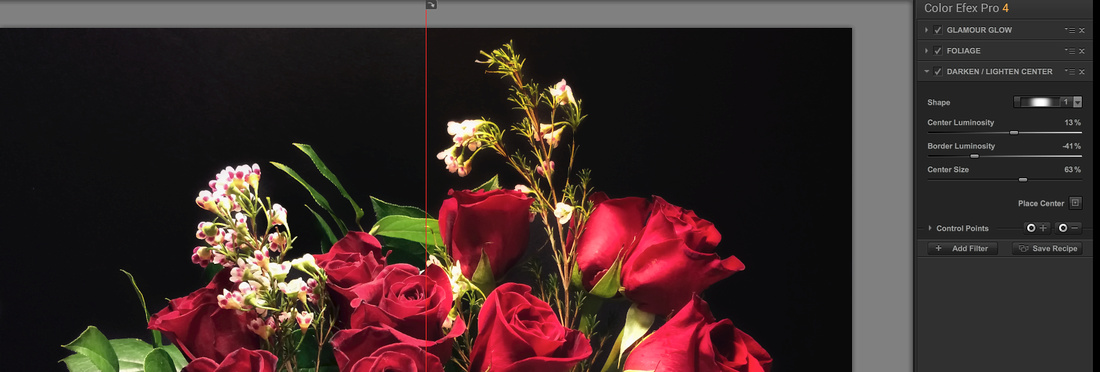
I decided to use the Darken/Lighten Center tool to direct the viewer's eye to the blooms of the roses. A neat thing about this tool is that you can place the center of brightness anywhere you want on the image and adjust the size of the area that will be brightened or darkened.
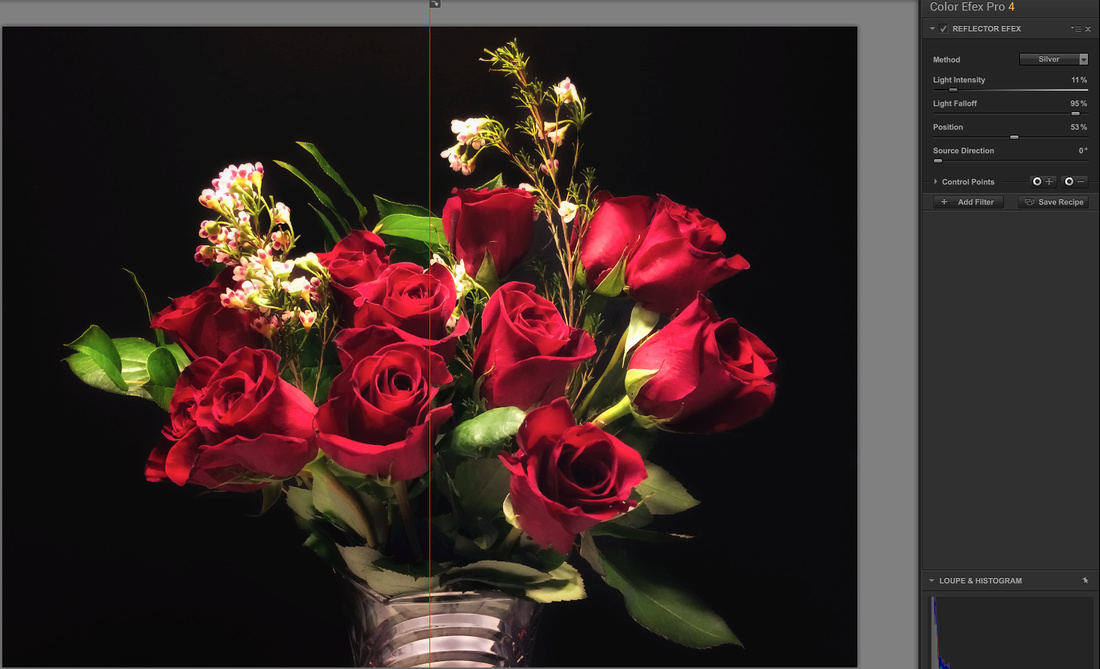
The last thing I did in Nik was to apply a little bit more reflection of light to the underside of the flowers. The Reflector Efex tool lets you choose the color of the reflected light, the strength of the light, how fast the light falls off or gets dimmer, and the direction of the light.
Step Nine: Apply final sharpening of selected areas of the image.
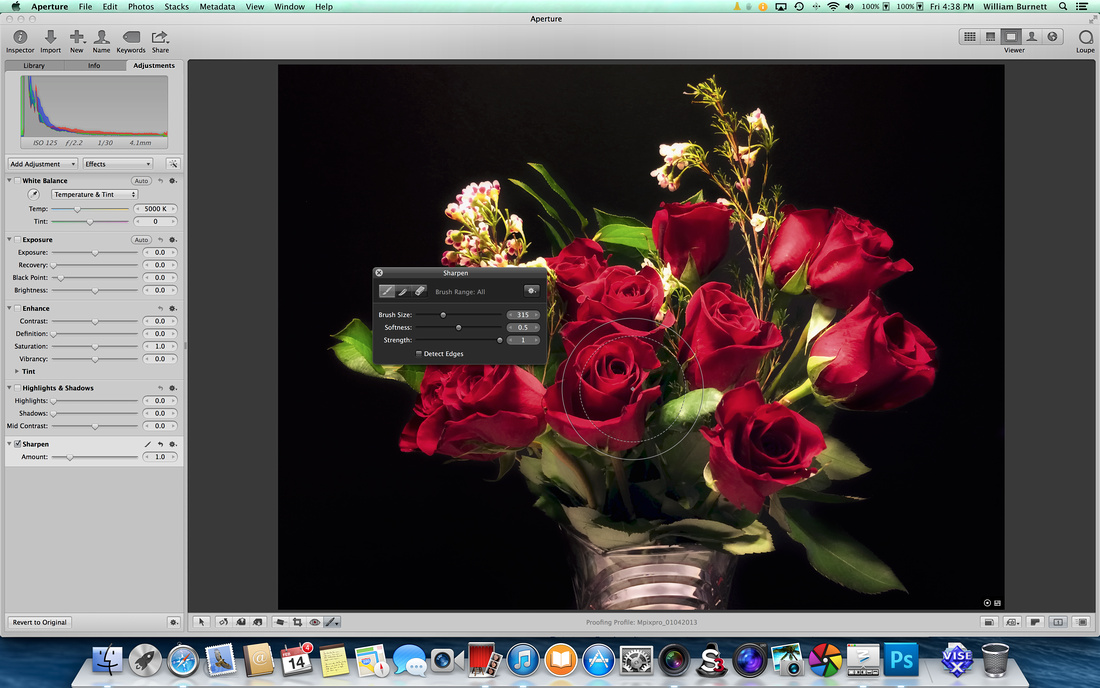
Back in Aperture, I used the Sharpening tool to sharpen a few select rose petals and leaves that I wanted the viewer to really notice. Our eyes are drawn to areas of sharp focus, and this technique lets you essentially tell the viewer what you think is important in an image.
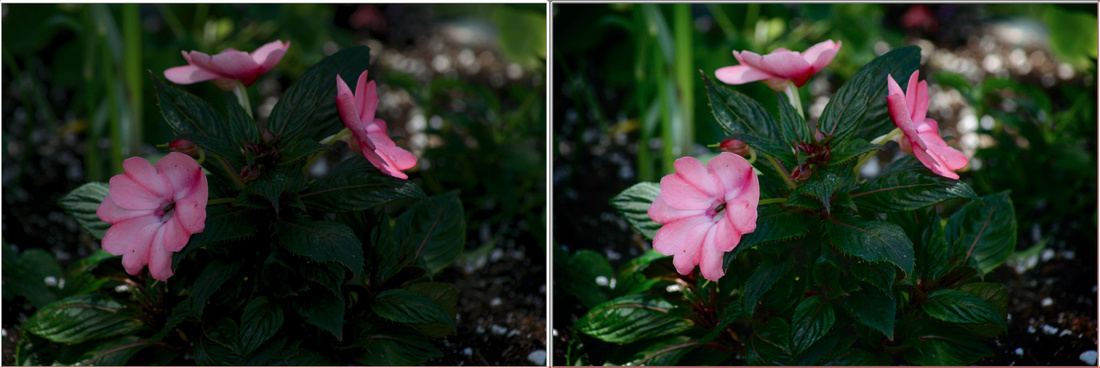
Step Ten: Compare the before and after, and then export your image to Google+, Facebook, Twitter, a blog, or print the final image.
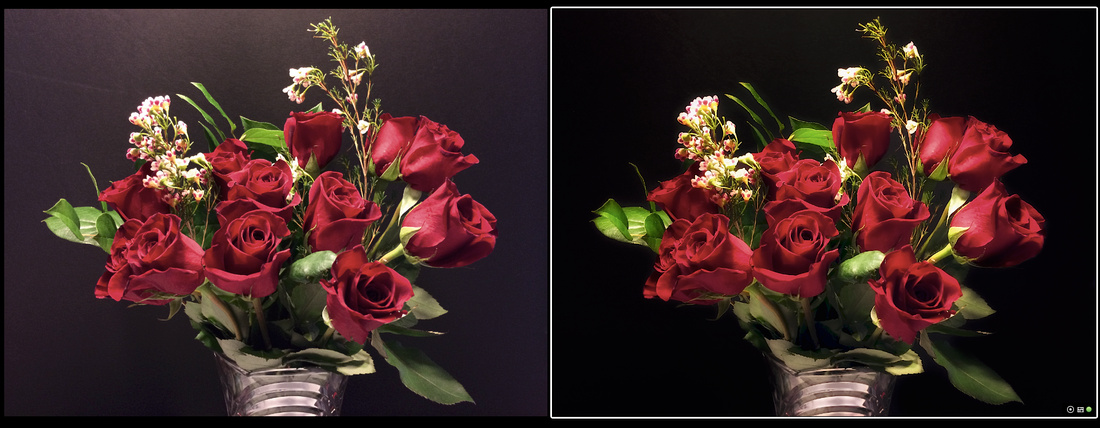
The in-camera image is on the left and the final image is on the right.
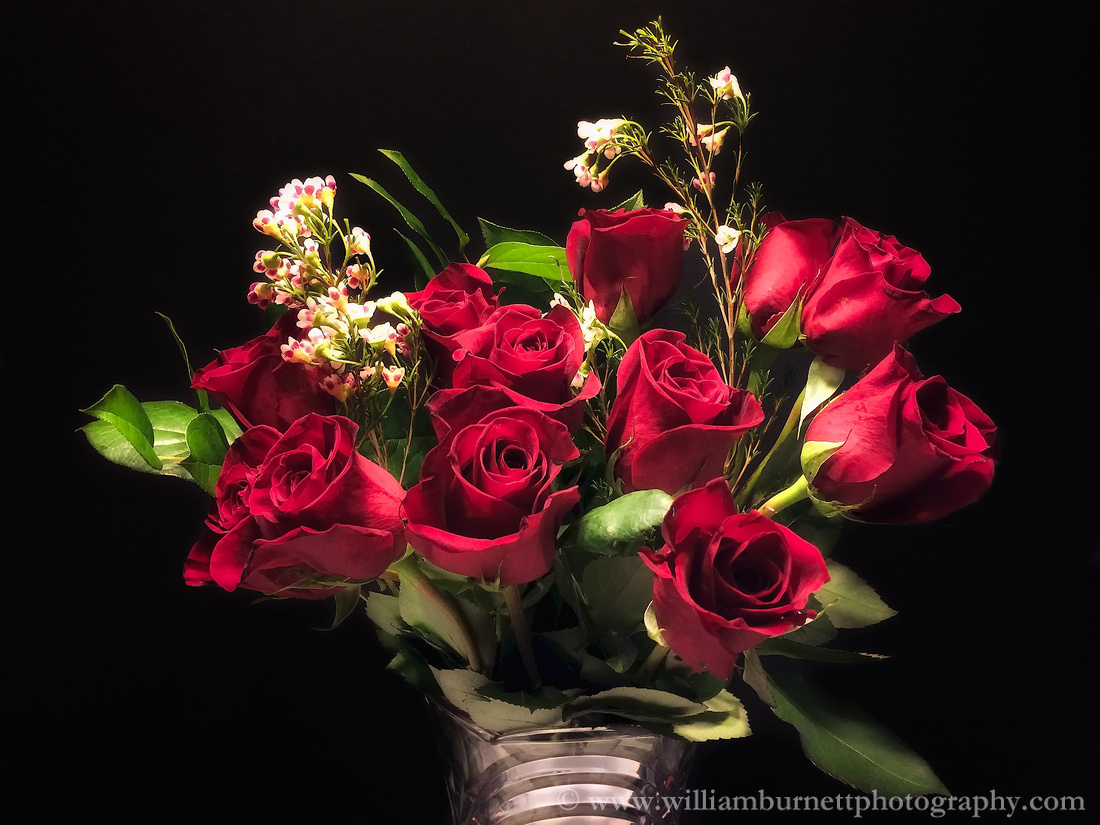
The final image.
During this tutorial I was careful to only apply global effects to the images while using the Nik plugins. 'Global application' means that changes are applied to the entire image. I did this to demonstrate how easy it is to start using filters on images. However, as you advance in photo editing, your application of global adjustments will slow and perhaps stop. I rarely use most plugins globally. Nik plugins and many other plugin packages allow for great precision in their application. I also want to emphasize that plugins are not a substitute for learning how to post-process an image. I encourage you to use plugins, if they fit your budget and needs, but I also encourage you to learn how to do these same effects in a software package like Photoshop, Corel, Gimp, or Pixlemator. I know how to do these effects in those programs, but many of the effects are time consuming to do manually. Learning how these effects are accomplished is important for the time that you no longer are content with global application of filters or effects. If you know how they work, you can apply them as an artist would apply paint to a canvas.
I hope that your Valentine's Day was a good one, and I hope that this tutorial helps you preserve some memories long after your roses are gone.
-- Enjoy
In the last article I discussed using a polarizing filter to reduce reflection when shooting through glass on a visit to a museum. However, there are times when you don’t have a polarizing filter or you may be shooting with a point and shoot camera or a cell phone. The good news is that even with these limiting factors you can still get a great photo.
The problem: A quick review of the problem of shooting in a location like a Museum or Aquarium.
- Most Museums or Aquariums do not allow flash photography, and even if they did the flash would reflect off of glass front displays.
- Most Museums or Aquariums will not allow the use of a tripod or mono-pod. In most cases they want to prevent scarring of the floor and they want to provide a safe and unobstructed walking area for guests.
- When shooting through glass, often ambient light sources are reflected in the glass.

Notice the reflected ambient light in the photo above. Even with a polarizing filter I might not be able to eliminate all of the reflections in this shooting situation. So, a different approach should be taken.
The Solution: Get up close and personal.
When you find yourself unable to eliminate the reflection, either because the reflection is too large or because you don’t have a polarizing filter it is time to get up as close to the glass as you can. Sure, it will change the type of photograph that you would like to take but in most instances it will improve the quality of your images so much that you will wonder why you wanted the other images in the first place.

This photo is of a model of a prehistoric fish. I shot this through glass with a camera phone.
Steps to getting up close:
- Survey the lay of the land. That is: really take the chance to look around and find something interesting about the display. Instead of photographing an entire painting, just shoot a detail. Instead of taking a picture of an entire aquarium, find one fish or groups of fish to photograph.
- Look for objects that are sitting still or moving slowly. Museums and aquariums are notoriously poorly lit and as such it can make photography extra difficult but not impossible. Photographing a stationary object or animal gives you more time to have the shutter open and therefore allow more light to hit the sensor.
- Make sure the flash is turned off.

As can be seen in this cell phone photo, leaving the flash on will result in a large bright spot in the image.
- Turn up the ISO setting. Even most point and shoot cameras allow for the adjustment of the camera’s ISO setting. This will cause the sensor to be more sensitive to the available light and therefore increase the amount of available light in the photograph. A word of caution on ISO adjustments: Increasing the ISO also increases the amount of noise in the photo. An ISO of 100 will produce a very clean photograph whereas an ISO of 1600 will produce a noisy or grainy photograph. If you must shoot with a very high ISO setting, consider shooting in Black and White. Grain in B/W photography is considered “Artsy” whereas grain in color photography can sometimes just ruin a shot.

While not shot through glass, this image was shot in very low light and I used an ISO of 12800. I chose to shoot this image in Black and White to prevent the noise from detracting from the final image.

Notice the magnified area of this image. This image was taken with a cell phone. The increased noise caused by the low light conditions can be clearly identified.

Here is the same image converted to Black and White. Notice that the digital noise is not as much of a distraction in the Black and White version.
- Hold your camera with both hands and keep your arms in close to your body. This will help you keep the camera still for longer exposures.
- If your camera or lens has vibration compensation be sure to turn it on.
- Shoot in Aperture priority mode if using a DSLR. Make sure you have an aperture setting that will get the portion of the object you are shooting in focus. This might be an f2 if you only want an animal’s eyes in focus or an f 4 - 8 if you want the entire scene in focus. Just remember the lower the number the longer the shutter speed is going to be.
- If you are using a point and shoot camera, check to see if you can set it for a low light or museum mode in leu of choosing a low aperture number.
- Get right up to the glass, without touching it.
- Use manual focus if available and if it is not, use the focus lock on your camera to select a focus point. To do this pick a focus point and then press your shutter button half way down. This will focus the image. When the spot you want to be in focus is in focus, gently press the shutter button the rest of the way down.
- Take lots of photos. However, be mindful of other guests and don’t hog up the displays.
If you follow these steps you will get some terrific shots. To prove it, here is a recent photo of a pike that I took while visiting the Cabela’s store near my home.

So, get out there and get to shooting, and most of all -- Enjoy.
Photographic Hot Links for February 13, 2014 -- Editing Tools and Tips
HDR in Google+ Photo Editor
The good folks at google are hard at work bringing photo editing to the masses. You might not be aware but last year Google acquired NIK software. NIK makes the award winning HDR software HDR Efex Pro ( http://www.google.com/nikcollection/products/hdr-efex-pro/ ) that is included in the Google NIK Collection. The great news for non-professionals is that Google is taking part of the power of HDR Efex Pro and bringing it to Google+ and the Chrome Browser.
Groovypost.com has all the details. Click through to find out how to use the new HDR effects for yourself.
http://www.groovypost.com/howto/hdr-google-plus-photo-editor/
----------
The Asia division of CNET has a Great Tutorial on Editing Self Portraits
This CNET tutorial on editing your self portraits is fantastic. The break the process down into five easy steps that include clearing up your skin, and slimming down your face. The whole tutorial takes about five minutes to read but it is still packed with useful real world skills that every portrait artist needs to know. If you are talking senior photos or just taking iPhone selfies this tutorial is for you.
http://asia.cnet.com/five-easy-steps-to-editing-self-portraits-62223606.htm
----------
TIME LightBox has a Great Article about Queen Victoria and Her Royal Obsession with Photography.
Queen Victoria might well be know as Queen of the selfie. This Time Lightbox article details the late Queens love of and influence on photography. Did you know she had her own Royal Darkroom and she once edited herself out of a family photo? In the days before Photoshop taking yourself out of a photo was no easy feat. Find out how she accomplished this edit and more in this great article.
http://lightbox.time.com/2014/02/04/magnificent-obsession-how-queen-victoria-influenced-photography/#end
My favorite photography finds for February 12, 2014
Andy Warhol -- Next to Ansel Adams I think that Andy Warhol has been one of the biggest influences in my artistic life. If you are in Rhode Island you should take the day and visit this new Warhol exhibit at The Rhode Island School of Design Museum.
http://www.browndailyherald.com/2014/02/11/warhol-photography-exhibit-captures-everyday-magic/
If you cannot make it to Rhode Island you can still get your Warhol fix at http://www.warhol.org/collection/art/
I have to admit that this photo was inspired by Warhol and his ability to find art in everyday life.
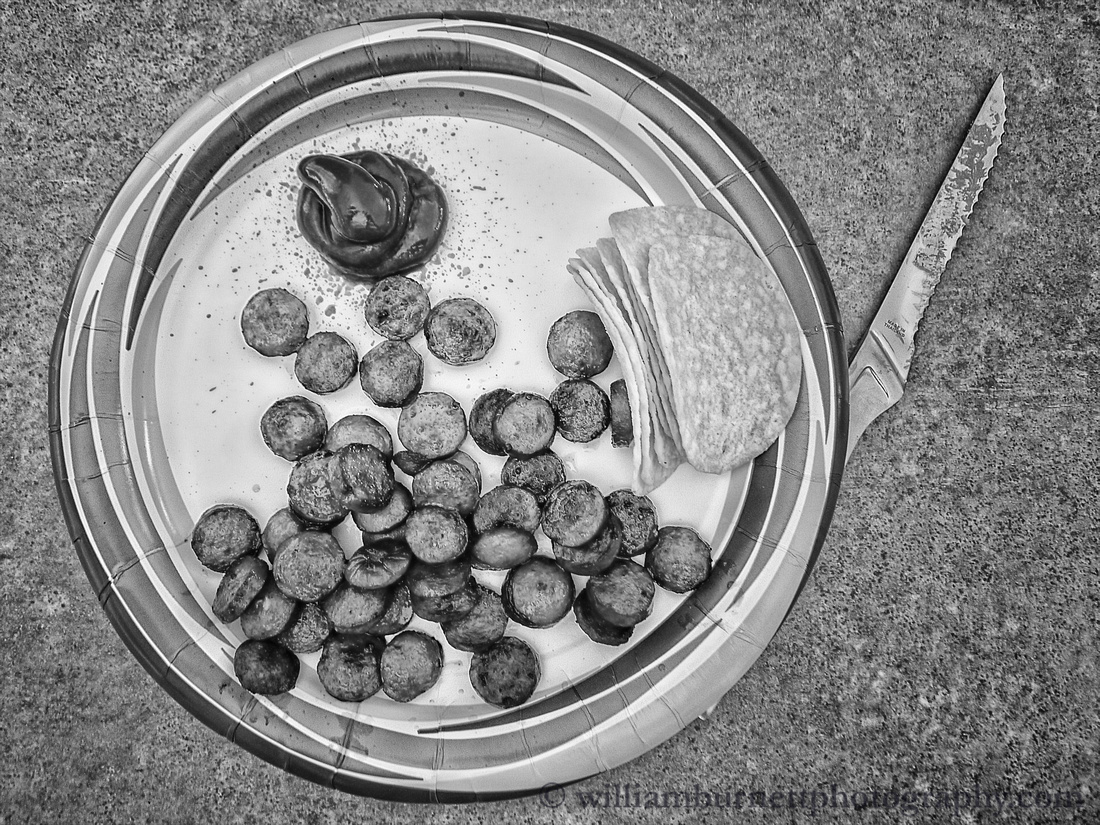 No Bun Needed -- 2012
----------------
Sigma -- The New Look of the Sigma dp2 might be the look of digital photography in the future?
Tech News World has a look at the new Sigma camera and the Sigma Foveon Sensor. I have to admit that if I were just starting in photography I would consider this camera. I like the concept of the layered sensor. I am a huge fan of film photography and this seems to be the nearest thing to film that I have seen in the digital world.
http://www.technewsworld.com/story/79948.html
----------------
Full Frame, Crop, or Point and Shoot vs Cell Phone Cameras, and why the cell phone should not replace your camera anytime soon.
Fox News gives five really good reasons to keep a "real camera" around. I am a huge fan of Cell Phone Photography and have a web site www.cellphonephoto365.com devoted to cell phone photography. However, my cell phone falls short in many situations and I have to keep my Point and Shoot or DSLR handy to fill in the gaps. In this web article Terry Sullivan details the five reasons for keeping your "real camera" in service.
http://www.foxnews.com/tech/2014/02/11/5-reasons-digital-cameras-leave-smart-phone-photography-in-dust/
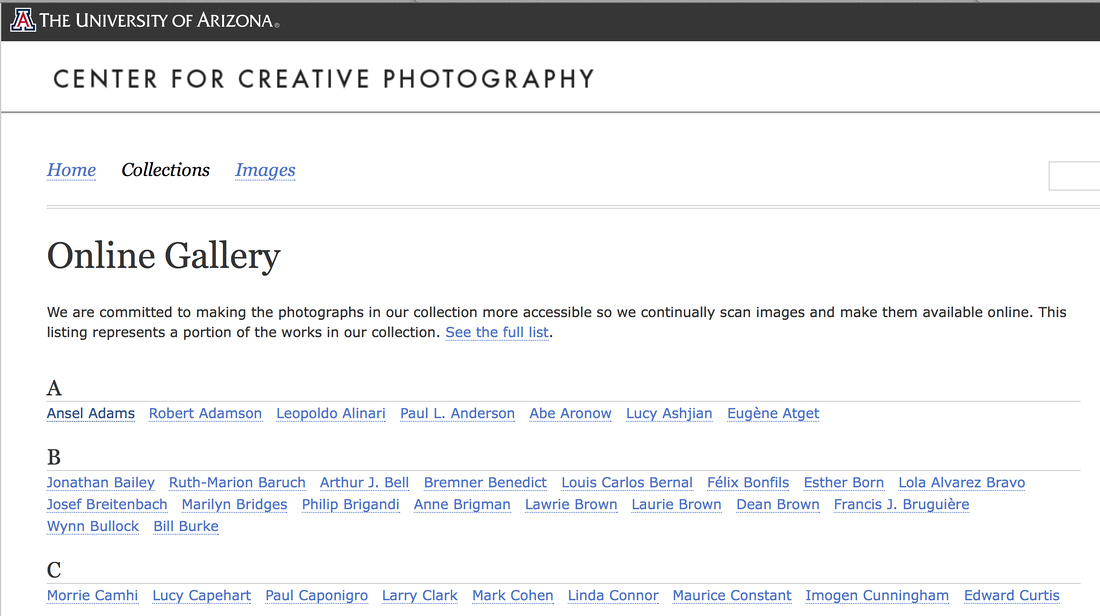
One of the best ways to improve your photography is to look at great photography. This archive of photography is an online treasure and it is completely free. Start at A and go to Y (no Z yet) or just browse the archive.
Just click the following link to enjoy this classic collection:
http://ccp.uair.arizona.edu/online-gallery
Everyone has to start somewhere and this video, courtesy of Adobe, is one of the most valuable videos I have ever seen on the subject of Photoshop. The basics are applicable to a variety of programs not just photoshop. If you want a jump start into the world of post processing this is the video for you!
Adobe deserves a big thank you on this one!
Enjoy!
Summer is filled with trips to the great outdoors. However, summer is over for most of us and we find ourselves looking for other places to visit. A great place to visit in the Fall and Winter is a Museum. I love to go to museums and when I go I love to take my camera. More often than not, museums have some pretty restrictive rules about camera usage inside the museum.
Almost all museums have the same two rules:
1) No Flash Photography.
2) No Tripods or Monopods
These two rules can make it hard on the average photographer. The disadvantages of these two rules can be overcome with the correct camera settings and a lens designed for low light. Even after these two challenges have been dealt with, another problem still exists that many photographers never overcome.
The problem: Shooting Through Glass.
Instead of taking a paragraph to explain the problem presented by shooting through glass I will just show you the result of shooting through glass at a museum.

Any Napoleon Dynamite fan will recognize this as a photo of Shasta the Liger. I took this photo at the Bean Life Science Museum in Provo, UT. Notice the light reflecting off of the glass case in which Shasta is stored.
Here is the same photo with the reflections highlighted.

If you look closely you can see the reflection of the museum lighting on the glass case.
The Solution
The solution is very simple and very old school photography. The solution is a Circular Polarizing Filter. A polarizing filter can reduce reflection of lights on surfaces, it can cause the sky to be more blue and can help in saturating colors. In future articles I will discuss when to use a polarizing filter to darken the sky and when to use it to saturate an image but today I want to concentrate on using it to remove reflections, especially reflections on glass.
A circular polarizer is easy to use. It attaches to the end of your lens and it rotates a full 360 degrees. I find that it is best to first line up my photo, set my exposure and focus and then, while looking though the viewfinder turn the polarizing filter until the reflection on the glass disappears. It is really just that simple and, guess what; it works.
Here is another photo of Shasta to prove it.

This photo was taken from the same distance, with the same exposure and the same focus. The only difference is the use of a polarizing filter.
Buying a Polarizing Filter
When you buy a polarizing filter remember the following guidelines:
1) Buy a filter that fits your lens. Filters are measured in millimeters or mm. If you look at the end of your lens it will have the filter mm number etched in the lens. Look for a number like 49mm, 55mm, 62mm. If you buy the wrong size filter, it will not fit your camera.
2) Don’t go cheap. Buy a reputable brand of filter. Tiffen makes good filters at a moderate price. There are also many other quality filter manufacturers. Most likely the maker of your camera provides their own line of filters.
3) Make sure it is a circular polarizing filter when you buy it. The older style of linear polarizing filter is not suited for general use applications on modern digital cameras. In other words, you are going to get a lot more bang for you buck with a circular polarizer.
I am aware that many of you do not have the money to buy a filter just yet and that many more of you do not have a camera that will accept filters. There is no reason for you to be left out in the cold. In my next article I am going to explain how to make the glass disappear without the use of a polarizing filter. It is simple, fun, and even works with your camera phone. So stay tuned and until then
-- Enjoy.
Kit Lenses vs. “Good” Glass
What is the difference between a kit lens and “good” glass? If many ‘would be’ professional photographers and camera store employees (who work on commission) are to be believed, that difference is night and day. They would say that a kit lens is not worth anything and does not even make a good paper weight, and that “good” glass is worth selling your kidney for if your kidney would bring in enough money to buy it.
The Secret
Here is a secret the camera store employee and the “Pro” photographer don’t want you to know. A kit lens is fine. For most people the kit lenses are about all they need for most of their photography. They certainly don’t need a 300mm f2.8 lens that costs upwards of $6000 just to take pictures of their kids at a baseball game.

This image was shot using a 70mm-300mm f4.5/5.5 kit lens. As you can see the kit lens can even be used to take a very artistic photograph.
Prior to the days of modern CNC machining, computer aided design, and photoshop, a really expensive piece of glass was the only way to go if you wanted to take a decent photograph. However, we live in a modern world and lenses have come a long way. The modern kit lens is generally very distortion free compared to its counterpart from even ten years ago. It is safe to say that a modern kit lens is at least as good or better than many of the mid-priced lenses available 20 years ago. The low cost of digital photography and modern manufacturing techniques have worked together to make the economy of scale almost a miracle for the amateur photographer.
Many DSLR cameras come with two lenses or one general purpose lens. These are generally a wide angle zoom lens like a 18mm-70mm f3.5-5.6 and a 70mm-300mm f4.5/5.5 and for a one lens kits a great choice is a 18mm-200mm or similar kit lens. These lenses are good general purpose lenses for shooting out of doors or indoors with the assistance of an external flash. These lenses are not very good at all for low light photography. This does not mean that you need to go out and buy an expensive piece of glass to take photos indoors. A kit lens can be supplemented with a very low cost lens that will step up and fill this hole in performance.

This photo is an example of using a kit lens without a tripod to take a low light photograph (It can be done). This photo was taken using a 18mm - 70mm f3.5-5.6 kit lens. The image was taken in a low light in a gorilla enclosure at the Louisville Zoo in Louisville, Ky. The image is through glass and no additional light was used.
50mm Prime Lens
Canon, Nikon, and Sony all have a 50mm f1.8 lens in their respective catalogue of lenses. And in every case the 50mm f1.8 lens is the least expensive lens that they make. They can be found for between $100 and $150 new. A 50mm f1.8 can step up and take the low light photographs that the kit lens just can’t touch and can do it at a fraction of the cost of an expensive zoom lens. Guess what? These lenses are great lenses. Are they sexy? No. Will people look at you and say, look at the size of his lens? Nope. However, adding a lens like this to your camera bag will make you a better photographer and will not break the bank doing it. Your indoor images will be sharp and you can save the money you would have spent on a lens and purchase a nice flash or a good piece of editing software for your computer.

This image was shot using a 50mm f1.8 prime lens.
A Word for the Pros
I know that expensive glass is a great thing. I own other lenses in addition to the kit lenses that came with my camera. I also know that it is not the lens or the camera that makes a photographer. I encourage anyone to buy the best glass that they can buy if they need it and can afford it. I also know that for most people an $8000 camera and a $6000 lens is not going to do anything to help them be a better photographer. I want the new and amateur photographer to come to know their equipment. I want them to take their systems to the limit and to make the best of what they have before they rush out and buy a lens that might not fit their needs or their budget. I want them to grow with their hobby and, yes, for most of them they are never going to outgrow the kit lenses and a supplemental prime lens. That is fine and their photos will be fine too. There are few things in this world more frustrating to me than to see a person with an expensive camera and lens trying to take a photo and then looking at the preview of the image and having a look of disgust on their face. I know that look is made worse because of the amount of money they dropped on a camera that they don’t know how to use.
A Final Word for the Amateur
Stick with the kit that you bought. Read everything you can about your camera. Experiment with your camera. Buy a low cost 50mm prime lens for where the kit lens does not work. Learn a good piece of editing software and learn to correct for the few flaws of the kit lens. Most of all, have fun and don’t worry about looking like a pro. Just learn to shoot like one and over time you will come to know what type of photography you really like to do and what type of lens will best suit your needs.
Enjoy
Shoot the Moon
Taking pictures of the moon can be a tricky affair. However, with a little practice it can be a success. Modern digital cameras that have a live preview make shooting the moon easier and safer than ever. The moon is bright, surprisingly bright. Next to the sun nothing in the sky is brighter and as such it may be dangerous to look through the eyepiece of your camera for long periods of time when shooting the moon. This is why I recommend using the live view function instead of the eyepiece when shooting the moon. The other added benefit of the live view feature is that on many cameras the live view will also preview exposure changes made to the photograph prior to shooting the picture.
Most first attempts at shooting the moon look something like this:

ISO 1600 / f5.6 / Shutter Speed 1/4 / 300mm
Notice the blown out moon and the ghosting of the moon. This is typical of what will happen if the camera is set to full auto. This is both an exposure and focusing problem. The image is overexposed and the focus is on the landscape in the near foreground. The focusing problem causes the moons image to reflect off the optics in the camera and provides the ghosted image. Don’t worry, this is easy to correct. Here is what you need and how to shoot the moon. You most likely will not even need to take the camera out of Auto mode.
Equipment:
- Tripod (Optional but highly recommended).
- Zoom Lens or Prime lens of 200mm or greater.
- DSLR or Midrange Point and shoot camera with exposure adjustment setting.
Step by Step instructions:
- Access your camera’s exposure controls in the Auto or Program mode settings (this will vary from camera to camera and from one manufacturer to another. Some cameras allow no modification of auto settings; in this case, a program mode is usually available).
- Once inside the Exposure controls, you should find a section called Metering Modes. Most cameras have three metering modes, Multi-Segment (this is the default mode, it looks at the entire frame to determine the best overall exposure for a particular image), Center Weighted (this mode looks at the middle third of the image to determine the overall exposure) and Spot Mode (this mode will expose only for the area directly in line with one spot, often the very center, of the frame of the camera.
- Select Spot Mode. This will cause the camera to expose only for the moon and ignore the background information such as the dark sky behind the moon.
- Mount the camera on the tripod, use the live view functions and aim the camera at the moon.
- Center the moon in the middle of your view finder, zoom in as close as possible and press the shutter release. If you experience a shaky picture, even with a tripod, you might consider using an external shutter control button or using the self timer on your camera.
Here is an example of the moon shot using exactly this method:

ISO 200 / f5.6 / Shutter Speed 1/160 / 300mm
Good luck and enjoy Shooting the Moon.