Film Noir
What is Film Noir?
In my opinion Film Noir is the work of Orson Wells. He established the style and techniques that dominated the genre in his classic film Citizen Kane. Although most Film Noir movies never reached the artistic vision of Wells' work, they all harken back to his genius and ability to use extremes in contrast, angles, lens selection and story line to involve the audience in film in such a way that had never been accomplished before the birth of this cinematic art form.
Wikipedia defines Film Noir as "a cinematic term used primarily to describe stylish Hollywood crime dramas, particularly those that emphasize cynical attitudes and sexual motivations. Hollywood's classical film noir period is generally regarded as extending from the early 1940s to the late 1950s. Film noir of this era is associated with a low-key black-and-white visual style that has roots in German Expressionist cinematography. Many of the prototypical stories and much of the attitude of classic noir derive from the hardboiled school of crime fiction that emerged in the United States during the Great Depression."
"The term film noir, French for "black film", first applied to Hollywood films by French critic Nino Frank in 1946, was unrecognized by most American film industry professionals of that era. Cinema historians and critics defined the category retrospectively. Before the notion was widely adopted in the 1970s, many of the classic films noirs were referred to as melodramas. Whether film noir qualifies as a distinct genre is a matter of ongoing debate among scholars."
Film Noir and the Still Image Photograph
Film Noir is first and foremost a cinematic term, not a photographic term. But there are photographic elements that are common to Film Noir cinematography. The mixing and matching of these elements can convey the feeling of Film Noir in a static print.
Film Noir is about extremes. The following are common components of a Film Noir photograph.
-
Shadows.
-
Low angle of shooting.
-
Back lighting.
-
Film grain from high ISO settings.
-
Close up with either a narrow depth of field for a single intense point of focus or a deep focus to keep both the foreground and background in sharp focus.
-
Black and White. Film Noir does not exclusively have to be black and white, although the majority of the genre was shot in black and white. When color is used, dark themes and high contrast still dominate this style of photography.
-
Chiaroscuro: low Key or high contrast between dark and light that is often achieved by a single bright light source.
-
Dutch Angles: cantering (tilting using the tripod) the camera so as to introduce tension or uncertainty in a photograph.
-
Night-for-Night shooting as opposed to Day-for-Night shooting: shooting in actual darkness using high ASA film or high ISO film settings in place of shooting in the daytime with filters to simulate darkness.
-
Forelengthening: distortion near the edges of a frame caused by a wide angle lens (a fish eye lens would be an extreme example of this).
-
Story: even a still life in Film Noir needs to imply a story or mystery.
-
Film Noir Style Establishing Shots: wide-angle and or close up shots that give an introduction or overview of the story that is about to unfold. Often these shots would be of a crime scene or a city and are often shot at night in near darkness or during crepuscular periods (at dawn or dusk). These shots may be a close-up image of an object or action that immediately implies mystery and sets a scene. My favorite example of a close-up Establishing Shot is that of the snow globe in a hand in the film Citizen Cane.
Planning a Film Noir Photograph
When planning a Film Noir photograph, I start to look for natural instances of contrasting light and shadows. I look for something that has some backstory to it that the viewer may be able to infer or imagine.
Making the Image
Angle
After selecting a subject, I then start looking for shooting angles. I keep in mind the common angle used in Film Noir. I see if a wide angle shot, a dutch angle shot, or an up angle shot will help the viewer infer or create a backstory or mystery.


In these three photos I am looking for angles to best tell a story about this walking stick.
Exposure and Focus
Exposure and focus decisions are critical. You can choose to keep everything in focus or in this case to narrow the depth of field as I have done in this photo. I have blurred the extreme foreground slightly because this is a walking stick and I wanted to imply movement. My exposure decision was a simple decision to keep most of the image in shadow and not blow out the highlights. In Film Noir, it is fine to occasionally bury the histogram to the left since part of the genre involves always asking the question "what is in the shadows?"
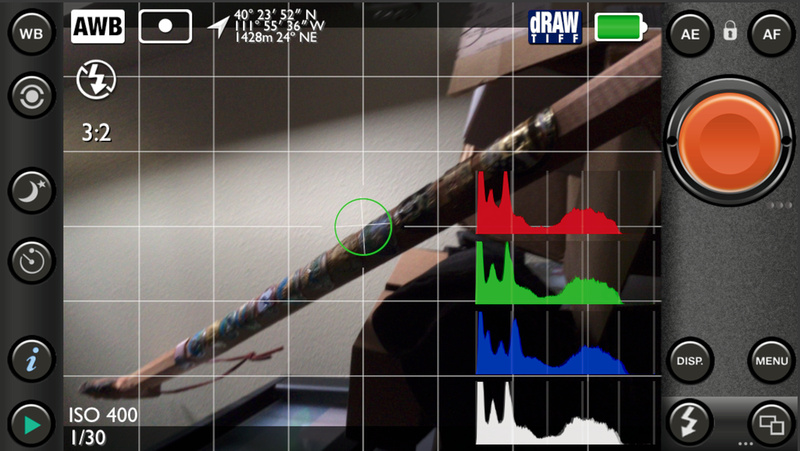
Since I am shooting this photograph with a cell phone camera, I would have had to change my angle to control for sharp depth of field. If you are using a camera with manual aperture control, you would only need to reduce the size of the aperture to bring the entire frame into acceptable focus. This image has an aperture opening of f2.2. If I moved that aperture opening to f8 or f11, the entire image would have come into acceptable focus.
Post Processing
My post processing work flow for this image is as follows.
-
I imported the image into my editing software and made a copy of the image. Remember to always work from copies.
-
I then reduced sensor noise. If you work with a RAW image, you can correct for sensor noise using either the noise reduction in your editing software or a noise reduction plugin like DxO Optics Pro or Nik Define.
-
I applied a small bit of sharpening, globally, to the RAW image. This can be done using a sharpening tool in your editing package or by using a plugin like Nik Sharpener Pro (Pre-sharpener).
-
I performed a Levels adjustment to make the darks a little darker and the lights a little lighter. I understand that many of you will not know how to work with levels or curves. I will cover these topics in later tutorials, but I encourage you to open up a photo in your favorite editing software and then play with the levels tool or the curves tool to see what changes happen to your photograph. In photography there is no one-size-fits-all formula for doing things. In fact there are a million ways to do everything. It is important for you to learn what the tools do and then you will be able to use them when you have an idea in your head that you want to transfer to a print. There is really just no substitute for experimentation. I can tell you the technical aspect of how a tool works, but you have to really get a feel of the tool yourself before you can instinctively reach for it and manipulate your image with the tool.
-
I cropped and adjusted the photo. I already had a pretty good Dutch Angle but I eddied it even more using the Horizon Straighten tool in my post-processing software.
-
I wanted this image to have a bit of a glow. This an be accomplished a number of ways: it can be done with a plugin or in Photoshop using one of the numerous blur filters. The important thing to remember is that it has to be a slight blur/glow. A harsh blur or glow would soften the focus of the image too much.
-
I then applied selective sharpening to my image. Selective sharpening allows me to sharpen the areas of the image where I want to direct people's attention. You should usually leave selective sharpening as the last step in the workflow, but in this case you will want to sharpen the image prior to black and white conversion if you plan to add photographic grain (I discuss this in step 8). If you wait to do selective sharpening until after you have added photographic grain, you will end up sharpening the film grain rather than the subject of your image. So it is best to finish any sharpening before moving on.
-
I then converted the image to Black and White. I used Silver Efex Pro 2 for my B/W conversion. The two things to keep in mind in converting to black and white are that you want to preserve contrast and that Film Noir photography was shot using high ASA (ISO) film. This means that the finished movie or print had lots of grain. Grain is simply the size of the pieces of metal that composed the reactive layer on the film stock. The larger the piece of metal particle, the more surface area it has, and the more light it could gather in a short period of time. Larger film grains equaled fewer film grains on a piece of film as well as lower resolution images. Since digital cameras have a fixed pixel size, it is necessary to add grain to an image to simulate the appearance of film stock. Programs like Silver Efex Pro allow users to select film models that accurately represent popular film types. If you do not have a plugin that allows for specific film emulation, your post-processing software most likely offers a generic film grain tool. Film Noir often uses film stock that employs a medium sized film grain applied at a medium density. If you are using Silver Efex Pro that translates into about 100 grains per pixel and a medium hardness to the grain edges. After conversion, I adjusted the contrast and brightness and saved my work.
-
I then shared my work. You can share your work on Google+, Facebook, a website or make a print of the image.
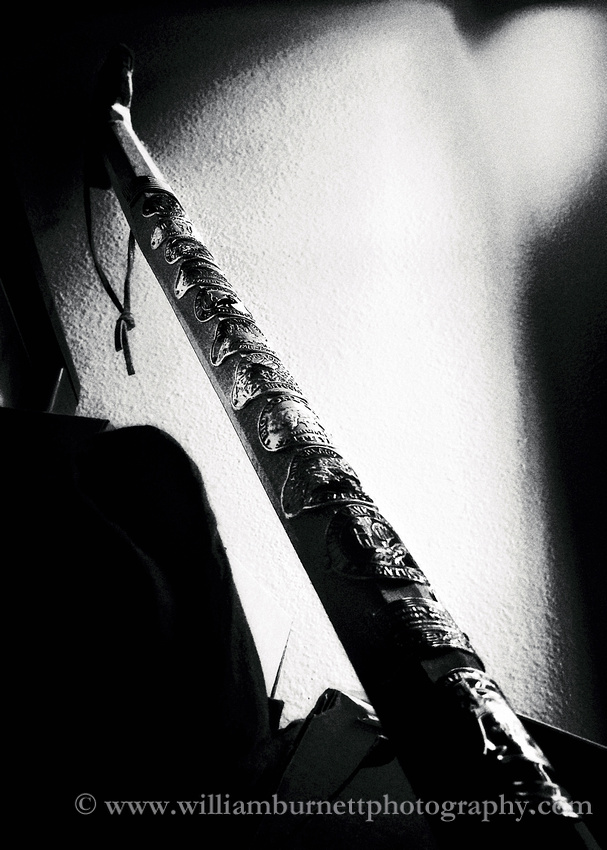
Before and After

The image on the left is the original photograph and the image on the right is the finished Film Noir B/W version of the photograph.
Conclusion
Since Film Noir is essential a cinematic genre, it is often difficult to translate into a single frame of a still image. But if you keep in mind that Film Noir is about mystery, and about setting a tone for the viewer to try and decipher the mystery, you will be off to a good start. Remember to use the basic elements of the Film Noir genre, do not be afraid to exaggerate contrast, and you will be well on you way to creating a Film Noir masterpiece of your own. If you need any inspiration, I recommend watching a Orson Wells movie, 1950's crime movie on late night TV or pull out a Mickey Spillane novel and look for inspiration. Remember there are eight million stories in the naked city (http://en.wikipedia.org/wiki/The_Naked_City).
 How Many Roads47/365
This image was taken as an example of an up close establishment shot in the Film Noir genre. It employs dutch angles, relatively deep depth of field, low key/high contrast lighting and medium film grain that was common to the genre.
How Many Roads
Suggested Further Reading:
